Adding Custom Colors
You can apply color to most objects. Graphics Editor has a range of colors but you can also customize colors and save for future use. Objects with both stroke and fill can have different colors on stroke and fill.
You can define color hue from the Gradient palette.
|
Object |
Stroke Color |
Stroke Style |
Stroke Gradient | Fill Color | Fill Gradient |
|---|---|---|---|---|---|
|
Line |
Yes | Yes | Yes | - | - |
| Shape | Yes | Yes | Yes | Yes | Yes |
| Text | Yes | - | Yes | Yesa | - |
| Textbox | Yes | - | Yes | Yesb | Yes |
a) Background behind text (default area)
b) Background behind text (textbox area)
You can add a custom color to the color palette to save it for quick access in the future.
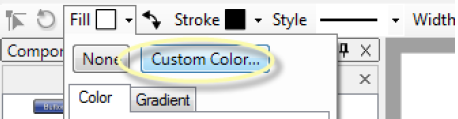
To add a custom color:
- In Graphics Editor, on the Options toolbar, click Fill (or Stroke) to open the color palette.
- Select Custom Color.
- In the Color dialog box, in the colored square, move the pointer to the color you want to add. If required, you can adjust the color by adjusting the numerical values for Hue, Saturation, Red, Green, Blue, and Luminosity.
- Click Add to Custom Colors.
NOTE: Fill and Stroke use the same color palette and also the same custom colors.
- Click OK.
The color is displayed in one of the Custom Color boxes.
You can use custom colors when you want to use a specific color in your design.
To use a custom color:
- In Graphics Editor, in the work area, select the object on which you want to use the custom color.
- On the Options toolbar, click Stroke (or Fill) to open the color palette.
- Select Custom Color.
- Select the color in the Custom colors area.
- Click OK.