Configuring third-party certificates
To configure third-party certificates for use with Power Operation, you must configure the service layer, edit the certificate, and then update the registry.
NOTE: The third-party certificate you want to use must be in the Personal Information Exchange (PFX) file format.
Configuring the Service Layer
- Navigate to and double-click the PFX file you want to import. The Certificate Import Wizard appears.
- Select Local Machine and select Next.
- In the File name field, verify the name of the file you are importing, then select Next.
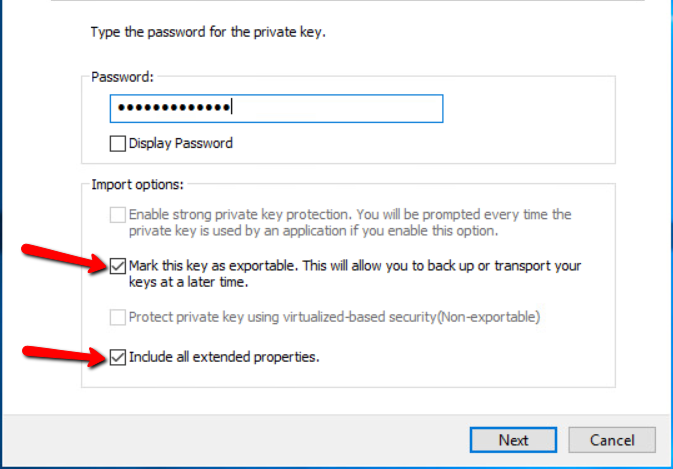
- If a password exists for the private key, enter it in the Password field.
- Select the Mark this key as exportable. This will allow you to back up or transport your keys at a later time. and Include all extended properties. check boxes.
- Select Next.
- On the Certificate Store page, choose the default option (Automatically select the certificate store based on the type of certificate), then select Next.
- Select Finish.
- Select OK.
Setting permissions on the certificate
- Press Window + R to open the Run window.
- In the Open field, type mmc and select OK.
- In the Console window, select File > Add/remove snap-in.
- In the left pane, select Certificates, then select Add.
- In the Certificates snap-in window, select Computer account, then select Next.
- Select Local computer, then select Finish.
- Select OK to close the Add or Remove Snap-ins window.
- In the Console Root pane, expand Certificates > Personal > Certificates. The installed certificate appears in the right pane.
- Right-Click the certificate and select All Tasks > Manage Private Keys…
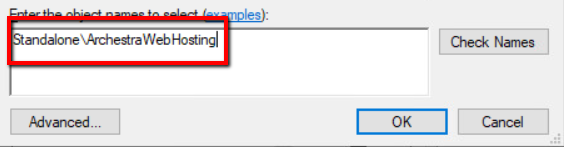
- Select Add and type <ComputerName\ArchestraWebHosting> then select OK.
- Verify that Full Control and Read permissions are allotted to the ArchestraWebHosting group.
- Select OK.
- Double-Click the certificate to view it. Select the Details tab, then locate and select the Thumbprint field in the list.
- Highlight the value, then press Ctrl + C to copy the value and press Ctrl + V to paste it to notepad or another text editor. You will need this value to update the registry.

NOTE: Some operating systems may store the Thumbprint with spaces, you may have to delete the spaces prior to updating the registry.
Updating the Registry
notice
irreversible operating system damage or data corruption
Before making any changes, back up your Windows Registry to a network folder or other remote location.
Failure to follow these instructions can result in irreparable damage to your computer's operating system and all existing data.
NOTE: Registry edits must be performed only by qualified and experienced personnel.
- Start a Windows command-prompt in Administrator mode.
- Copy and paste the following command to create a backup of the registry key:
Reg copy "HKEY_LOCAL_MACHINE\SOFTWARE\WOW6432Node\Schneider Electric\Power Operation\WebApplications\Default" "HKEY_LOCAL_MACHINE\SOFTWARE\WOW6432Node\Schneider Electric\Power Opeation\WebApplications\Default_orig" /s /f - Copy and paste the following command to update the registry value:
Reg Add "HKEY_LOCAL_MACHINE\SOFTWARE\WOW6432Node\Schneider Electric\Power Operation\WebApplications\Default" /t REG_SZ /v SslThumbprint /d “<PASTE THE THUMBPRINT HERE>” /f - Run the following commands for the changes to take effect in the services:
%windir%\System32\inetsrv\Appcmd stop apppool /apppool.name:PsoWebserviceAppPool
%windir%\System32\inetsrv\Appcmd start apppool /apppool.name:PsoWebserviceAppPool
%windir%\System32\inetsrv\Appcmd stop apppool /apppool.name:PlatformServerAppPool
%windir%\System32\inetsrv\Appcmd start apppool /apppool.name:PlatformServerAppPool
- Close the command prompt.