Using the Logical Device Type Editor
Use the Logical Device Type Editor to define a collection of output measurements for each logical device type. Logical device types created with this editor are available for selection in the Logical Device Editor, where you map input registers to output measurements.
Open the Logical Device Type Editor
- Start Management Console and log in using an account with supervisor-level access.
- Select Tools > Logical Device > Logical Device Type Editor.
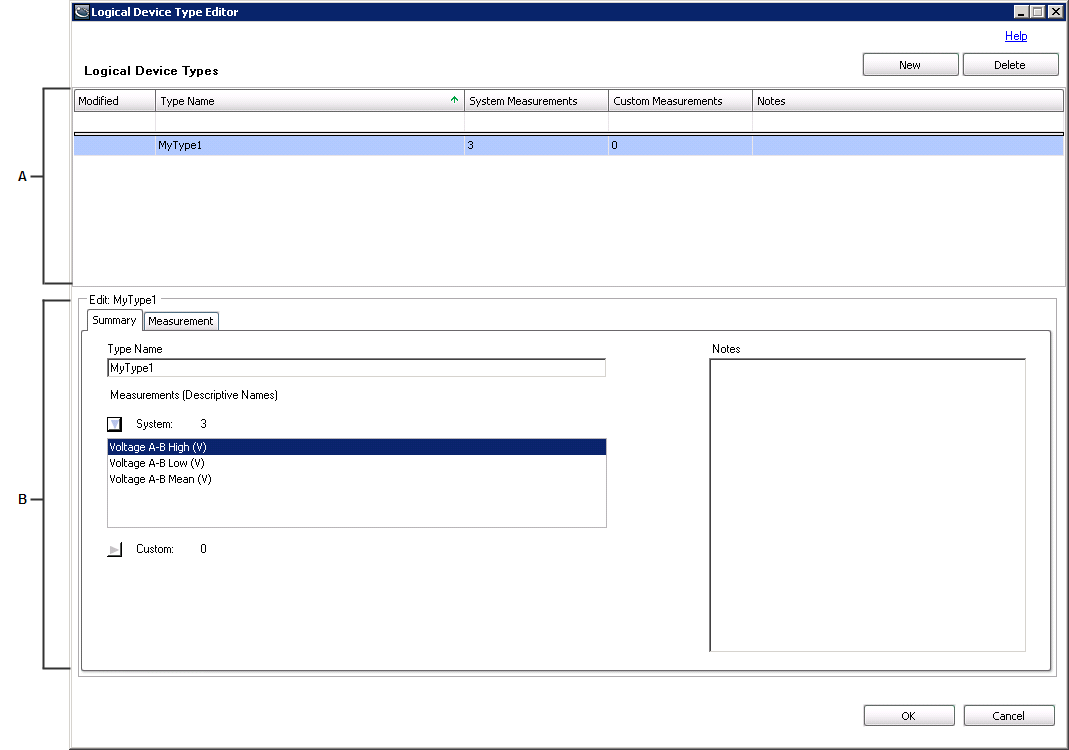
The top portion of the editor contains a logical device type display grid listing the logical device types that have been defined. The bottom portion is an edit area where you can modify existing device types and their measurements, or create new ones.
|
||||||
|
||||||
|
The display grid area
The Modified column displays one of the following characters indicating a change of status of an entry:
+ (plus) - a new entry.
* (asterisk) - an existing entry has been modified.
! (exclamation mark) - the entry is incomplete or in error.
The Type Name column contains the names for the defined device types. Type names must be unique.
The System Measurements and Custom Measurements columns show the number of measurements that have been defined for each device type.
The edit area
When a device type is selected in the display grid, the current information for that device type is displayed in the edit area. The edit area has a Summary tab and a Measurement tab.
The Summary tab contains the following:
- A Type Name field showing the name of the device type that is selected in the display grid at the top.
- In the Measurements area, expand System and Custom to view the measurements defined for these respective categories. You can expand each list to show all of the measurements that have been defined for the selected device type.
- A Notes input field that you can use to describe the device type.
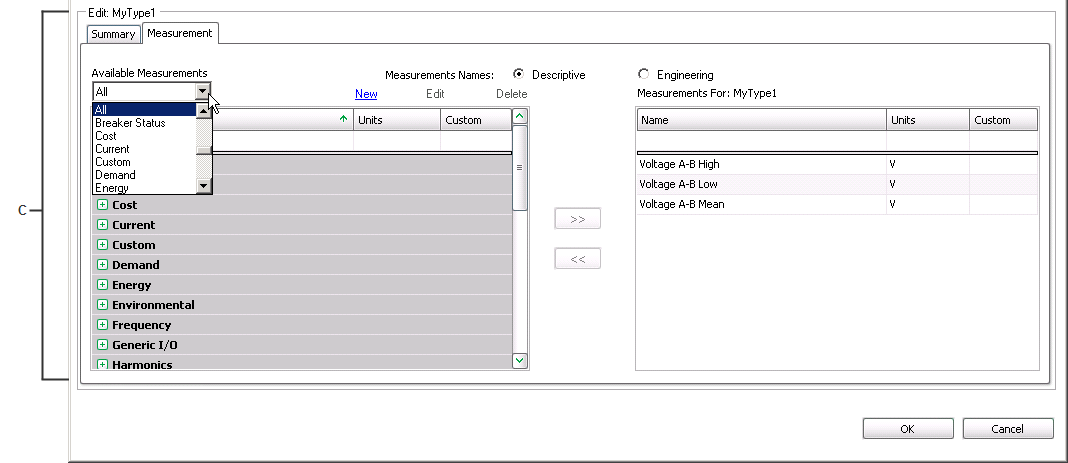
The Measurement tab contains the following:
- Options that indicate whether to display the measurements with descriptive names or engineering names.
-
An Available Measurements dropdown list that contains category names for the measurements, such as Air, Current, and Voltage. When you select one of these categories, only those measurements associated with the selected category appear in the grid.
The default All in the list displays all of the categories and their respective measurements in the grid.
-
An available measurements grid listing the measurements available for selection when you define a device type. Measurements that are grayed out indicate that they have been added to the selected device type. Clicking New opens a dialog for defining a new, custom measurement. An X in the Custom column identifies the entry as a custom measurement. The Edit and Delete links give you the option to modify or delete custom measurements only.
NOTE: It is recommended that you add a new custom measurement only if an existing measurement does not suffice. Factory-defined System Measurements contain considerable information about their type and usage, which is then used throughout the system to provide intelligent assistance in Dashboard controls and Report selections. Since custom measurements do not have this information, their usage may not provide the expected results.
-
A Measurements For grid that lists the measurements that comprise the device type that is selected in the display grid area. Use the >> button to add a measurement that you selected in the list of available measurements to the Measurements For list for the device type. Measurements that you select for a device type are grayed out to indicate that they have been assigned to the device type. Use the << button to remove a selected measurement from the Measurements For grid. Measurements that are removed are no longer grayed out in the list of available measurements and they are available for selection.
Note that if you attempt to delete a custom measurement that has been mapped to any logical device, a message indicates that the measurement cannot be deleted. You need to unmap the custom measurement from the logical devices before you can delete it.
In all grids:
- Each of the columns can be sorted in ascending or descending order when you click on the column heading.
- When you place your cursor on a column heading, a filter icon appears on the right side of the heading area. Click this icon to open a list of items that are available for filtering. Click the item that you want to use as the filter. When you do this, the filter condition displays on the left side of the status area at the bottom of the grid. Click the X icon in the status area to turn off the filter.
- The blank area immediately below a column heading is an entry field for filtering on an entry you type in that area. For example, to filter on a specific name, enter a name under the Name column to automatically filter the entries in the grid.
- You can drag and drop the grid column headers to rearrange the order of the columns in the grid.
Creating a new logical device type
Complete the following steps to create a new logical device type:
-
Click New on the top right of the editor.
This clears the Type Name field and resets System measurements and Custom measurements to 0 (zero) on the Summary tab.
All is selected by default in the Available Measurements list on the Measurements tab.
-
Enter a device type name in the Type Name field.
The name appears in the logical device type display grid and an ! (exclamation) appears in the Modified column to indicate that the device type entry is incomplete.
- Click the Measurements tab to go to the list of measurements that are available for selection.
- Locate and click an available measurement that you want to associate with the device type, then click >> to add it to the Measurements For list. Repeat this step for each measurement that you want to associate with the device type.
-
To delete a device type, click the device type in the display grid and click Delete on the top right of the editor.
Note that Delete is disabled if any logical devices are associated with the logical device type.
Custom measurements
The following sections describe how to create, modify, or delete custom measurements. Because factory-defined System Measurements contain considerable information about their type and usage, custom measurements should only be created in exceptional circumstances, and only with an understanding of the expected results from their usage.
![]() CAUTION
CAUTION
inaccurate data results
| ● | Do not incorrectly configure the software or the devices. |
| ● | Do not base your maintenance or service actions solely on messages and information displayed by the software. |
| ● | Do not rely solely on software messages and reports to determine if the system is functioning correctly or meeting all applicable standards and requirements. |
Failure to follow these instructions can result in injury or equipment damage.
Creating a new custom measurement
Complete the following steps to create a new, custom measurement:
- Click New beside the Available Measurements dropdown list to open the New Measurement dialog. (You can also edit a new custom measurement by clicking Edit and modifying the entries.)
- Enter a descriptive name and an engineering name for the new measurement in the respective fields. For example, Voltage A-B Low is the descriptive name, and Vll ab low is the engineering name.
-
Select the unit of measure from the Units list or add a custom unit of measure by typing it in the Units field.
Note that the combination of the descriptive name, the engineering name, and the unit of measure must be unique for each custom measurement.
- Select a type of information to be measured from the Quantity list.
-
Click OK to add the measurement.
The new measurement is added as an available measurement in the grid and an X in the Custom column indicates that it is a custom measurement.
You need to select All or Custom in the Available Measurements list to see the custom measurement in the grid.
Modifying or deleting a custom measurement
Complete the following steps to modify a custom measurement. Note that you cannot modify or delete system measurements.
- Go to the Measurements tab of the Logical Device Type Editor.
-
Select the custom measurement that you want to modify or delete.
Custom measurements that have been associated with a logical device type can be edited but not deleted. Selecting Delete results in a message indicating that the custom measurement cannot be deleted because it is mapped either to a logical device type or to a logical device that is logging data.
- To modify the custom measurement, click Edit to open the Edit Measurement dialog, update the entries or selections in the dialog, and click OK to apply to changes.
-
To delete a custom measurement, click Delete.
A message confirms the deletion.
Note that if you attempt to delete a custom measurement that is associated with any logical devices, a message indicates that the measurement cannot be deleted.