Hierarchy template structure
PME includes a number of standard hierarchy templates that provide a structure for modeling the different aspects of your organization. This section describes the structure of a hierarchy template XML file.
Sample and generic hierarchy templates are included with your software. You can use any of these templates if they more closely represent the hierarchy organization you want to implement. However, you need to have a thorough understanding of the structure of a template before making any changes. Always back up your files before proceeding with any changes. The additional hierarchy templates are located in: ...\Applications\HierarchyManager\SampleTemplates
NOTE: Any time you change a hierarchy template, you need to import it into Hierarchy Manager before those changes take effect. See Installing a hierarchy template.
Localizing a hierarchy template XML file
You can localize a hierarchy template XML file to display national language text on the tabs and views in Hierarchy Manager, and also wherever hierarchies are enabled in the Web Applications component. For example, localized hierarchy node names will display in the Source Selector in the Reports application.
To localize the text you need to edit the displayName attribute that is used throughout a hierarchy template XML file. For example, the display name attribute for Site in the hierarchy template file is displayName="Site". Change the text within the quotation marks to the national language equivalent.
The displayName attribute is used in <Type>, <Attribute>, <Reference>, and <View> xml elements in a hierarchy template file. (See The XML elements in the template file for descriptions of these elements.) In some cases the same text is used on displayName attributes more than once in the hierarchy template file. Be sure to change every occurrence in the file.
When you complete the edits, follow the process described in Installing a hierarchy template to update the hierarchy template used by Hierarchy Manager.
The hierarchy template
The hierarchy template XML file defines the Node types, attributes, and relationships used in Hierarchy Manager. Each element of the template is defined using information contained within the various XML tags. For example, assume that Generic 5 Level Template.xml is imported into Hierarchy Manager. (See the Generic 5 Level Template.)
The initial page in Hierarchy Manager shows the node types and attributes defined in the hierarchy template file. The bottom three node types are configured for devices to be connected to them.
(See Additional notes for considerations related to associating devices to more that one node level in a hierarchy.)

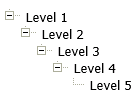
The hierarchy view defined in the template is represented on the Hierarchy Manager Tree View page as a physical layout:
The following table summarizes the major elements in a hierarchy template XML file.
| Tag | Description | Example |
|---|---|---|
| <Template> | Contains template namespace information | <Template version="1.0" xmlns="uri:application-modules/power/model/template#"> |
| <Types> | Container tag for Type and Attribute elements | <Types> </Types> |
| <Type> | Defines elements that define characteristics used by the node. Each type represents a tab in Hierarchy Manager. | <Type displayName="level_1".../> |
| <Attribute> | Defines the characteristics used in each type. | <Attribute displayName="id" dataType="String" uri="uri::application-modules/power/model/attribute#name" /> |
| <Reference> | Used to create relationships between nodes. For a relationship to exist between nodes, each Type element must contain reference information for every other element it is associated with. | <Reference displayName="level_2" isReverse="true" target="uri:application-modules/power/model/type#level_2" uri="uri:application-modules/power/model/relation#1_2" /> |
| <Views> | Contains elements that define how the Node types are presented in different hierarchical views. | <Views> </Views> |
| <View> | Specifies the node type the view starts at. Contains Relation elements. | <View displayName="Generic Layout" rootNodeTypeUri="uri:application-modules/power/model/type#level_1"> |
| <Relation> | Contained in a View element. Defines the order that the node types are displayed in. | <Relation follow="uri:application-modules/power/model/relation#1_2" reverse="true" /> |
The XML elements in the template file
This section describes each element in the template XML file.
<Template>
The <Template> element is the container for all of the XML tags.
<Template version="1.0" xmlns="uri:application-modules/power/model/template#"> |
<Types>
This is a containment tag for all <Type> elements. Make sure any <Type> elements are inside this containment tag.
<Types>
    <Type...>
     ...
    </Type>
    ...
</Types>
<Type>
The <Type> tag contains all the information required to define the Node. Each defined type adds a tab in Hierarchy Manager. The tab name is defined by displayName. The <Type> tag also contains one or more <Attribute> and <Reference> tags.
<Types> <Type displayName="level_1" uri="uri:application-modules/power/model/type#level_1"> <Attribute... /> <Attribute... /> ... <Reference... /> ... </Type> <Type> ... </Type> </Types> |
To change the tab name in Hierarchy Manager from level_1 to new_name, modify displayName in the template file from:
<Type displayName="level_1" uri= "uri:application-modules/power/model/type#level_1"> |
to:
<Type displayName="new_name" uri="uri:application-modules/power/model/type#new_name"> |
<Attribute>
The <Attribute> tag defines the characteristics of the <Type>. It uses dataType to determine the format of the edit dialog that opens in Hierarchy Manager.
You need to define at least one <Attribute> element with attribute#name in the uri:
uri:application-modules.com/power/model/attribute#name.
The datatypes on the <Attribute> element can be such things as name, floor number, or breaker ratings, depending on the template layout.
dataType="String"- For short blocks of text (for example, name).dataType="LongText"- For long blocks of text (for example, notes, contact information).dataType="Number"- For numeric fields (for example, breaker rating in Amps).dataType="Boolean"- For checkboxes (for example Rack Circuit).
<Types> <Type displayName="level_1" uri="uri:application-modules/power/model/type#level_1"> <Attribute displayName="id" dataType="String" uri="uri:application-modules/power/ model/attribute#name" /> <Attribute... /> ... <Reference... /> ... </Type> <Type> ... </Type> </Types> |
To add an attribute to a node, determine the characteristic you need to capture with that attribute, determine the appropriate dataType, and create the attribute. To define Name as one of the characteristics for a type, the Attribute tag is written as:
<Attribute displayName="Name" dataType="String" uri="uri:application-modules/power/model/ attribute#name" /> |
<Reference>
The <Reference> tag defines the relationship between types. To establish a relationship, each <Type> element needs a <Reference> element, and each <Reference> element needs to refer to the displayName of the related <Type>.
The following example contains references establishing a relationship between the <Type> with displayName="level_1", and the <Type> with displayName="level_2".
Since the types are in a parent-child relationship, the reference in the child needs to contain isReverse="true".
The last portion of the <Reference> element includes a relation name. It is used in the Relation element within the <View> structure to define what appears on the Tree View page in Hierarchy Manager.
<Types> <Type displayName="level_1" uri="uri:application-modules/power/model/type#level_1"> <Attribute displayName="id" dataType="String" uri="uri:application-modules/power /model/attribute#name" /> <Attribute... /> ... <Reference displayName="level_2" uri="uri:applications-modules/power/model/ relation#1_2" target="uri:application-modules/power/model/type#level_2 /> ... </Type> <Type displayName="level_2" uri="uri:application-modules/power/model/type#level_2"> <Attribute displayName="id" dataType="String" uri="uri:application-modules/ power/model/attribute#name" /> <Attribute... /> ... <Reference displayName="level_1" isReverse="true" uri="uri:applications-modules/ power/model/relation#1_2" target="uri:application-modules/power/model/ type#level_1 /> ... </Type> </Types> |
A physical or logical deviceReference tag similar to the example below. Note that meteredBy is a keyword, and it must be entered exactly as shown to correctly reference a device.
<Reference displayName="device" uri="uri:application-modules/power/model/relation#meteredBy" target="uri:application-modules/power/model/type#device" /> |
<Views>
This is a containment tag for all <View> elements. Views are the means by which other applications such as Dashboards and Reports discover the set of devices that are aggregated together. All <View> elements need to be inside this containment tag.
<Types>
    <Type...>
     ...
    </Type>
    <Type...>
     ...
    </Type>
</Types>
<Views>
    <View... >
    </View>
</Views>
<View>
The <View> tag defines how a hierarchy can be viewed in PME. These different views provide different ways that a hierarchy can be displayed, or different ways the device data associated with the hierarchy types can be grouped together.
The view displayName (for example Generic Layout) is defined here. The name appears on the Tree View page of Hierarchy Manager. You can select the view as a data source in the Dashboards and Reports applications.
The <View> tag groups together the <Relation> elements whose order determines how the view appears.
<Types> <Type> ... </Type> <Type...> ... </Type> </Types> <Views> <View displayName="Generic Layout" rootNodeTypeUri="uri:application-modules/power/model/ type#level_1 > <Relation... /> <Relation... /> ... </View> </Views> |
<Relation>
The <Relation> tag is used to establish how the different views of the hierarchy are structured. The initial relation is defined in the <Reference> element within a <Type>. Specify the node type to start at (the initial <Relation> entry), then add <Relation> entries to complete the tree.
If a <View> element contains a <Relation> with reverse="true", then the view presented follows the relationship in the reverse order.
<Types> <Type displayName="level_1" uri="uri:application-modules/power/model/type#level_1"> <Attribute displayName="id" dataType="String" uri="uri:application-modules/power/ model/attribute#name" /> ... <Reference displayName="level_2" uri="uri:applications-modules/power/model/ relation#1_2" target="uri:application-modules/power/model/type#level_2 /> </Type> <Type displayName="level_2" uri="uri:application-modules/power/model/type#level_2"> <Attribute displayName="id" dataType="String" uri="uri:application-modules/ power/model/attribute#name" /> <Attribute... /> ... <Reference displayName="level_1" isReverse="true" uri="uri:applications-modules/ power/model/relation#1_2" target="uri:application-modules/power/model/ type#level_1 /> </Type> <Type...> ... </Type> </Types> <Views> <View displayName="Generic Layout" rootNodeTypeUri="uri:application-modules/power/model/ type#level_1 > <Relation follow="uri:application-modules/power/model/relation#1_2" /> <Relation follow="uri:application-modules/power/model/relation#2_3" /> <Relation follow="uri:application-modules/power/model/relation#3_4" /> <Relation follow="uri:application-modules/power/model/relation#4_5" /> ... </View> </Views> |
Additional notes
Considerations when selecting a hierarchy view in a Web-based report
If devices are associated with more than one node in a parent-child relationship in a hierarchy tree, only those devices first encountered in the tree are included in generated reports. All devices lower in the hierarchy tree are ignored in generated reports.
For example, if a hierarchy tree is structured as:
Site 1
Building 1 (including associated devices)
Area 1 (including associated devices)
and you select Building 1 on the Views page of the Source Selector in a report, the generated report includes data for the devices associated with Building 1, but not for devices in the lower node in the tree – Area 1.
Similarly, if you select Site 1, which does not include a device association in the hierarchy, the generated report includes data for the devices associated with the Building 1 level only, the level in the hierarchy where devices are first encountered.
Using comment tags
If you do not require all the levels provided in the example hierarchy template XML file, you can comment out the types you do not need, from the bottom type up. Commenting out the type, rather than just deleting the type preserves the structure of the template file and allows you to reinstate the type with a minimum of effort. Enclose the <Type> element within the start comment tag <!-- and the end comment tag --> to comment it out. For example:
<!-- <Type... >
...
</Type> -->
Remove the comment tags to restore the type.
If you want to remove one or more view elements defined in a template, add comment tags around the applicable <View> tags. Remove the comment tags to restore the View elements.
When you import the hierarchy template XML file, the Hierarchy Configuration utility performs a validation test on the file. If the file validation is not successful, the utility does not import the file and provides information indicating where the validation process stopped. Check for any discrepancies in the file, save the changes and reimport the file.