Customizing and navigating interface displays
The following sections describe ways to customize and navigate display windows, dialogs, and tables in components of Power Monitoring Expert.
Navigating tree structures
Information is often displayed in a tree structure. Click “+” to expand items in the tree or “-” to collapse them.
Selecting multiple items in tables, tree structures, diagrams and folder structures
To select adjacent items, select the first item, hold down the SHIFT key then click the last item.
To select non-adjacent items, hold down the CTRL key then click to select the items.
To select adjacent items in Vista or Designer diagrams, drag a selection box around the items. All items in the box are selected.
Adjusting the display of a window or dialog
The following sections describe how to resize and hide or reveal panes.
Resizing panes
To resize panes in a window, point the mouse at the border where the two sections meet. When the resize handle appears, drag to move the border.
Dock (Pin) or hide (Unpin) pane
Some component interfaces have panes that can be hidden (visible temporarily) or docked (visible all the time).
To hide or dock a pane, click the Pin/Unpin ![]() button on the pane. When a pane is hidden, it is minimized to a button at the edge of the workspace.
button on the pane. When a pane is hidden, it is minimized to a button at the edge of the workspace.
To temporarily show a hidden pane, hover the mouse over the button for that pane. Move the mouse away to hide the pane again.
Grid table controls
Certain windows and utilities display information in “grid” tables. These tables have unique table and information display commands.
Select columns/column selector
Some tables allow you to select which columns to include in the table.
- In Management Console, hover over the column selector tab on the right side of the display window. In other interfaces, click the “Select Columns” link.
- Select the boxes for the columns you want to include in the table. Clear the boxes for the columns you do not want to include in the table.
Adjust column width
To change the width of a column, point the mouse to the right edge of the column header. When the resize handle (double-arrow pointer) appears, click and drag to adjust the width. To adjust the width for best fit, point to the right edge of the column header, then double-click when the resize handle appears.
Best Fit
To adjust a column width to the best fit with the least amount of white space:
- For one column, right-click a column header and select Best Fit.
- For all columns, right-click the column title area and select Best Fit (all columns).
Arrange columns
To change the order of the columns, drag a column header to the left or right of its original position.
Group by column
To group data according to the contents of a particular column, drag the column header to the area above it (marked “Drag a column header here to group by that column”). To expand or collapse the groups, click the “+” or “-” button. To expand or collapse all groups, right-click the column header in the Group By Box area and select Full Expand or Full Collapse, respectively.
You can also group by multiple columns in a specific order, with sorting and filtering applied. To do this drag each column to the Group By Box area in the order that you want to group them.
To ungroup, drag the column header back to its original position (or right-click the column header and select Ungroup).
To show or hide the Group By Box area, right-click the column header and select or clear Group By Box.
Sorting data in a column
Click a column header to sort table rows according to data in that column. You can sort in ascending or descending order (indicated by an up or down arrow, respectively). To cancel sorting and return the column to its default state, right-click the column and select Clear Sorting.
Filtering data in a column
The following sections describe the available filtering options.
Using the Simple Column Filter
When the mouse is positioned over a column header, the Filter icon appears in the top right corner of the header. Click it to select one of the listed filter conditions and apply it to the data in that column. Select (Custom) to apply one or two logic conditions to filter the data. To cancel filtering and return the column to its default state, right-click the column and select Clear Filter.
Using the Dynamic Column Filter
Some tables have a row between the column header and the table data. This is the dynamic filter area.
To use the dynamic filter area, start typing the entry you want to filter on in the space above the applicable column. You can use an asterisk (*) at the beginning of the filter as a wildcard. Once you achieve the filter results you want, you can stop typing. For example, to filter out “DST” from “disturbance” in System Log Events, you only need to type “di”.
Using the Filter Builder
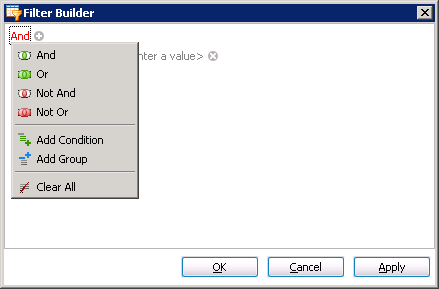
The Filter Builder is an advanced data filtering tool. Use it to create filters with multiple conditions across multiple columns. To use the Filter Builder:
- Right-click a column header and select Filter Editor to open the Filter Builder dialog.
-
Specify the filter conditions.
The elements of the filter builder are: <Column Header> <Condition> <Value>
Click an element to display the options available, then select the option you want to use.

- Select the <Column Header> and the <Condition> you want to apply. Type the <Value> to test for.
- To add another filter, click the “+” button on the top.
- Select a logic to apply to this new filter (in relationship to the current filter).
- Repeat step 3.
- To remove a filter, click the delete (“x”) button beside it.
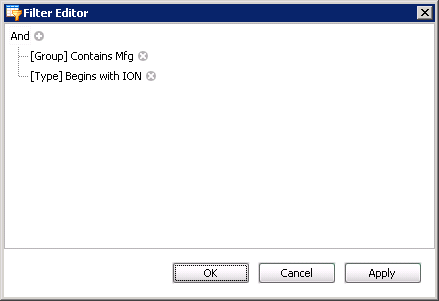
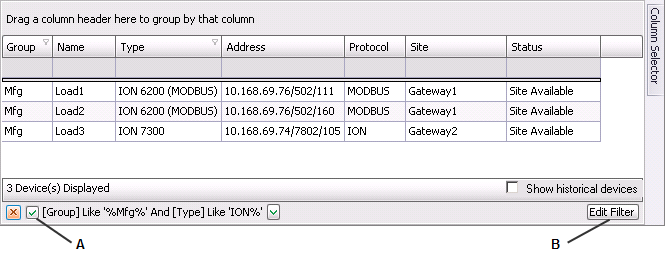
In the following example, the filter finds all devices in group name containing “Mfg” and whose types begin with “ION”.

The rows returned are as follows:

|
||||
|