ETL tips and tricks
Performing a Batch Edit for Trend logs
To perform a Batch Edit (map multiple Trend logs at once):
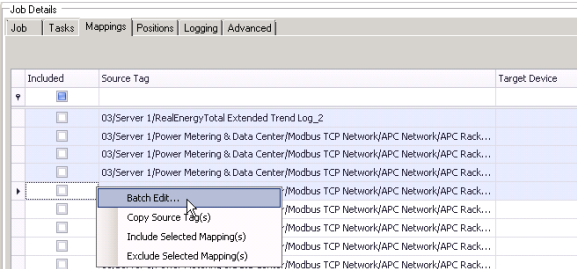
- Highlight multiple rows in the Mappings tab by clicking and dragging downward the handles to the left of the rows. To select all rows, press Ctrl+A.
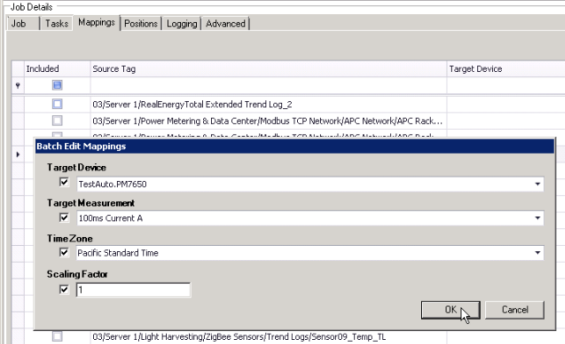
- Right-click and select Batch Edit. The Batch Edit Mappings dialog appears.
- Complete all applicable fields in the dialog as needed.
You must complete the Target Device and Target Measurement fields before you can select Included for the row.
- While the rows are still highlighted, right-click and select Include Selected Mapping(s). The Included check box is now checked for the selected rows and these Trend logs are now included in the job.
- Click OK, and then click Apply to save the changes to the job. The Batch Edit values now appear for the selected rows.
See Measurement mapping for ETL to learn about the most common, supported measurements in used in PME and how to link to typical Building Management tags.
Sorting contents by column
To sort contents by column:
- Right-click a column heading and choose from the sort menu to sort column contents by ascending or descending order.
Searching contents by column
To search the contents by column:
- Click in the search field below a column heading.
- Begin typing characters. Only column contents appear based on the search criteria you enter. Note that characters are not case sensitive.
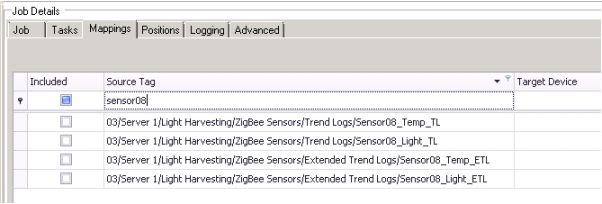
Searching Target Measurements by column
To search the Target Measurements by column:
- Click in the search field below the column heading.
- Begin typing characters. Only column contents appear based on the search criteria you enter. Note that characters are not case sensitive.
See Measurement mapping for ETL to learn about the most common, supported measurements in use in PME.
Filtering content by column
To filter the contents by column:
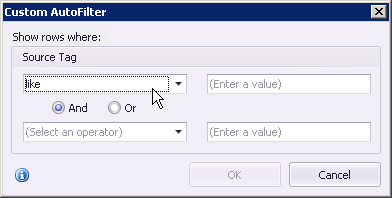
- Click the filter symbol to the right of the column heading, and then choose (All), (Custom), (Blanks), (Non blanks), or a specific Trend log.
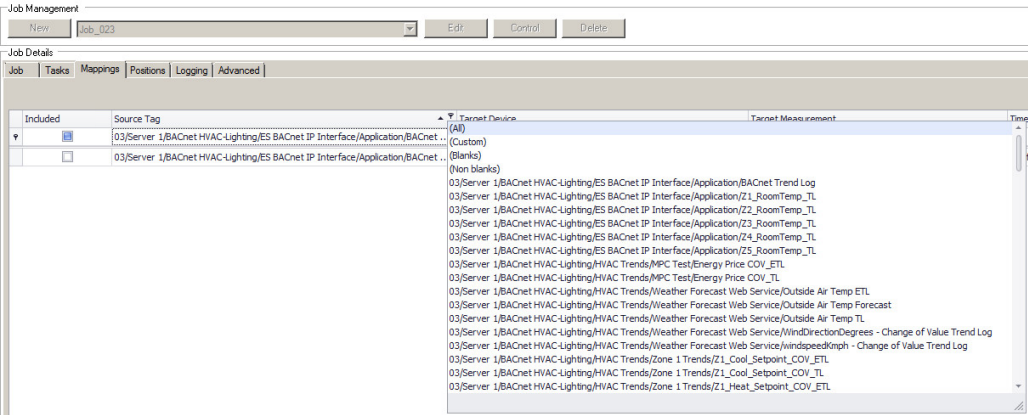
- If you choose (Custom), you can define a unique filter, based on your input, in the Custom AutoFilter dialog. Complete the fields in the dialog and click OK.
Copying and pasting Trend logs
You can select and copy one or more Trend logs from Building Operation and paste that data into a document, such as a text editor or a spreadsheet.
To copy and paste Trend logs into a document:
- Select one or more rows in the Mappings tab.
- Press Ctrl + C or right-click and choose Copy.
- Open your document and place the cursor where you want to paste.
- Press Ctrl + V or right-click and choose Paste.
- The Trend log data appears in the document.
Finding and opening a Trend log in Building Operation
You can find and open a Trend log with the source tag path.
- From the document created in the previous step Copy Source Tag(s) from the list.
- Click in the Building Operation address bar.
- Press Ctrl + V or right-click and choose Paste, and then press Enter. The Trend log opens.
Running a job manually
- In the ETL Configuration Job Configuration Tool screen, select a job to run from the Job Management drop-down list.
- Click Control. The Job Control tab appears.
- Click Run Once, and then click OK in the dialog when it appears. Wait until the output dialog box appears (depending on your system size, this could take up to a few hours).
NOTE: To confirm the ETL job, look to see that the job executed successfully.
If the ETL Engine returns a Job execution failed message, click Open Log Folder in the dialog and open the error log. Locate the timestamp that corresponds to your job and review the log. Based on this information, make the appropriate changes to the job and then run the job again.
Running a job as a service
You can configure a job to run as a service. Using this method, the job automatically runs at set times, based on the settings you provide in the Job tab. Make sure to change the Sleep Time Between Execution value (in seconds) if you require the service to be run on a schedule different from the default value of 3600 seconds.
NOTE: Run the service under a dedicated Windows user account.
To configure a dedicated Windows user account for an ETL job service:
- Create a Windows user account with User access permissions.
NOTE: If the ETL is installed in its default location,
C:\Program Files\..., then the Windows user must have Administrator access. warning
potential compromise of System availability, integrity, and confidentiality
Use cybersecurity best practices for password creation and management.
Failure to follow these instructions can result in death, serious injury, equipment damage, or permanent loss of data.
Cybersecurity policies that govern user accounts and access - such as least privilege, separation of duties - vary from site to site. Work with the facility IT System Administrator to ensure that user access adheres to the site-specific cybersecurity policies.
- Add the Windows user account to the PME SQL database server with db_owner rights to the ION_Data and ION_Network databases.
To configure the ETL job to run as a service:
- In the ETL Configuration Job Configuration Tool screen, select a job to run from the Job Management drop-down list.
- Click Control. The Job Control tab appears.
- Click Register. ETL creates a registered service under the job name. Click OK in the dialog when it appears. This option is available only after running a job successfully at least once.
- Open Windows Services and change the Log On account for the service to the dedicated Windows account.
- In ETL Configuration Job Configuration, click Start/Continue to start the service.
- Click Stop to stop the service or click Unregister to unregister the service for this job.
- Press OK to save and exit job.
Managing your ETL jobs
You can also switch between jobs, change task order and remove tasks from a job.
Switching between jobs
- Click OK at the bottom right to save and exit the current job.
- Select another job in the Job Management drop-down list.
- Click Edit.
Changing the order of tasks for a job
- Select a job from the Job Management drop-down list and click Edit.
- Click the Tasks tab.
- Highlight the task you want to move from the left pane.
- Click the Up arrow
 or Down arrow
  icon to move the task.
 - Press OK to save and exit job.
Removing a task from a job
- Select a job from the Job Management drop-down list and click Edit.
- Click the Tasks tab.
- Highlight the task you want to remove from the left pane.
- Click the Delete
 icon. The task is removed from the pane.
 - Press OK to save and exit job.