Setting up large systems
To perform batch network setup of devices, create the first device in Management Console (see Adding network components) using a logical naming scheme. After you create this first device, you can then use it to create multiple duplicate devices and configure their properties.
The Duplicate and Configure interface
NOTE: The Duplicate and Configure function always operates on all devices visible in the table. When table rows are filtered in the Duplicate and Configure tool, changes done using the configuration editors on the top pane of the window affect only the devices that are visible in the Table Editing area. If you want to apply the changes to all devices, clear the filter first before making the changes.
NOTE: The Duplicate and Configure function cannot be used with logical devices. See Creating multiple logical devices for information about creating more than one logical device.
The Duplicate and Configure area
The Duplicate and Configure area has different sections depending on the type of device you are duplicating.
Ethernet devices have the following sections:
- Configure Names: Use this section to create the duplicates.
- Configure TCP/IP Addresses: Use this section to create a sequence of IP addresses to assign to the duplicates after they have been created.
- Configure TCP/IP Ports: The port number used in the original device is automatically assigned to all the duplicates. If required, use this section to select a different port number for all the displayed devices in the Table Editing area (changes made in this area are applied to all devices, including the original).
- Configure Unit IDs: This section is disabled by default, since unit IDs do not apply to typical Ethernet devices. (To enable this section, you must first set up the Table Editing area so that the “Unit ID” column is visible).
Serial devices have the following sections:
- Configure Names: Use this section to create the duplicates.
- Configure Unit IDs: Use this section to create a sequence of unit IDs to assign to the duplicates after they have been created.
- Configure Serial Sites: The serial site used in the original device is automatically assigned to all the duplicates. If required, use this section to select a different serial site for all the displayed devices in the Table Editing area (changes made in this area are applied to all devices, including the original).
OPC devices have the following sections:
- Configure Names: Use this section to create the duplicates.
- Configure OPC Address: Use this section to create a sequence of addresses to assign to the duplicates after they have been created.
- Configure OPC Sites: The OPC site used in the original device is automatically assigned to all the duplicates. If required, use this section to select a different OPC site for all the displayed devices in the Table Editing area (changes made in this area are applied to all devices, including the original).
The Table Editing area
When making configuration changes in the Duplicate and Configure interface, these changes are applied only to the rows that are visible in the Table Editing area.
See Customizing and navigating interface displays for instructions on filtering and sorting data in the table.
NOTE: To discard your changes since the last saved state, click Revert. You can also press CTRL+Z to undo the last action. To redo the last action, press SHIFT+CTRL+Z. You can only undo your last action (one undo).
Creating multiple copies of a device
This section describes how to duplicate and configure devices.
Step 1: Configuring the first device
-
Add the first device using your logical naming scheme.
For example, you can use a scheme like “FL1_PNL1A.CCT01” to name a device that is installed on the “1st Floor” of the building, “electrical panel 1A”, and “Circuit breaker #1”. Type “FL1_PNL1A” as the group name and “CCT01” as the device name when you configure the first device.
- Right-click the device you want to duplicate and select Duplicate and Configure. The Duplicate and Configure interface appears.
Step 2: Configuring names
In the Configure Names area, the device name is displayed. Each letter and number is selectable. A group of numbers is treated as a single entity. For example, in the name “MY8600” the entities you can select are “M”, “Y” and “8600”. Leading zeroes are also supported, so you can set sequences such as “01, 02, 03” or “001, 002, 003”.
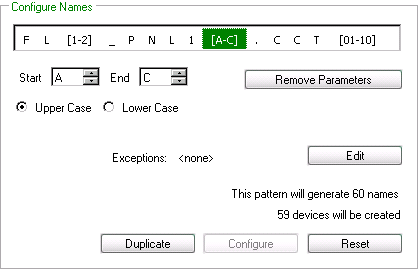
- Select a letter or number in the device name. The Start box displays the selected number/letter, which is the start value. Use the up or down arrow in the spin box to change the start value, or simply type it in the box.
- Click the up or down arrow on the End box edit the range, or type the end value in the box. To clear the range and start over, click Remove Parameters.
- For letters, select Upper Case or Lower Case, depending on whether you require upper case or lower case letters.
- Set exceptions for individual values or a range of values, if required. Exceptions reduce the number of names created (i.e., total generated names minus the exceptions). See Setting exceptions to generated sequences.
Once you have finished configuring names, you can duplicate the device. See Step 3: Duplicating the device, below, for more information.
Example
For example, if you select the first “1” from the example naming scheme and set the End spin box to “2”, two names are generated (the original, plus one duplicate). If you select a letter and set its Start value to “A” and the End value to “C”, three names are generated (the original, plus two duplicates).
The total number of generated names is the product of the first range multiplied by the next, and so on until the last range, as indicated in the following graphic.
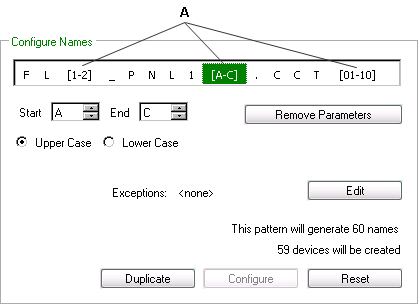
| A | The total generated names are the product: [2 X 3 X 10] = 60 |
Setting exceptions to generated sequences
The Exceptions option applies to the Configure Names and Configure TCP/IP Addresses sections only.
-
To set exceptions to the range of generated values, click Edit (this button is unavailable until you change the name or IP value).
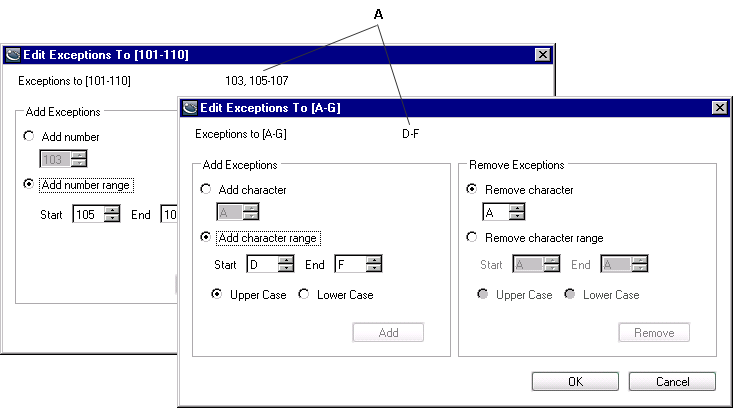
A List of current exceptions -
Use the Add number or Add character (as applicable) spin box to set a value to exclude from the range you have specified, then click Add. Repeat to set additional values to exclude. To set a range of values to exclude, select Add number range or Add character range, then use the Start and End spin boxes to set the range to exclude.
Click Add. Repeat to set additional ranges of values to exclude.
NOTE: You cannot add the same number or letter to the list of exceptions more than once. If the Add button is disabled, check that the numbers or letters are not already included in the exceptions list near the top of the window.
- Use the Remove number or Remove character spin box to remove the exception that was set for a given value (i.e., put it back in as an acceptable value). Use the Remove number range or Remove character range spin boxes to remove the exception that was set for a range of values. Click Remove.
Step 3: Duplicating the device
Once you have finished configuring names, you are ready to duplicate the device. Click Duplicate. The duplicated devices appear in the Table Editing area of the window.
The first device in the list is the original device. The remaining devices are the duplicates. Asterisks next to the device names indicate pending changes that have not yet been saved.
Click Apply to save your changes and continue editing devices, click OK to save your changes and return to Management Console, or click Revert to undo unsaved changes.
In Management Console, duplicated devices are always disabled when they are added.
Step 4: Configuring duplicated devices
See the following section, Configuring multiple devices, for instructions on configuring other properties for multiple devices.
Configuring multiple devices
After you have duplicated the devices, you can select and configure any or all of them.
-
If you have closed the Duplicate and Configure interface, select the devices you want to configure from the Devices display window in Management Console. Right-click and select Configure Selected Devices (this option is only available if multiple devices are selected).
The Configure Selected Devices interface appears. This interface has the same layout and controls as the Duplicate and Configure interface; see The Duplicate and Configure interface for information.
NOTE: Devices affected by a configuration change (that has not been saved) are identified by an asterisk in the first column of the Table Editing area.
-
Scroll to the right in the Duplicate and Configure area to view the Configure TCP/IP Addresses, Unit IDs, Ports and Sites sections of the interface (depending on the type of device being configured). If the number of items in this area does not match the number of items in the |Table Editing area, a message in red text appears in the area. If the numbers match, the message text is black. Configure these parameters as described in Configuring addresses, ports, unit IDs and sites then click Configure at the bottom of the applicable interface section.
NOTE: Configuration changes only affect the devices that are currently displayed in the Table Editing area. Use the column sorting and filtering features, described in Customizing and navigating interface displays, to control which devices are displayed in the table. If you want to apply the changes to all devices, clear any filtering before making the changes.
-
Click Apply to save your changes and continue working or click OK to save your changes and return to Management Console.
NOTE: If you changed the name of one or more devices, a message displays with a list of devices that will be renamed. If data for those devices already exist in the ION_Data database and you still proceed with the renaming, then the existing data associated with the old device name is lost (“orphaned”).
Click Continue to proceed or Cancel to go back and edit the device configuration.
-
When you have finished, click OK to save your changes and return to Management Console or click Cancel to discard your changes.
If you click Cancel, a message prompts you if there are pending (unsaved) changes when you click Cancel. Click Yes to discard the changes and return to Management Console, or No to return to the configuration window and continue editing.
If inappropriate values (such as a device that is renamed with the same name as another existing device) are encountered, a message displays with error details. You cannot save the configuration changes until you have corrected the errors.
Configuring addresses, ports, unit IDs and sites
The following sections describe how to configure addresses, ports, and unit IDs.
Configuring TCP/IP addresses
- Select the section of the IP address that you want to configure. The Start box displays the selected number/letter, which is the start value. Use the up or down arrow in the spin box to change the start value, or simply type it in the box.
- Click the up or down arrow on the End box edit the range, or type the end value in the box. To clear the range and start over, click Remove Parameters.
- Set exceptions for individual values or a range of values, if required. Exceptions reduce the number of addresses created (i.e., total generated addresses minus the exceptions). See Setting exceptions to generated sequences.
- Click Configure at the bottom of the Configure TCP/IP Addresses section.
Configuring unit IDs
The following instructions apply to serial devices (and Ethernet devices that require a unit ID).
- Use the up or down arrow in the Start spin box to change the start value, or simply type it in the box.
- Click the up or down arrow on the End box edit the range, or type the end value in the box.
-
Click Configure at the bottom of the Configure Unit IDs section.
NOTE: To edit the unit ID of an Ethernet device, you must first add the Unit ID column to the table in the Table Editing area.
Configuring sites
- From the dropdown list, select the site you want to use for the selected serial or OPC devices.
- Click Configure at the bottom of the Configure Sites section.
Configuring ports
- From the dropdown list, select the port you want to use for the selected Ethernet devices.
- Click Configure at the bottom of the Configure Ports section.
Editing duplicated device information
The following sections describe how to quickly edit the properties of duplicated devices in the table editing area.
Copying device information from a spreadsheet
Sometimes device names do not follow any particular naming pattern. In this case, you can use the copy/paste function to apply configuration changes directly to the Table Editing area.
First, you need to add a new device in Management Console, then create as many duplicates of the device as the quantity of items you are pasting.
If you have a Microsoft Excel spreadsheet that contains a list of these devices to add to Management Console, you can use the Configure Names area to create duplicates of that device type, then use the Table Editing area to copy and paste the device properties from the Excel spreadsheet.
Example: Copy and paste 20 Ethernet devices from excel
- Confirm that the names in the Excel spreadsheet conform to the naming convention “[Group].[DeviceName]”.
- Add the first device and set up its properties in Management Console. You can assign it a simple device name such as “A.B1” since it will be overwritten when the values are copied and pasted from Excel. Set the Enabled property to No so that Management Console does not attempt to connect to the device.
- Click OK to add the device.
- Right-click the device and select Duplicate and Configure.
- Select the “1” in the Configure Names box, then use the End spin box to set the value to 20.
- In the Hide/Show Columns area, clear the check box of all non-editable columns to hide those that contain grayed out values. Also hide the columns you do not want to paste over or those that are not included in the Excel spreadsheet.
- On the Excel spreadsheet, arrange the columns so they match the order of the columns on the Table Editing area. Hide all columns on the Excel spreadsheet except those corresponding to columns on the Table Editing area.
- Select the cells in Excel and copy them (CTRL+C).
- On the Table Editing area, click on the first cell under the Name column to select it, then paste the contents of the clipboard (CTRL+V).
- Click Apply to save your changes or click OK save your changes and return to Management Console.
Using Find and Replace to edit device information
Use the Find and Replace feature to modify matching characters in the device names or in any other editable columns on the device table. The Find and Replace feature does not work on read-only columns.
- Right-click the device table and select Find and Replace (or press CTRL+H).
- Type the characters you want to search for in the Find box. Do not use wildcard characters (“*”). Note that the search is case-sensitive.
- Find in column lists all available columns. Select the column you want to search in.
- In the Replace box, type the characters you want to use to replace the characters in the Find box. If you want to delete characters from a column value, leave the Replace box blank.
- Click Preview to list the search results in the table. The Replace with column displays the new name or value resulting from the Find and Replace operation.
- Use the check box in the Select column to select the rows for which you want to change values. Click Select All to select all the items or Clear Selected to clear all.
- Click Apply to save your changes or Cancel to discard your changes
- Click OK to save your changes and close the dialog.