NOTE: This report is part of the Energy Analysis Reports Module. This module requires a separate license.
Summary
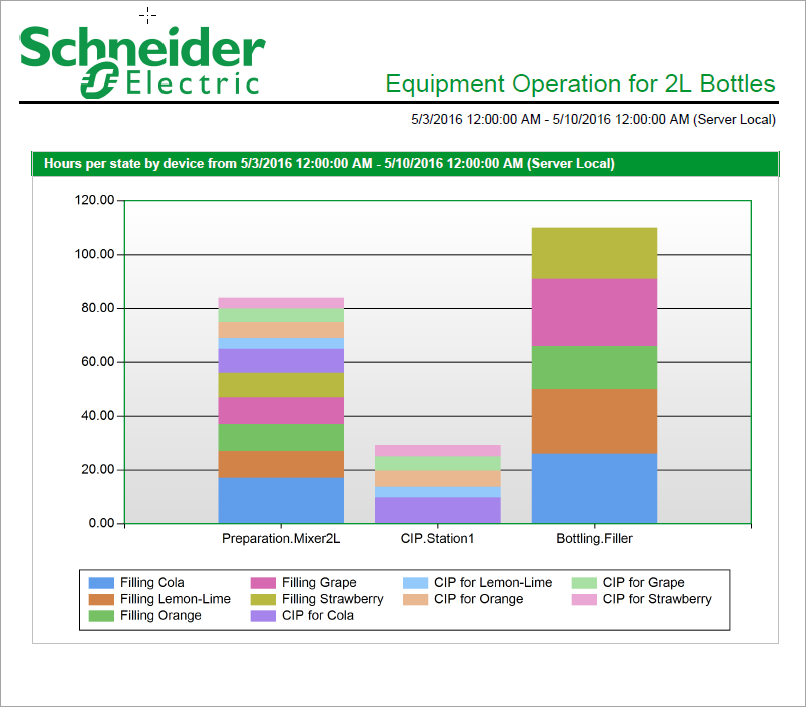
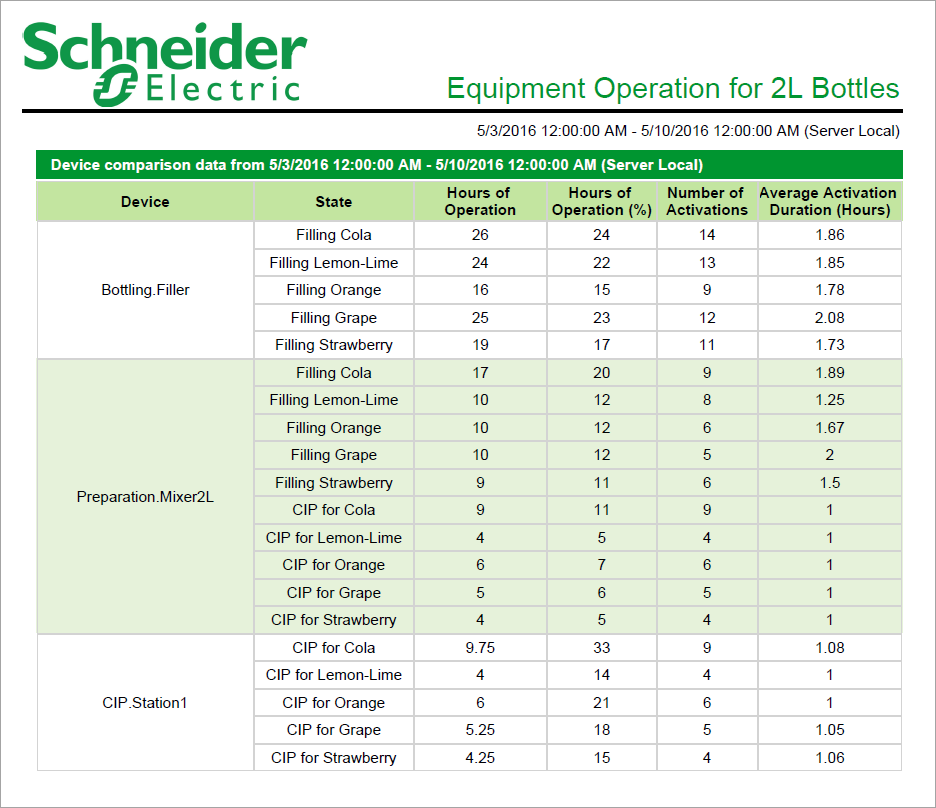
The Multi Equipment Operation Report shows how much time different equipment spends in a certain state, the number of activations, and the average activation duration. Use this report to gain an understanding of the operations of your facility or processes.
Prerequisites
- The Energy Analysis Reports Module must be configured.
- The measurement data must be available as historical data logs in the database.
Report inputs
Type a title for the report in the text box.
Use state measurement to select equipment with state values.
- Click Select Source to open the Source Selector dialog.
- Select the source and then click OK.
- Click Select Measurement to open the Measurement Selector dialog.
- Select the equipment state measurement and then click OK.
Depending on how your state measurements are configured, the equipment state measurement could be grouped under "Miscellaneous" or "Custom".
- (Optional) Click + and add another source measurement pair.
Use state labels to add labels to equipment state codes. For example: value = 1, state = maintenance.
NOTE: State labels are related to the state measurements in the Power Monitoring Expert database.
For each state that you want to include in the report:
- In the Value field, enter a state value.
- In the State field, enter the value's corresponding state. For example, if the state with a value of 3 = medium, enter 'medium'.
- (Optional) Click + and then repeat steps 1 and 2 to add a state label for each state that you want to include in the report.
- (Optional) Click - to delete a state label.
NOTE: If you do not add state labels for every source state, and you set Include Data Notification to Yes, the generated report will include error warnings indicating that equipment states are unaccounted for in the State Label mapping.
Use this input to select the timeframe for the data you want to view in the report.
Select the reporting period from the dropdown list. The timeframe options in the timeframe dropdown are relative to the date the report is run. To run a report that starts and ends in the past, select the fixed date option. Type a start and end date in the date boxes or click the arrows beside the dates to display a pop-up calendar and select a date. Type a time in the time boxes or click the up and down arrows beside the time to adjust the hours or minutes up or down. You can also run a report that starts and ends in the future. You must manually add the future data. You can use any tool to generate future data. For example, use Manual Data Editor to manually enter measurement data.
Select the timezone you want to view timestamps in.
Select whether or not to scale the chart normally. Selecting No, sets the starting point of the Y-axis at zero. The default is Yes.
Select whether or not to show the data table in the generated report. The default is No.
Click Yes to include data notifications in the report. If there are none, the section is not included. Click No to exclude this section.
Example:


NOTE: This example only shows selected content from the report, it does not show the entire report.