Measurement Aggregation Report
Summary
The Measurement Aggregation Report gives aggregated logged measurement data in tabular format. The aggregation intervals are configurable, and the report supports aggregation by time of use. Use this report to understand the consumption patterns of your facility or processes.
Prerequisites
- The measurement data must be available as historical data logs in the database.
Report inputs
Type a title for the report in the text box.
The Source Selector dialog provides options to show Devices or Views:
Use the Devices option to select the devices you want to include in the report.
From the Grouping list, select the way in which you want to display the sources (for example by device type or by group name). Click + and - to expand and collapse items in the navigation tree. Click the check box beside a device (or group of devices) to select it. Click Select All or Select None in the top-right corner to select or clear all the check boxes.
After selecting the devices, click OK.
Use the Views option to select a hierarchy view (a tree of relationships) or virtual meters. The hierarchy views and virtual meters are configured in the Hierarchy Manager component. (See the Hierarchy Manager Help for further information about hierarchies, virtual meters, and views.) Click + and - to expand and collapse items in the tree. Click the check box beside any hierarchy item in the tree or any virtual meter to select it.
Click OK after making your selections.
Use this input to select the measurements you want to include in the report.
Click Select Measurement to open the Measurement Selector dialog. Click + and - to expand and collapse items in the navigation tree. For reports where you can select multiple measurements, click the check box beside a measurement (or group of measurements) to select it. For reports where you can only select a single measurement, click the measurement name to select it.
After selecting the measurements, click OK.
Use this input to select the timeframe for the data you want to view in the report.
Select the reporting period from the dropdown list. The timeframe options in the timeframe dropdown are relative to the date the report is run. To run a report that starts and ends in the past, select the fixed date option. Type a start and end date in the date boxes or click the arrows beside the dates to display a pop-up calendar and select a date. Type a time in the time boxes or click the up and down arrows beside the time to adjust the hours or minutes up or down. You can also run a report that starts and ends in the future. You must manually add the future data. You can use any tool to generate future data. For example, use Manual Data Editor to manually enter measurement data.
Select the timezone you want to view timestamps in.
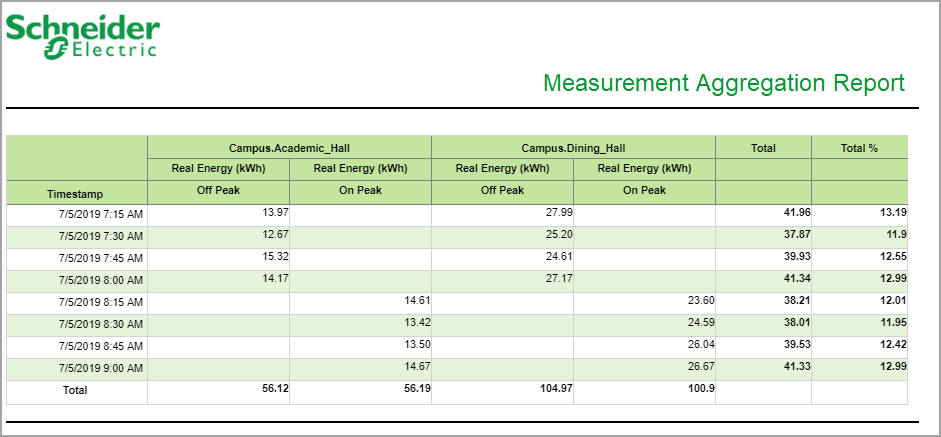
Select the aggregation time interval for the reporting data.
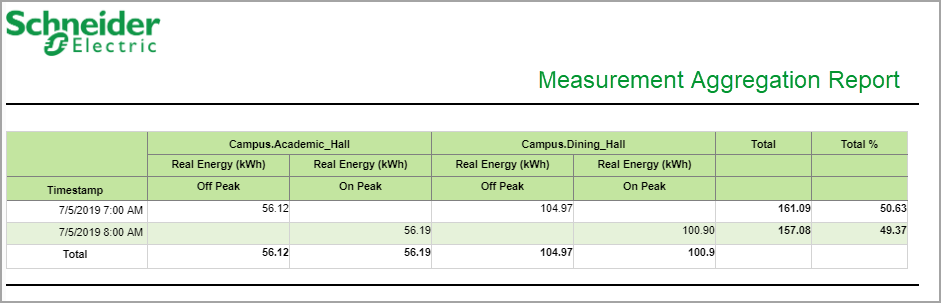
NOTE: This note is applicable for KPI report. For the selection of Hourly, Daily, Weekly, or Yearly value for Rollup parameter, the measurement values are always aggregated for the selected measurements based on the interval values. For non-cumulative measurements, it is recommended to select Interval value. For example, if Mean Current measurement is selected and the Rollup is set to Interval, the Mean Current measurements for the selected interval is displayed. If Rollup is set to Hourly, the Mean Current measurement values are displayed as aggregated values and not average values.
NOTE: Interval Rollup is available only for the following reports: KPI reports, Measurement aggregation export report, Measurement aggregation report and Multiple trend report.
Select the aggregation method to be used for rolling up non cumulative measurements. Examples of non cumulative measurements include Voltage, Current, Power. An example of a cumulative measurement is Energy. Cumulative measurements are aggregated by summation.
Select if you want to use a time of use (TOU) schedule with this report. If you want to use a TOU schedule, select a TOU schedule from the list. The list shows the existing TOU schedules that are configured in the system. If you have not created a TOU schedule, the field shows that no schedule is available.
Select an option for the format of the label describing the source. The options are Source Name, Source Description, and Combined Name/Description.
NOTE: The source description is the description that was entered in Management Console or Device Manager for a source, when the source was added or edited.
Select the format for the report data table. The available options are:
- Horizontal Rollup Table
The data is shown with sources and measurements as columns and timestamps as rows.
Example: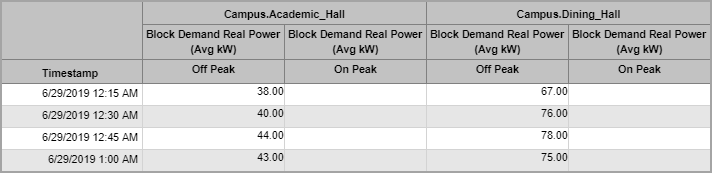
- Vertical Rollup Table
The data is shown with timestamps and measurements as columns and sources as rows.
Example:
- Demand and Consumption Rollup Table
The data is shown with sources and measurements as columns and timestamps as rows. This view is similar to the horizontal table with more compact measurement column headers.
Example: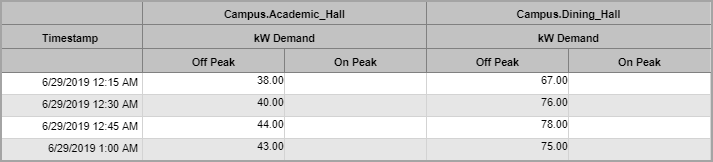
- Flat Rollup Table
The data is shown with the source name, measurement name, timestamp, value, and so on, in a single row per data record.
Example:
Select to include or exclude totals columns or rows in the data tables.
Click Yes to include data notifications in the report. If there are none, the section is not included. Click No to exclude this section.
Click Yes to include the standard report header in the report. Click No to not include the standard report header in the report.
The standard report header includes the logo and report title.
Example 1 - Report output with Rollup set to Interval:
Example 2 - Report output with Rollup set to Hour:
NOTE: This example only shows selected content from the report, it does not show the entire report.