Installing PME with manual installation of the databases
NOTE: The procedures described below, for the manual installation of the database, can only be used for Distributed Database architectures. Do not use the procedures for Standalone architectures where the database and the application server are on the same computer.
NOTE: To use this procedure you must use Mixed Mode Authentication for the SQL Server. This procedure does not work if you use SQL Integrated (Windows) Authentication for the SQL Server.
The following describes how you can install PME without having to provide SQL Server account credentials with sysadmin privileges in the PME installer. This involves using the software installer and performing manual configuration steps on the database server.
NOTE: The user account that is used on the database server to run the SQL scripts that are part of this procedure, must have sysadmin privileges on the SQL Server. However, you do not have to enter information for this account in the PME installer.
Overview
Installing PME with manual installation of the databases consists of the following steps:
- Running the PME installer to install and configure the application files.
- Manually running scripts on the database server to create the databases and setup the database accounts.
See details below.
Prerequisites
- You need the PME install DVD or ISO file.
- You will need to set a password for the three SQL accounts (
ION, ionedsd, AMUser) that PME uses to access the database. This password must comply with the password policies of the Windows server and the SQL server. - You need the following SQL server accounts on the database server:
- An account that can connect to the SQL server instance. This account does not require sysadmin privileges. This account is used for the installation of PME and future password resets.
- An account that has sysadmin privileges on the SQL Server. This account is used to run the SQL scripts to create the databases and setup the database accounts.
- You need a folder on the database server for the database files. This folder must exist before you start the PME installation.
- You need access to SQL Server Management Studio on the database server.
Installation
Run the PME installer on the application server and follow the regular install process, with the modifications shown below:
- On the Setup Type installer page, choose Application Server setup type. Continue with the installer workflow.
- On the Database Accounts installer page, choose Use SQL Server Authentication and provide your own password by selecting Change Password. Continue with the installer workflow.
NOTE: Do not use the installer generate password since it cannot be copied. You will need access to this password in step 18 below, when editing a script file.
NOTE: If you change the password, the password you are providing must comply with the password policies of the Windows server and the SQL server.
The software installer cannot validate the password at the time you enter it.
If the password is not valid, the installation will not be successful. In that case, complete the installation, skipping any unsuccessful steps. See Unsuccessful installation due to invalid account passwords for information on how to repair the unsuccessful install. warning
potential compromise of System availability, integrity, and confidentiality
Use cybersecurity best practices for password creation and management.
Failure to follow these instructions can result in death, serious injury, equipment damage, or permanent loss of data.
Cybersecurity policies that govern user accounts and access - such as least privilege, separation of duties - vary from site to site. Work with the facility IT System Administrator to ensure that user access adheres to the site-specific cybersecurity policies.
- On the SQL Server installer page, choose SQL Server Authentication and provide SQL account information for a low privilege account. This account only needs to be able to connect to the SQL Server instance.
Continue with the installer workflow.
TIP: Make a note of the account username. You will need this username in step 9 and 16 below, when editing a script file.
- On the Database Files Destination installer page, provide the path to the folder on the database server, where the database files will be installed. Continue with the installer workflow.
NOTE: The folder on the database server must exist. The PME installer cannot create a folder or verify the existence of a folder on the database server. This is because the SQL account you specified in the previous step has low privileges.
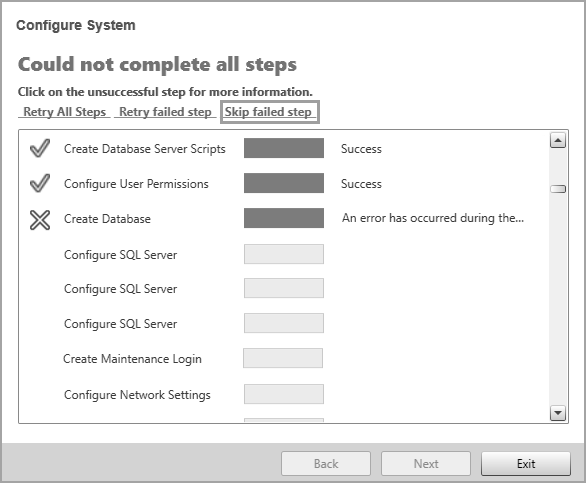
- After copying files and completing many configuration steps, the installer will stop on the Create Database step and display an error message. This is because the installer could not create the databases.
Example:

Leave the installer open in this state. On the PME application server, browse to
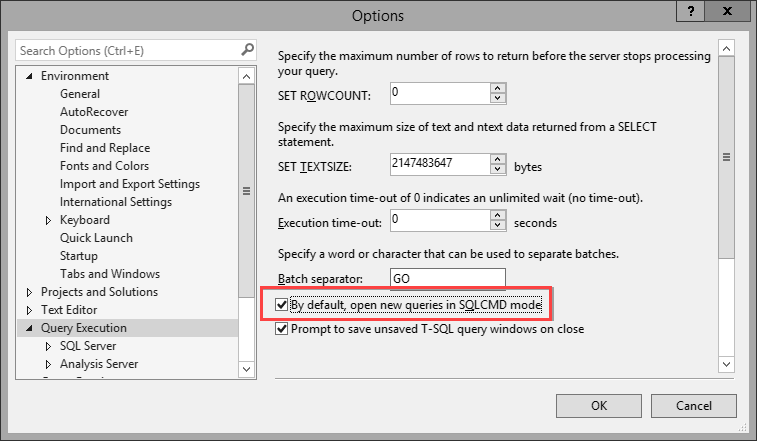
...\Power Monitoring Expert\Database\Diagnosticand copy the following files from there, to a temporary location on the database server:ION_Data.sql,ION_Network.sql, andION_SystemLog.sql. - On the database server, open SQL Server Management Studio (SSMS) and enable SQL CMD by going to Tools > Options, selecting on Query Execution and checking the box By default, open new queries in SQL CMD mode.
Example:

- On the database server, open and execute the three scripts files (
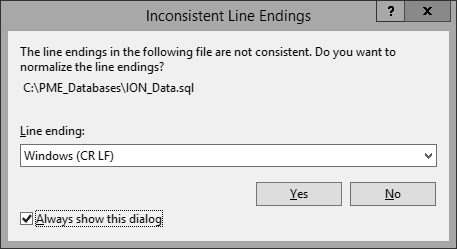
ION_Data.sql,ION_Network.sql, andION_SystemLog.sql) in SSMS. If an Inconsistent Line Endings dialog box is displayed, select Yes to continue.NOTE: The account you use to log into the database server must have sysadmin privileges on the SQL Server.
NOTE: The order in which you run the scripts is not important.
NOTE: The script files create three of the four PME databases -
ION_Data, ION_Network, and ION_SystemLog. TheApplicationModulesdatabase will be created in a later step.Example of Inconsistent Line Endings dialog box:

- On the PME install DVD or ISO file, browse to
root\ManualInstall\and copy the following script file from there, to a temporary location on the database server:ManualDBInstall_Script1-Make_DBOwner-DataNtwrkSystm.sql. - On the database server, open
ManualDBInstall_Script1-Make_DBOwner-DataNtwrkSystm.sqlin SSMS. Edit the script by replacing PM_Login with the SQL account username you entered in the Database Software installer page (step 3). Execute the script.Script part where you must set the username:
DECLARE @PM_SQL_User_Account NVARCHAR(MAX) = 'PM_Login';NOTE: This will add the account to the db_owner role in the databases.
- Go back to the PME installer on the application server. It still shows the Configure System page with the unsuccessful Create Database step. select Skip failed step to skip the failed Create Database step.
Example:

- The installer will stop on the Create Database step and display an error message. This is because the installer could not create the
ApplicationsModulesdatabase. Leave the installer open in this state. - On the PME application server, browse to
...\Power Monitoring Expert\Database\Diagnosticand copy theApplicationsModules.sqlfile from there, to a temporary location on the database server. - On the database server, open and execute the
ApplicationsModules.sqlscript files in SSMS. This will create theApplicationsModulesdatabase. - On the PME install DVD or ISO file, browse to
root\ManualInstall\and copy the following script file from there, to a temporary location on the database server:ManualDBInstall_Script2-Make_DBOwner-AppMods.sql. -
On the database server, open
ManualDBInstall_Script2-Make_DBOwner-AppMods.sqlin SSMS. Edit the script by replacing PM_Login with the SQL account username you entered in the SQL Server installer page (step 3). Execute the script.Script part where you must set the username:
DECLARE @PM_SQL_User_Account NVARCHAR(MAX) = 'PM_Login';NOTE: This will add the account to the db_owner role in the database.
- On the PME install DVD or ISO file, browse to
root\ManualInstall\and copy the following script file from there, to a temporary location on the database server:ManualDBInstall_Script3-CreateMap_Logins.sql. - On the database server, open
ManualDBInstall_Script3-CreateMap_Logins.sqlin SSMS. Edit the script as shown below. Execute the script.To edit the script:
- Uncomment the following two statements:
DECLARE @IsIntegratedSQLAuthUsed BIT = 0andDECLARE @PM_SQL_Account NVARCHAR(MAX) = '<DOMAIN\USERNAME>'. - Set the
@PM_SQL_Passwordvariable in the following statement,DECLARE @PM_SQL_Password NVARCHAR(MAX) = ‘<enter password here>', to the database accounts password that you chose in step 2 above.
NOTE: This will create the PME database accounts that are used by the software to connect to the databases.
- Uncomment the following two statements:
- Go back to the PME installer on the application server. It still shows the Configure System page with the unsuccessful Check Applications Database step. select Skip failed step to skip the failed Check Applications Database step. Continue with the installer workflow.
- The installer will stop on the Configure SQL Server step and display an error message. select Yes to continue with the rest of the installation.
- select Exit, after the installation is complete.
NOTE: The installer will display a Could not complete all steps message when it finishes. Ignore this message. The steps that did not complete are the ones that were done manually as per instructions above, and then skipped.
Final notes
- Delete the low privilege SQL account created for step 3. It is no longer needed.
- Delete the copy of the
ManualDBInstall_Script3-CreateMap_Logins.sqlscript with the entered password (see step 18) or keep it in a secure location to prevent unauthorized access to the password. - You can disable SQL CMD in SSMS on the database server. This option was enabled in step 6 above.
- If, at a later point, you want to change the password used by PME to connect to the databases, first manually change the password for the three PME logins (
ION, ionedsd, AMUser) on the database server using SQL Server Management Studio.NOTE: Note that all three logins need to use the same password.
Then run the PME installer on the application server and select Reset Accounts. In Reset Accounts, change the password for the Database Accounts to match the one you manually set in SSMS. You can use the low privilege SQL account created for step 3 for the password reset in the installer.
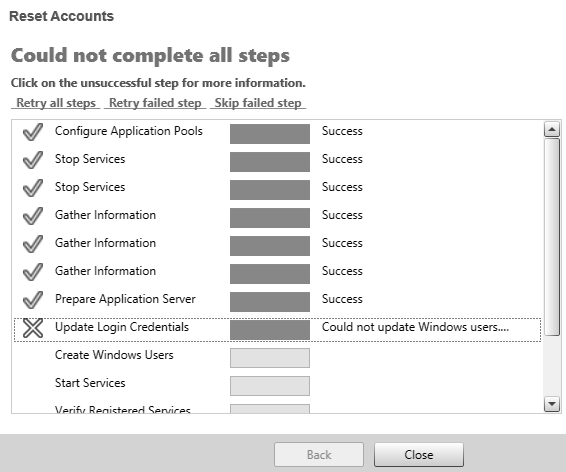
NOTE: If you use an SQL account without sysadmin level SQL credentials for the password reset in the installer, you will see an error at the Update Login Credentials step. Ignore the message and skip this unsuccessful step. The password reset will still be successful.
Reset Accounts error on Update Credentials step:
