Setting up a multi-cluster master project
You can use the following example to set up a multi-cluster master project with multiple clusters. This is a standalone setup that includes the Site A and Site B projects as one large project.
Prerequisites:
The following projects:
- MultiSite_Common_Include.ctz
- PLS_Example_MultiSite_Master.ctz
- PLS_Example_SiteA.ctz
- PLS_Example_SiteB.ctz
restored in the following directory:
[Install directory]\ProgramData\Schneider Electric\Power Operation\[version]\Examples\Multi-Site Example
See Restoring a project for detailed information on how to restore a project.
To set up a multi-cluster master project:
- In Power Operation Studio, set PLS_Example_MultiSite_Master as the active project.
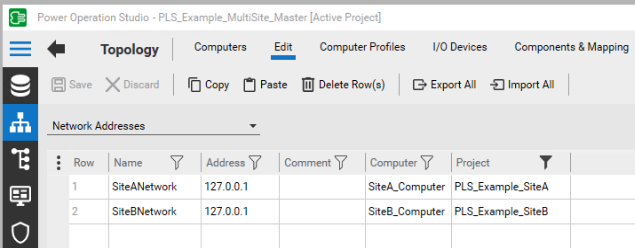
- Go to Topology > Edit > Network Addresses and confirm both SiteANetwork and SiteBNetwork addresses are set to either the loopback IP, server IP, or the same hostname.
- Go to Project > Setup Wizard and run the Computer Setup Wizard in Custom mode.
- Click Next through the Project Setup, Profile Setup, Computer Role Setup, and on Network Setup, confirm that the Networked radio button is enabled.
- Click Next through the Report Server Properties Setup, Trend Server Properties Setup, CPU Setup, and Events Setup.
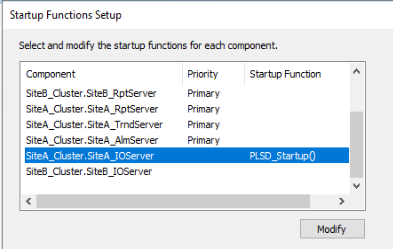
- In the Startup Functions Setup window, do the following:
- Select the startup function for the SiteA_IOServer
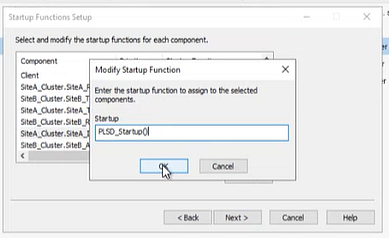
- Enter PLSD_Startup() in the Modify Startup Function dialog.
- Click OK.
- Click Next.
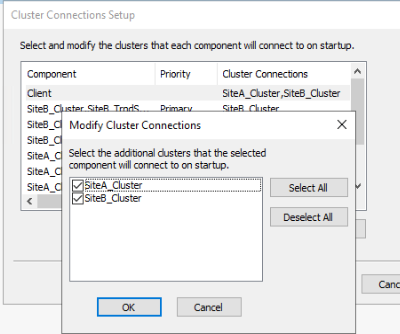
- In the Cluster Connections Setup, select the client, and click Modify.
- In the Modify Cluster Connections window, enable both clusters, and click OK.
- Select SiteACluster.SiteA_IOServer and click Modify.
- In the Modify Cluster Connections window, enable SiteB_Cluster, and click OK.
- Click Next and set the server authentication password.
- Click Next through Configure Server User, Security Setup - Control Menu, Security Setup - Keyboard, Security Setup - Miscellaneous, General Options Setup, and Finish in Computer Setup.
- Click Run the active project.

NOTE: At minimum, both the client and SiteA_Cluster.SiteA_IOServer must be selected. If other components have multiple clusters selected, this can safely be ignored.
NOTE: The advanced one-line will not run on the Citect Runtime. This is because both Site A and Site B projects include a zOL device that is used for advanced one-line. With multiple clusters within a single project, only one zOL device is required.