Alarm/Event filter form

This topic describes the PLSCADA filter form. The information in the Citect filter form is the same, but is presented differently on the page. To change the filter form, use the UsePLSFilter parameter:

[Alarm] UsePLSFilter

default: 1 (use PLSCADA filter form)

Change to 0 to use the Citect filter form.

To filter for the information that displays in the alarm logs and the event log, click Filter (in the upper left corner of the screen). The Advanced Alarm Filter screen displays:

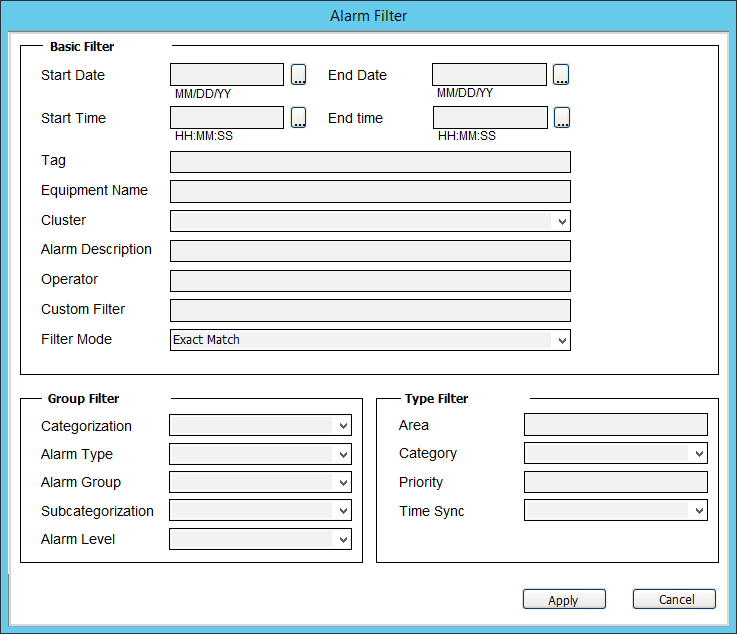
The table below describes its settings.

Filter Option

Description: Display all alarms for:

Basic Filter box:

Start Date/End Date

a date range.
Choosing only a start date displays alarms from that date to the current date.
Choosing only an end date displays alarms for the past year up to that date.
For example, to display alarms only for today’s date, enter only a start date.

Start Time/End Time

a time range.
Choosing only a beginning time displays alarms from that time through the end of the day (23:59:59 or 11:59:59 p.m.).
Choosing only an ending time from the start of the day (00:00:00 or 12:00:00 a.m.) through the time selected.

Tag

a single tag; use tag name only, do not include equipment name. For example, enter MMXU1\A\phsA, not MainCM4\MMXU1\A\phsA.

To filter on tag and equipment, enter the tag here and the equipment in the Equipment Name field.

Equipment Name

a device (entered when using the I/O Device Manager or the Manage Multiple Devices window)

Cluster

a single cluster, which was added when setting up the project (listed in Project Editor > Servers > Clusters)

Alarm Description

Alarm Desc from Time Stamped Digital Alarms: a customized on and off text description, such as “active” and “inactive”

Custom Filter

There are eight custom filters, which can be assigned by the customer in each alarm. A group of alarms in a specific location could have the same name in CUSTOM8 so that custom filtering can be easily applied.

Custom8 has a default assignment of “Equipment.” To change custom filter assignments, use the AlarmFormat parameter (Project Editor > System > Parameters). This is the only means available for filtering on a custom field. When viewing the log, you can use the new custom filter by typing it into the Custom  Filter field.

Group Filter box:

Categorization

These “alarm filters” are created in the Profile Editor when alarms are created.

Alarm Type

Alarm Group

Subcategorization

Alarm Level

Type Filter box: These are advanced topics; see Power Operation help for more information.

Area

the area associated with the alarm

Category

This is the alarm category. There are four predefined categories (high, medium, low, and event).You can assign alarms to their own categories by changing the equipment profiles and then re-generating the database.


See the following table (Categories and Priorities) for a list of the categories and their defaults.


Keep in mind that alarms that are categorized as events need to keep the category of _PLS_ALM_EVENT (category 1004).

Priority

This is the priority of the alarm category; not used in the default PLS_Include project.


As with the category, priority has defaults (see Categories and Priorities table below). You can change these settings in the equipment profiles. However, be sure that you use priority 1 for events.

Time Sync

Yes = in the Alarm or Event Log, only events/alarms with time quality information will be listed. The time sync data displays in the Time Quality column of the log. Data displays to the accuracy recorded at the device.

Default: no

Category Label

Category Number

Priority Number

_PLSALM_HIGH

1001

1

_PLSALM_MEDIUM

1002

2

_PLSALM_LOW

1003

3

_PLSALM_EVENT

1004

0