Device Management - Monitoring Rules
This procedure describes how to use the Device Management user interface:
|
Step |
Description |
|---|---|
|
1 |
Device management oAfter user login, Device is the default page. oDevice management page is composed of a system hierarchy tree (left-side) and device list (right-side). oDevice management provides three levels of management view: Device List, Group List, and Map View. oSystem hierarchy tree includes server, account, and group node for device/group list mode as well as location, layout, and device node for map view mode. Each node supports corresponding operations (add/delete/edit) according to node attributes. 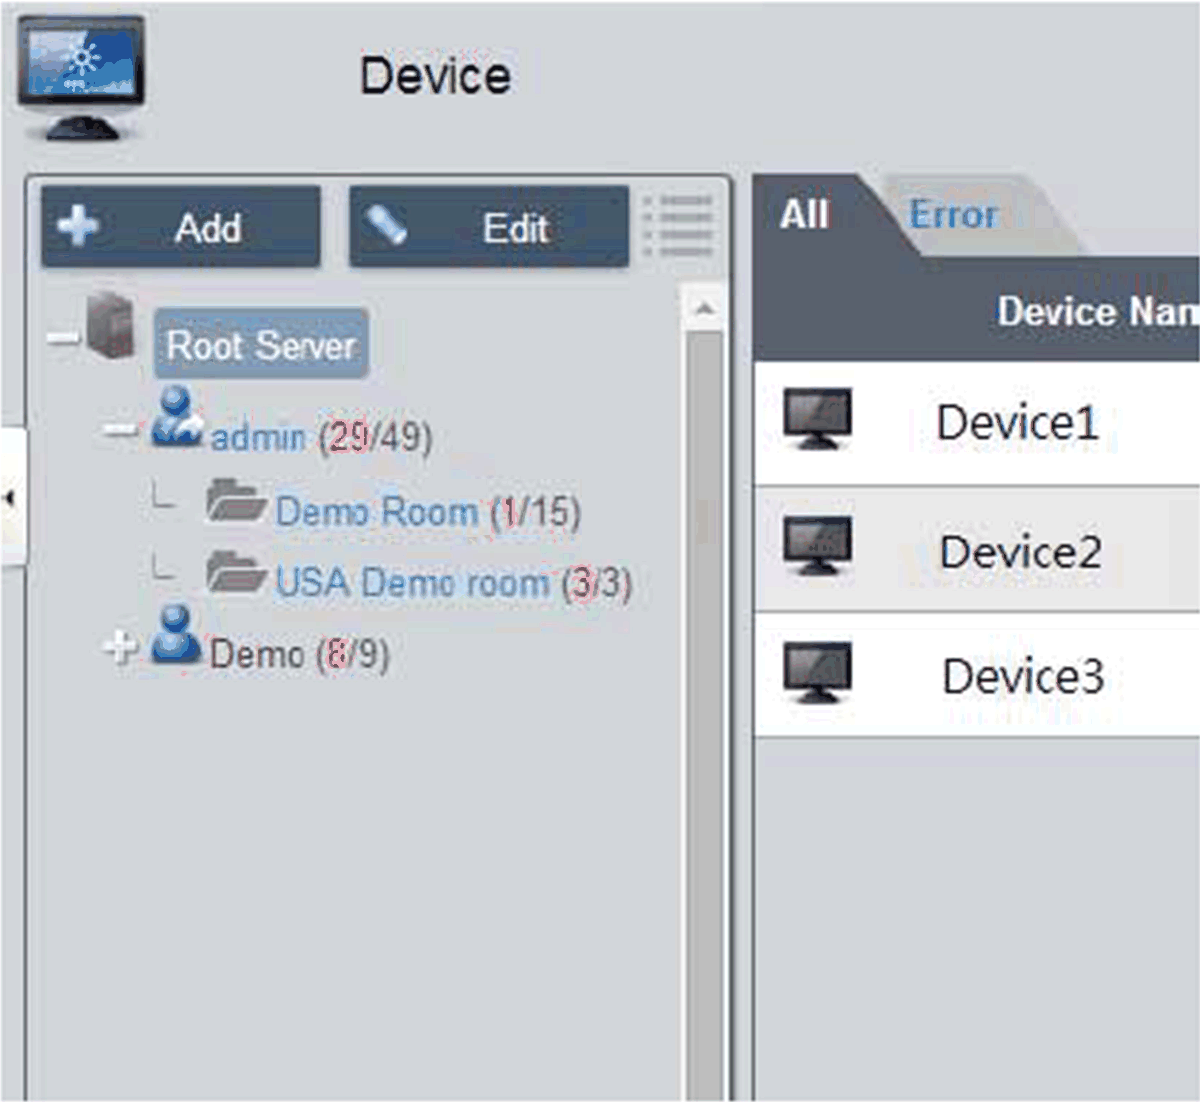
|
|
2 |
View mode – Device status list: 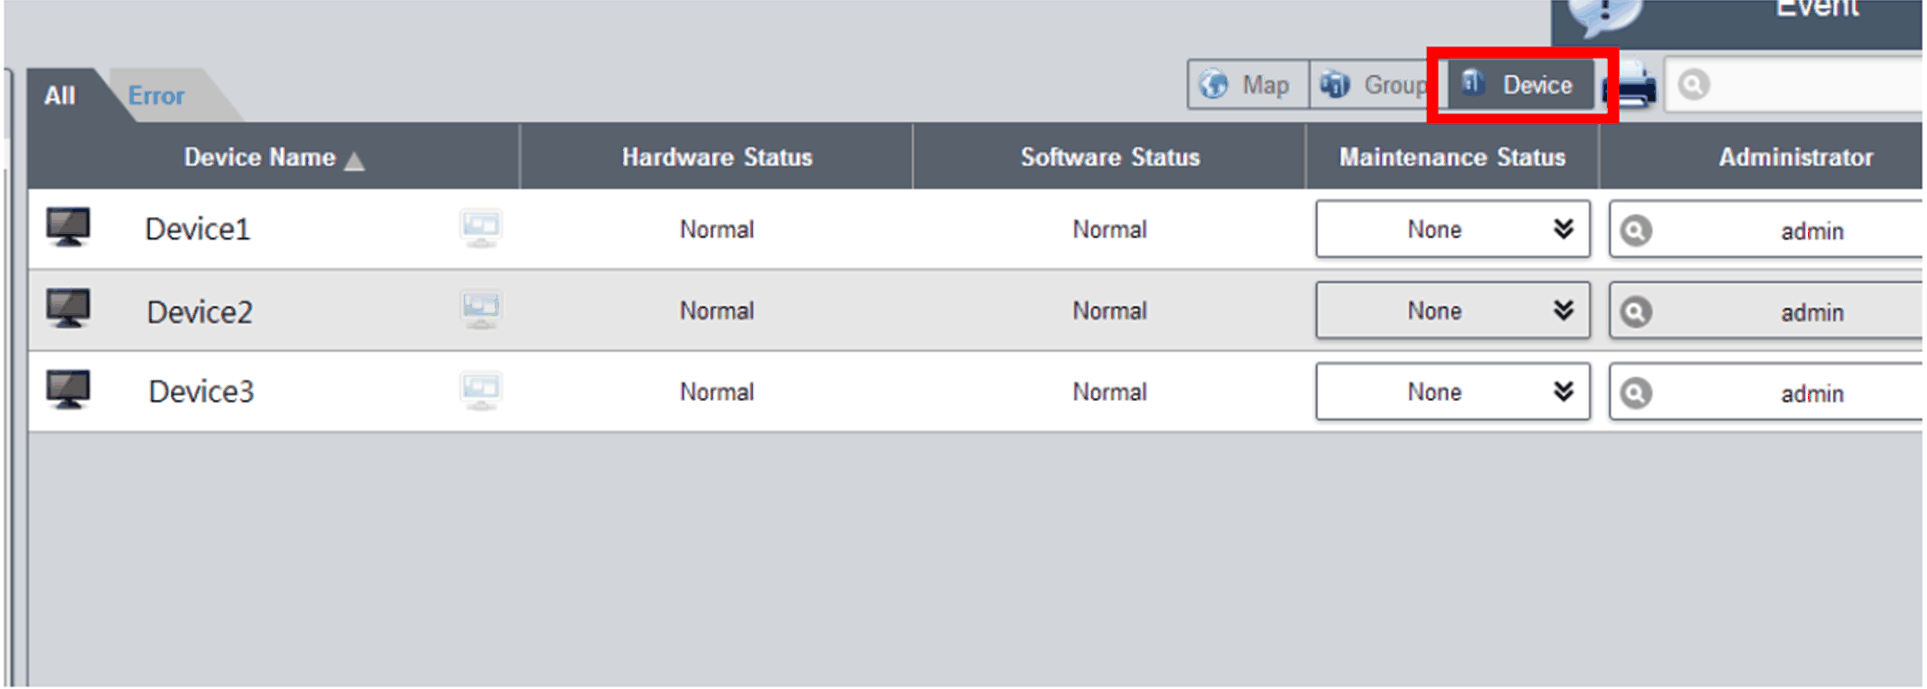
|
|
3 |
Add/Delete/Edit device server Add device server: Select on one of server nodes and click Add to the pop-up menu option: 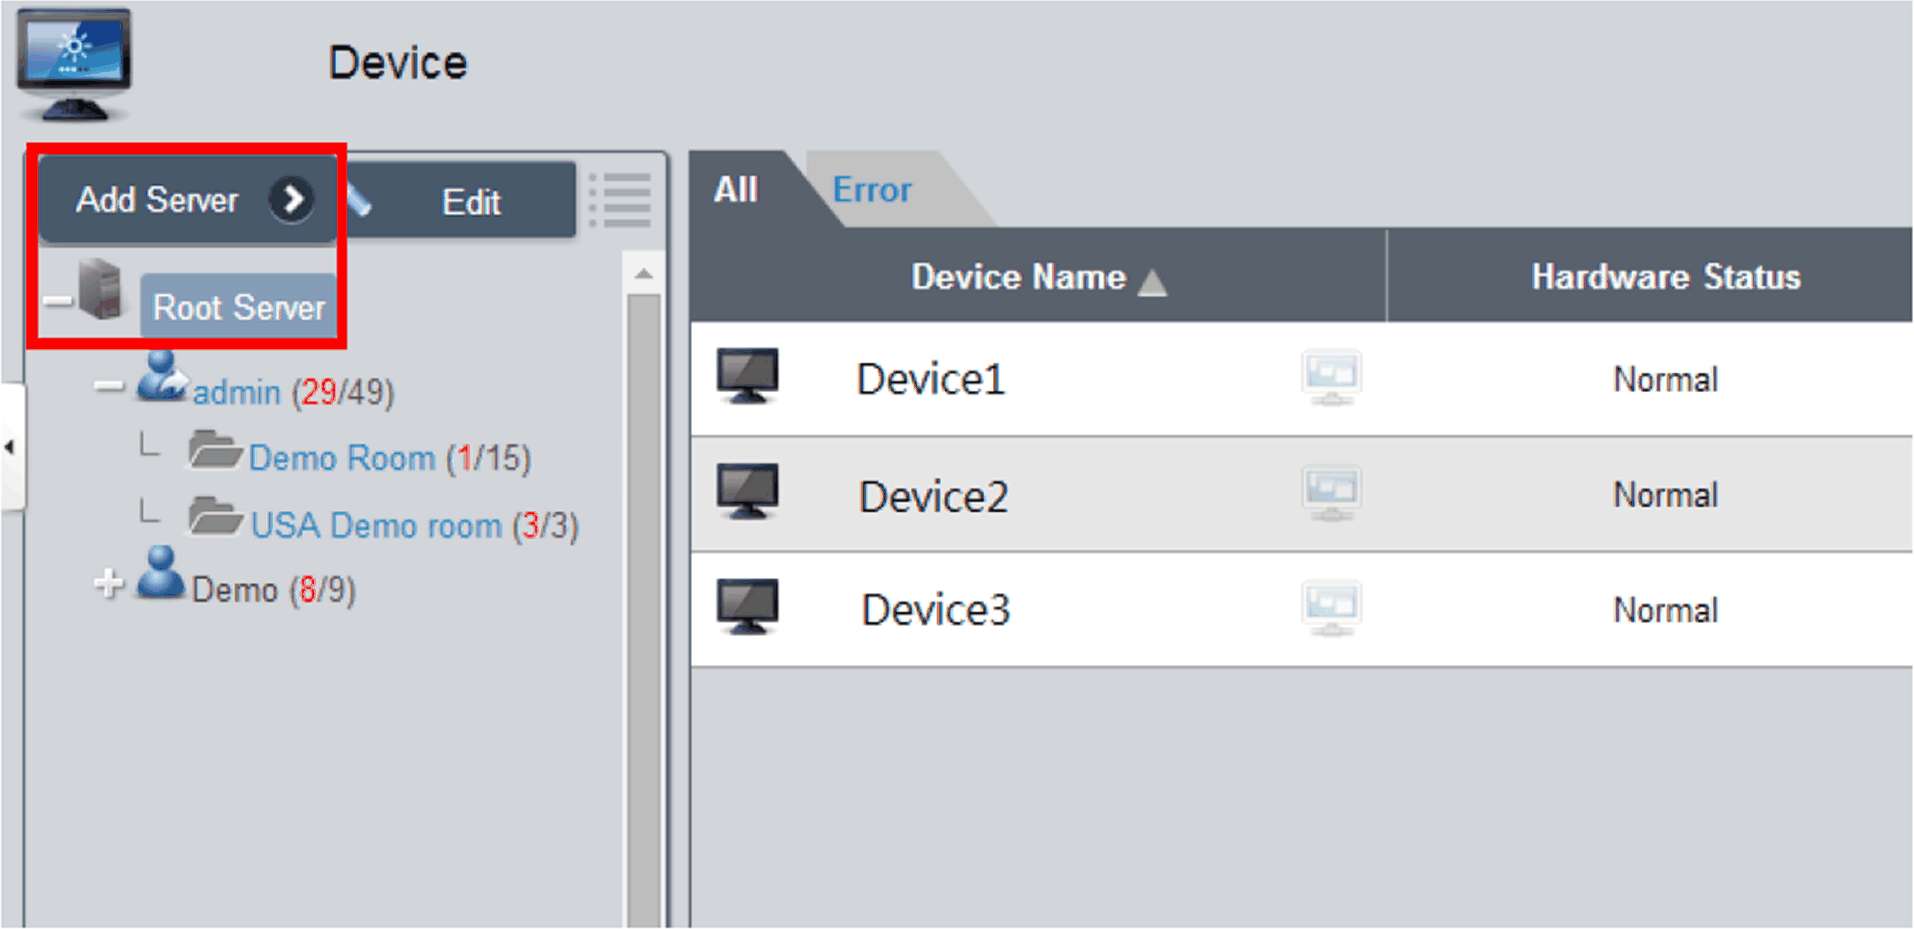
Click Add Server to pop up the Device Server dialog for new subserver registering. Delete device server: Click Edit to switch to edit mode and click the icon X to delete this server node. Edit device server: Click Edit to switch to edit mode and select one of the server nodes. You can remove and edit this server node. |
|
4 |
Add/Delete/Edit device group Add device group: Select one user account and click Add to the pop-up menu option. Click Add Group to pop up Device Group dialog for new group addition: 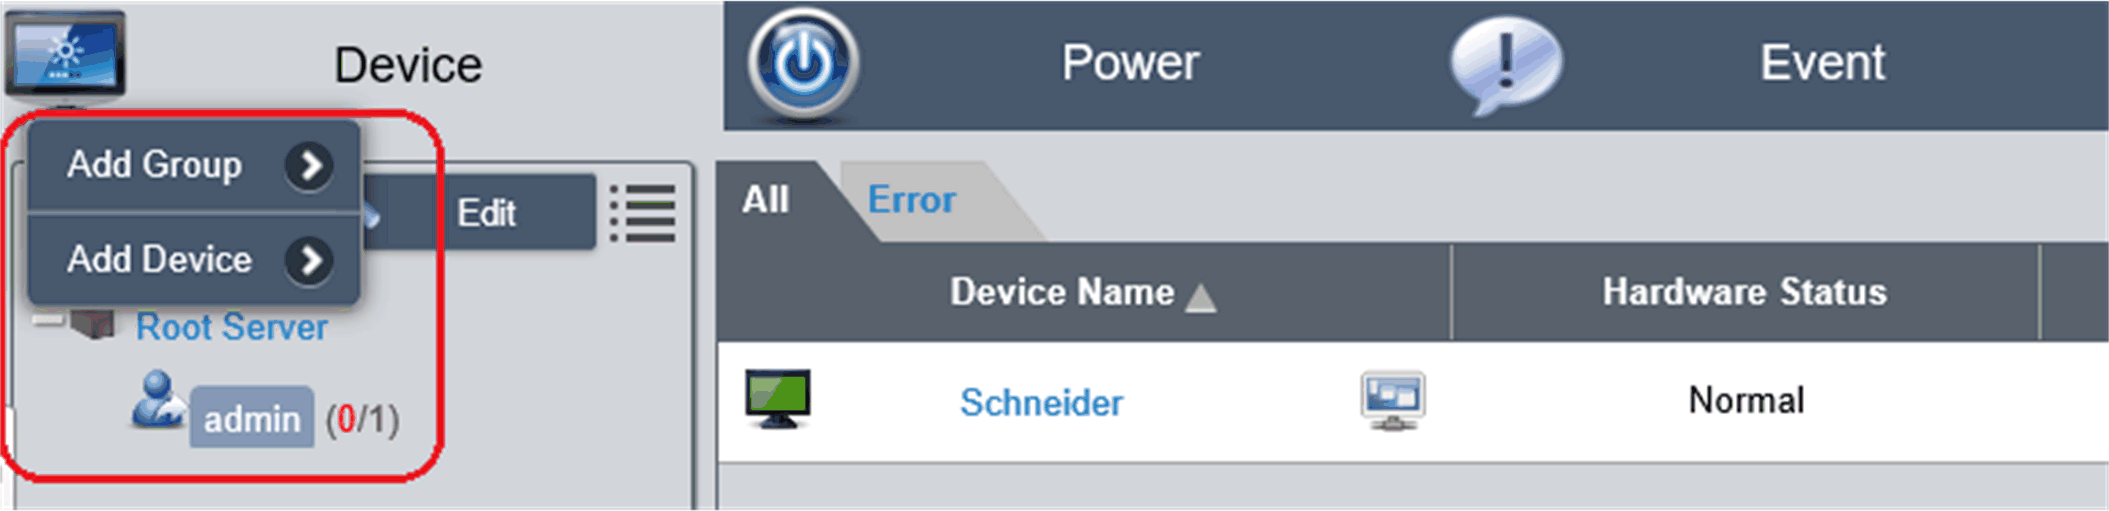
|
|
5 |
Delete /Edit device group Delete /Edit device group: Click Edit to switch to edit mode and select one of the group nodes. You can remove and edit this group node: 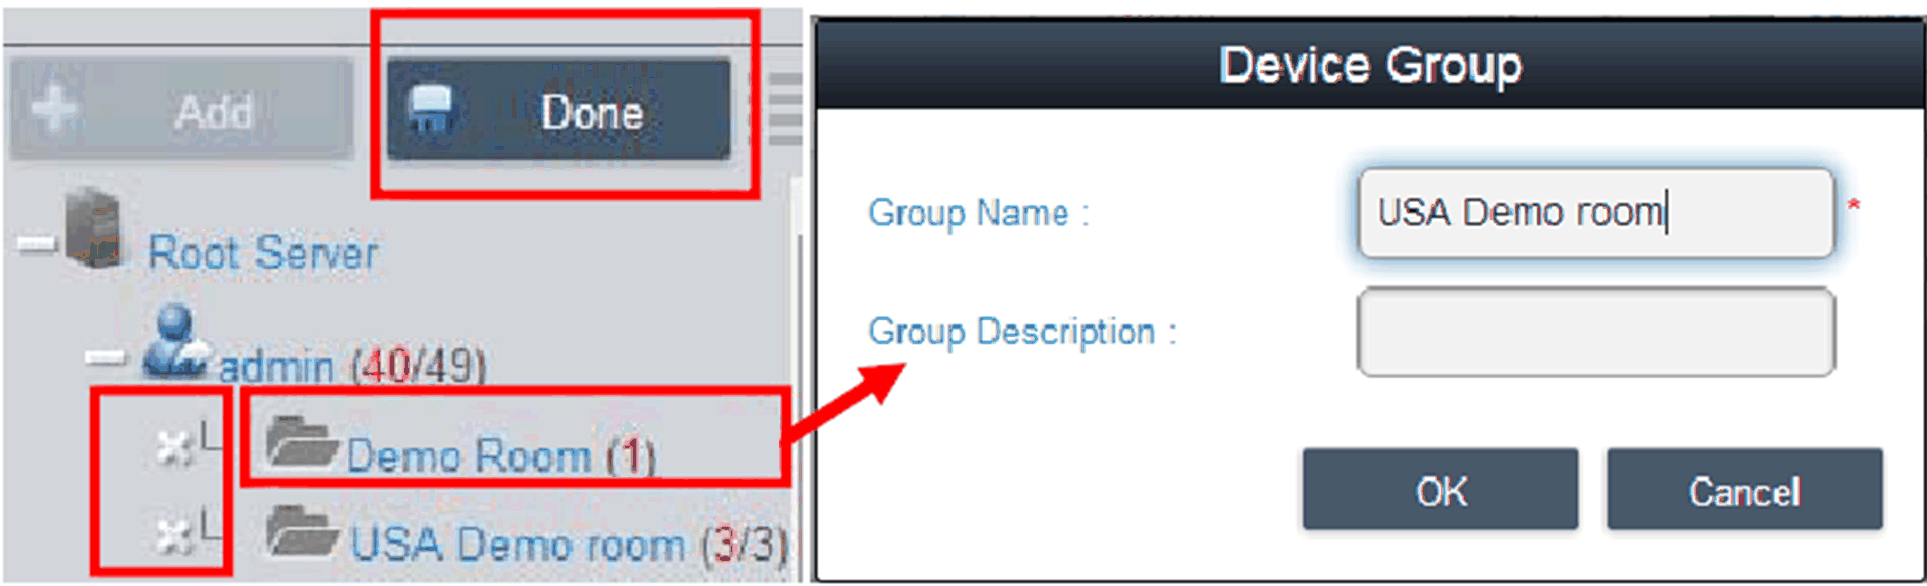
|
|
6 |
Add/Delete/Edit device Add device: Select one of the user accounts or groups and click Add to the pop-up menu option. Click Add Device to the pop-up dialog for new device addition: 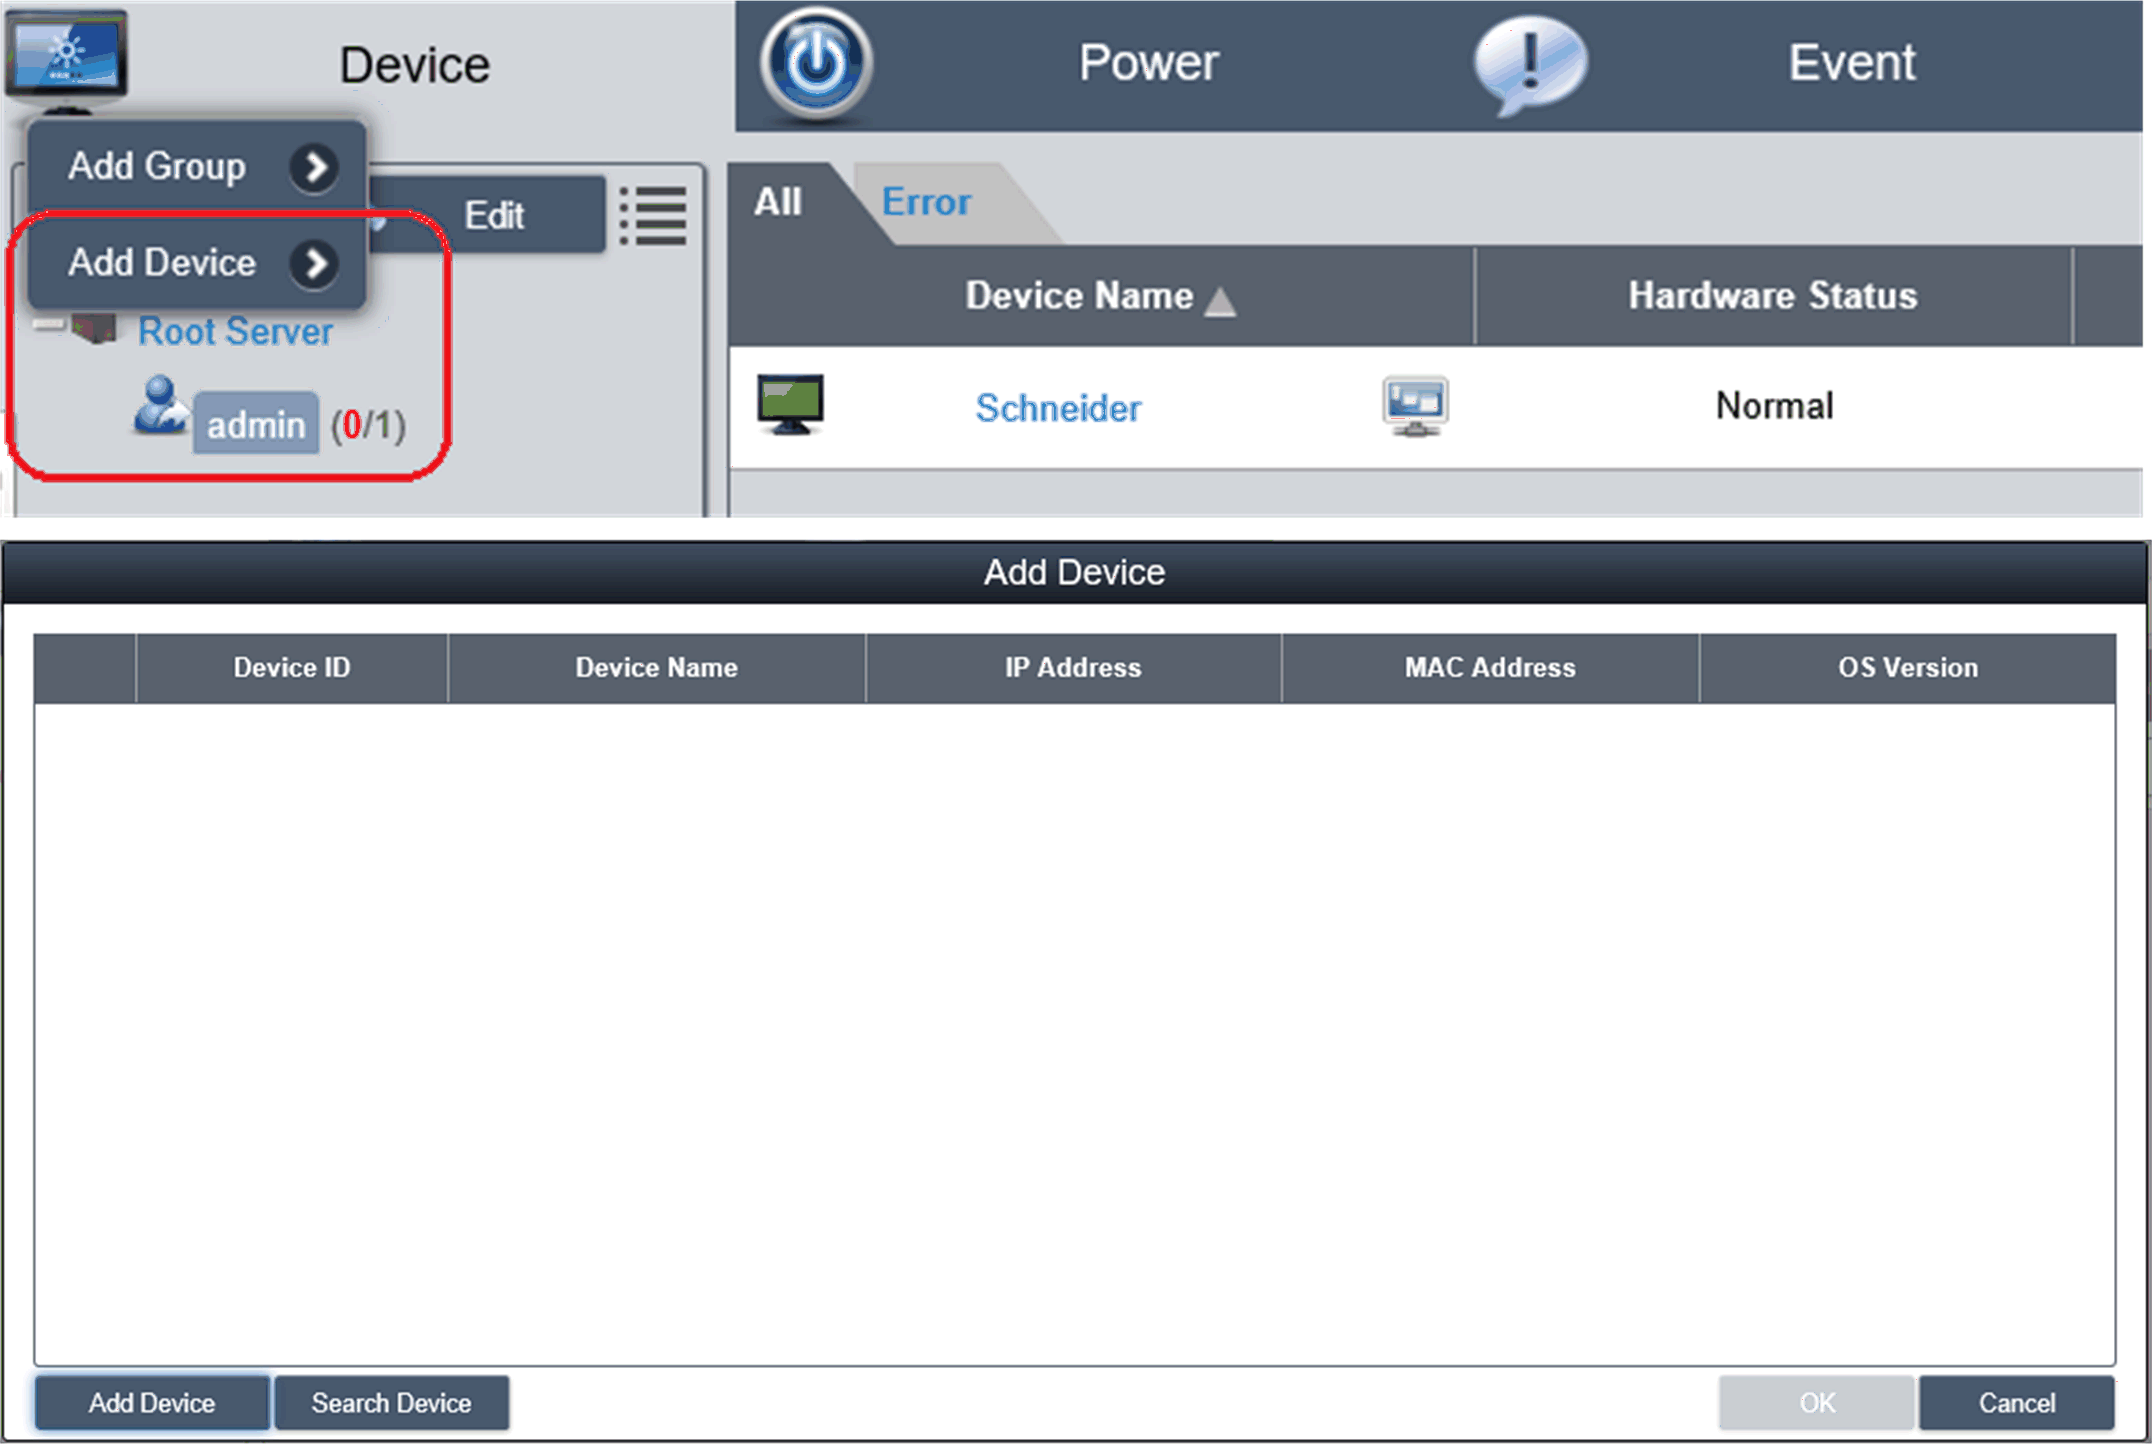
|
|
7 |
Manual add Click Add Device to pop up the Add Device dialog to add a device manually. You can input known device ID or MAC addresses that have already registered to the server and assign a current account or group. If the device does not exist, you can also add a device directly: 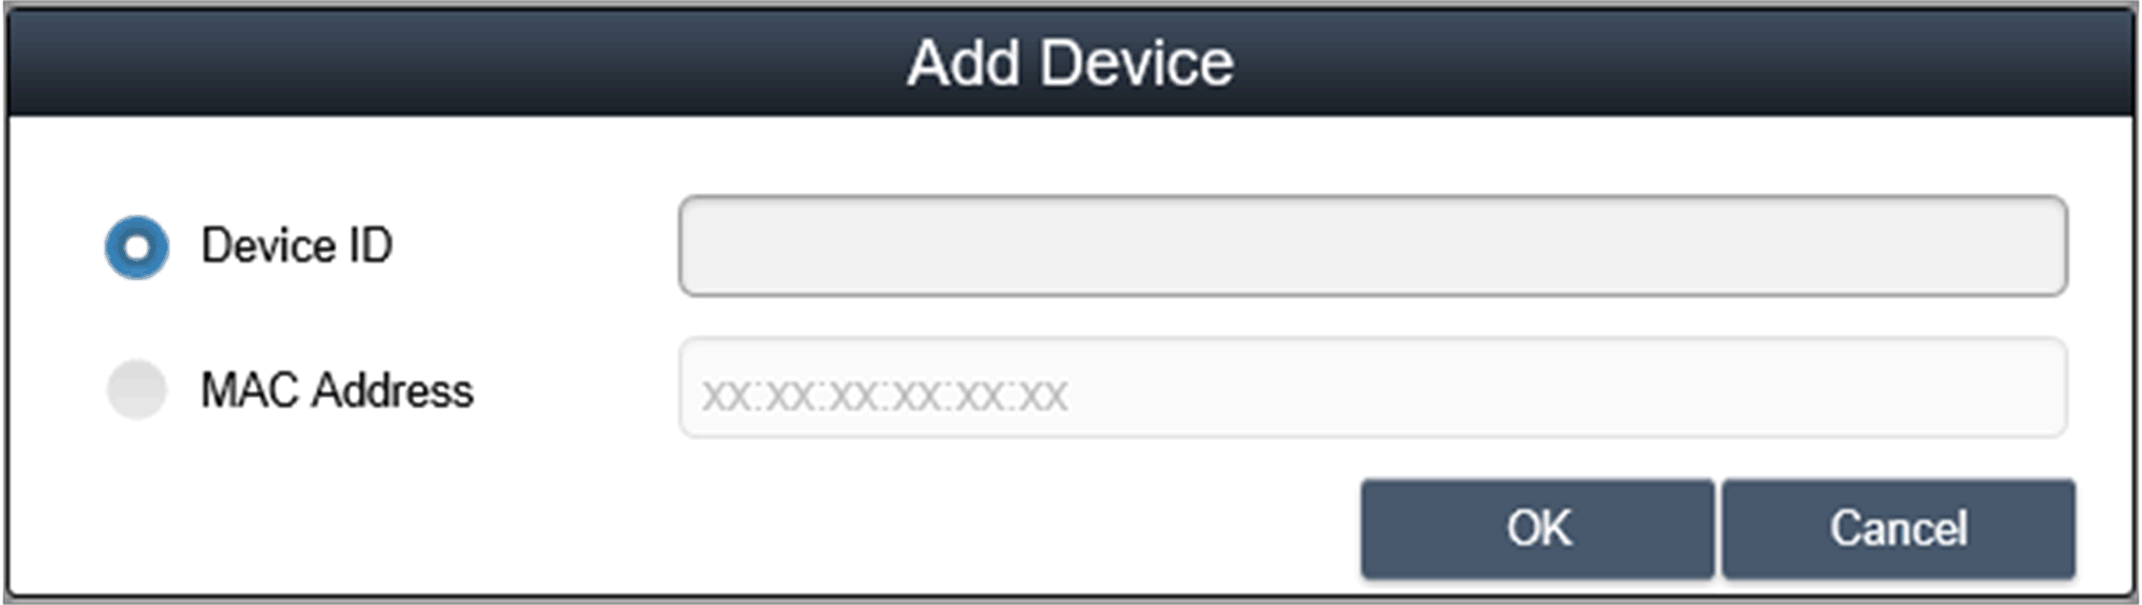
|
|
8 |
Search device Click Search Device to pop up the Device dialog for advanced device smart search. The system auto-discovers both connected and unassigned devices located at the same local area network as the client user: 
|
|
9 |
Delete device Click Edit to switch to edit mode. You can remove and edit devices on the device list in this mode. Click the X icon for the selected device row and confirm the device warning removal: 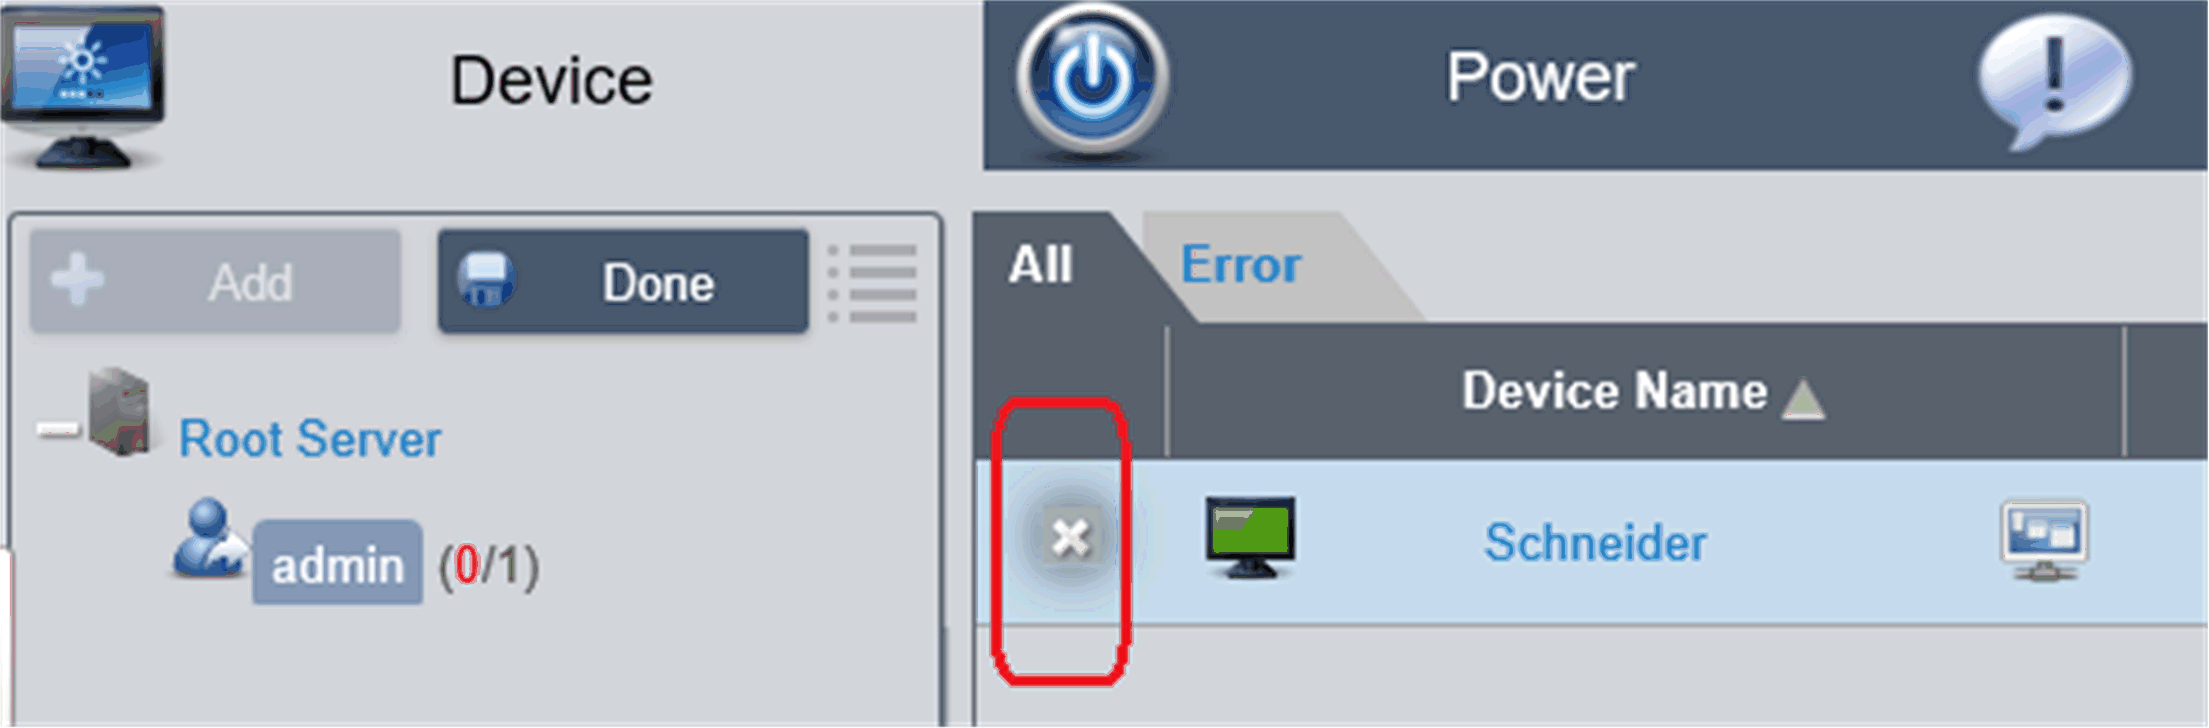
|
|
10 |
Edit device Click Edit to switch to edit mode. You can remove and edit devices of the device list in this mode. Click selected device name to pop up the Device dialog for editing: 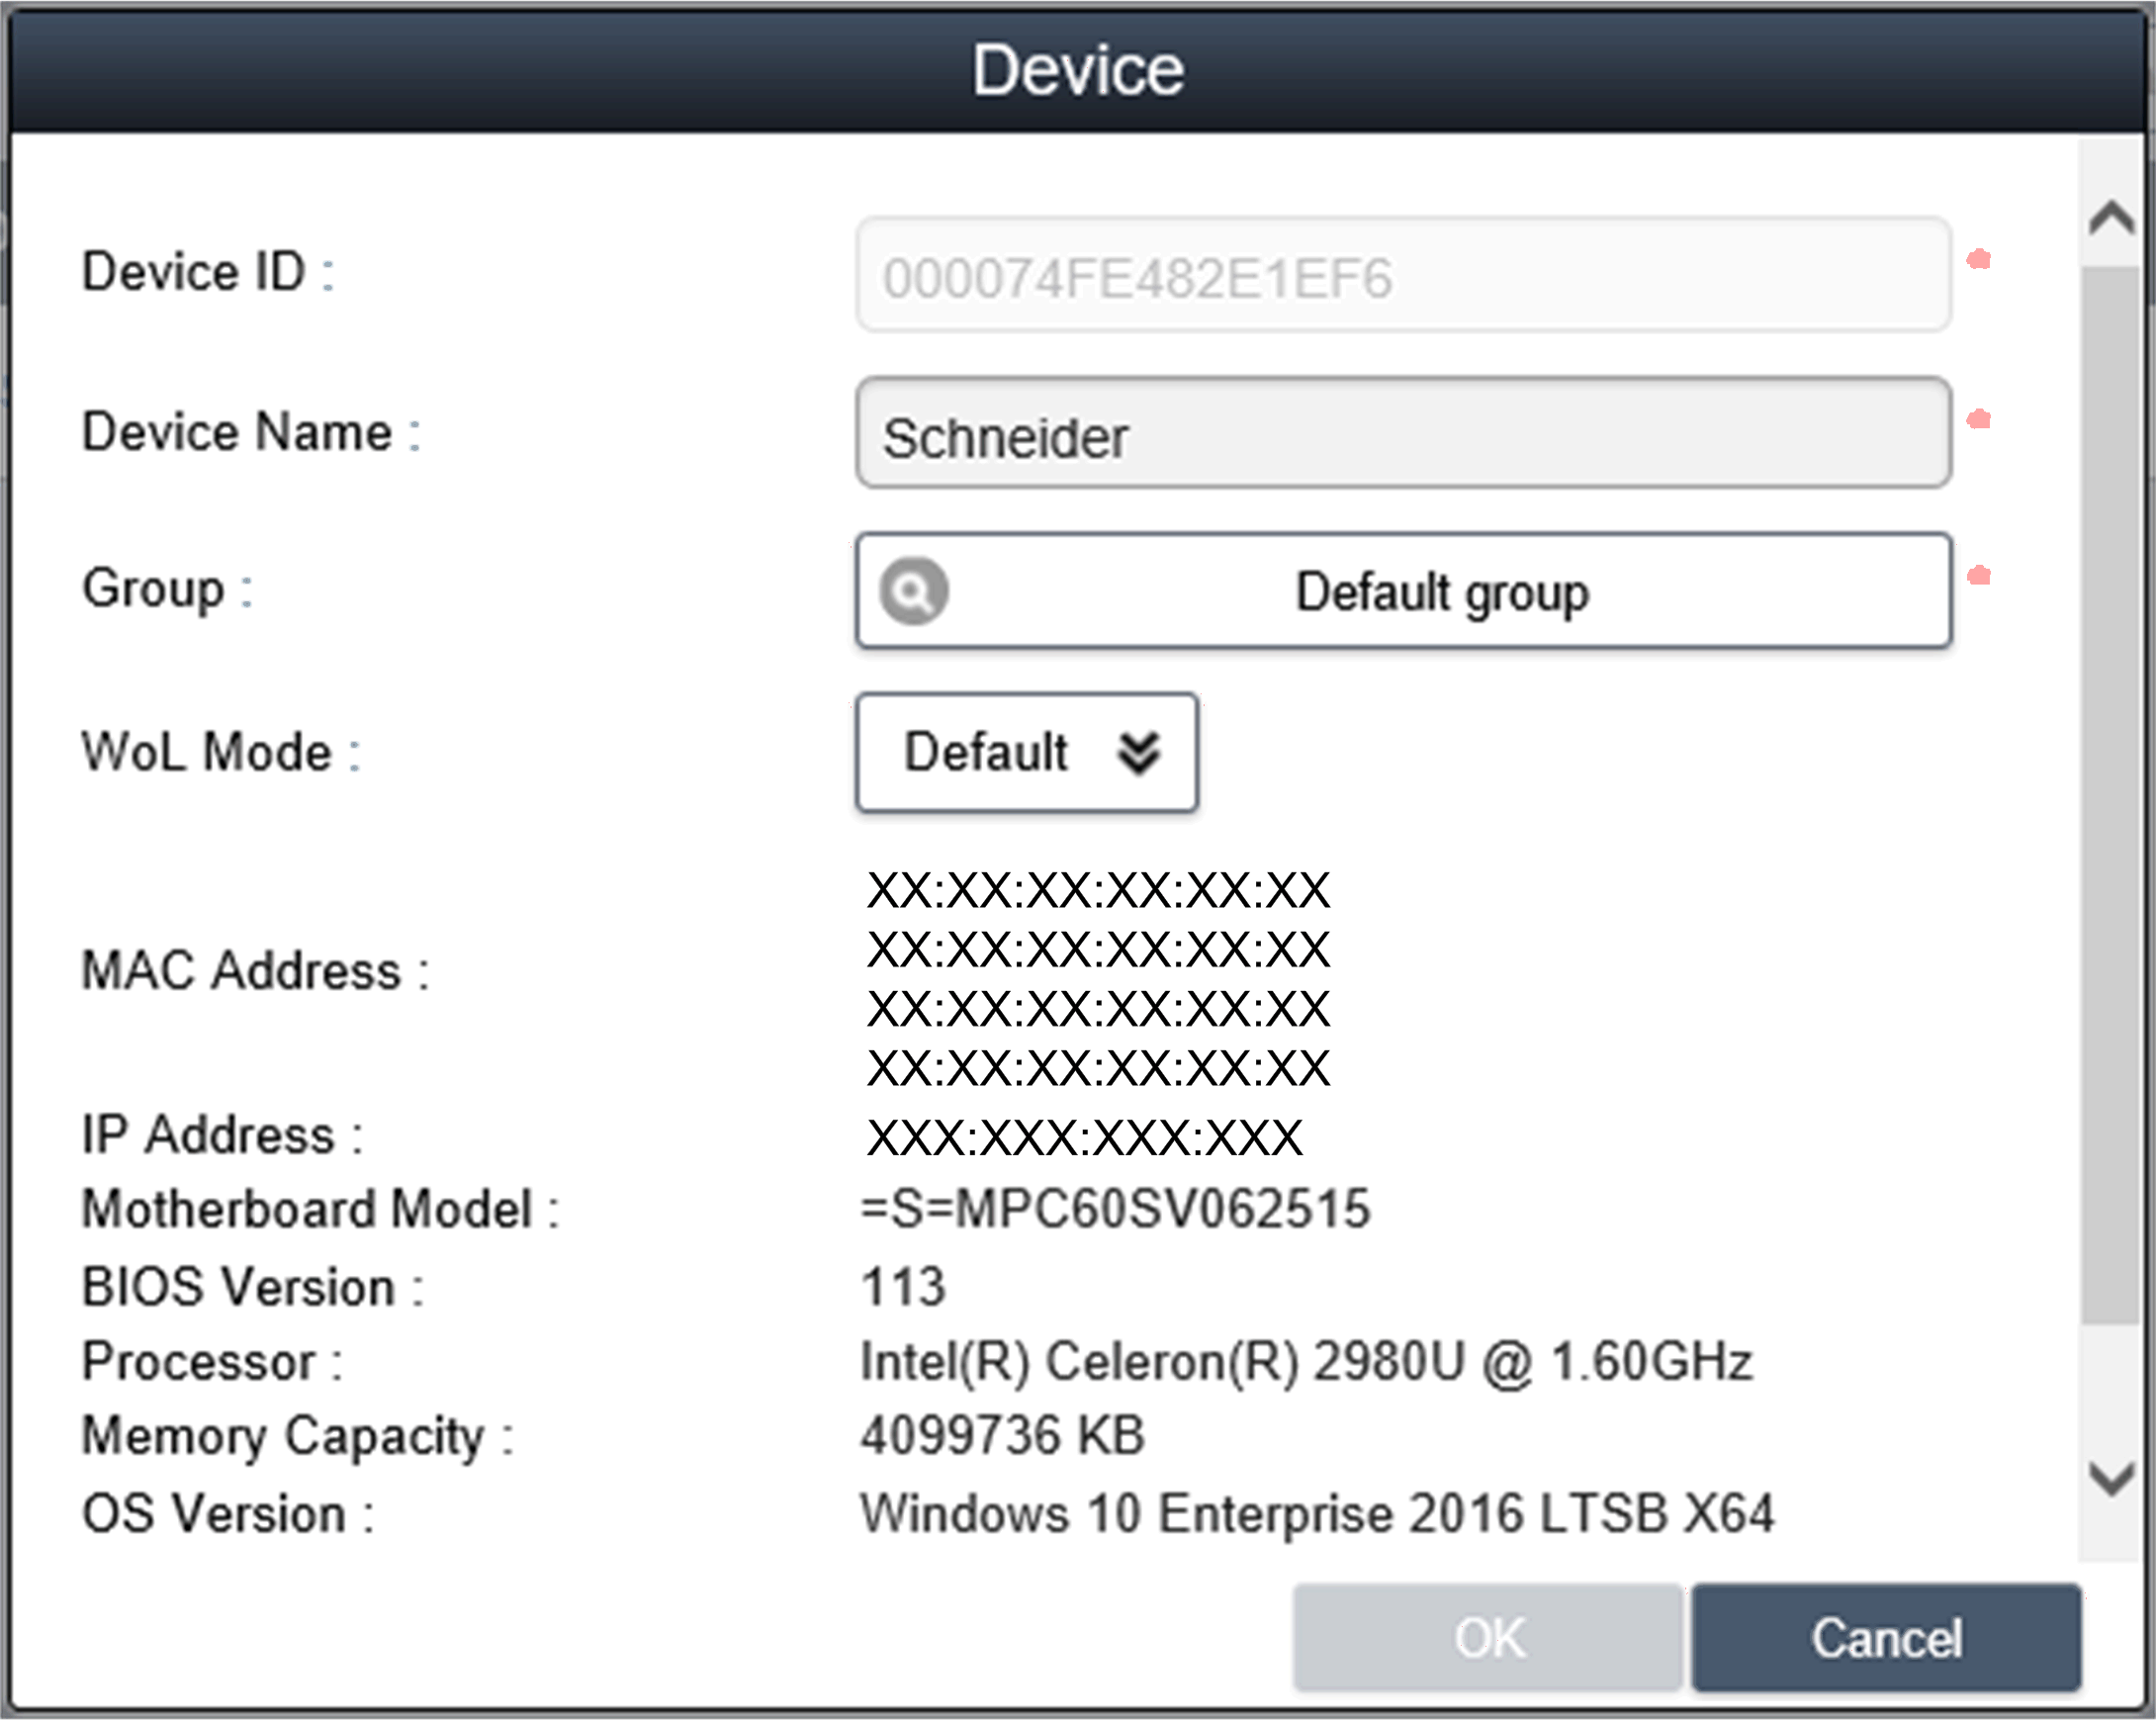
|
|
Step |
Description |
|---|---|
|
1 |
Remote control – KVM viewer When a device has been connected, the remote control icon shows on the right side of the device name. Click the icon for advanced controls including KVM (Keyboard Video Mouse) viewer, terminal, and screen shot: 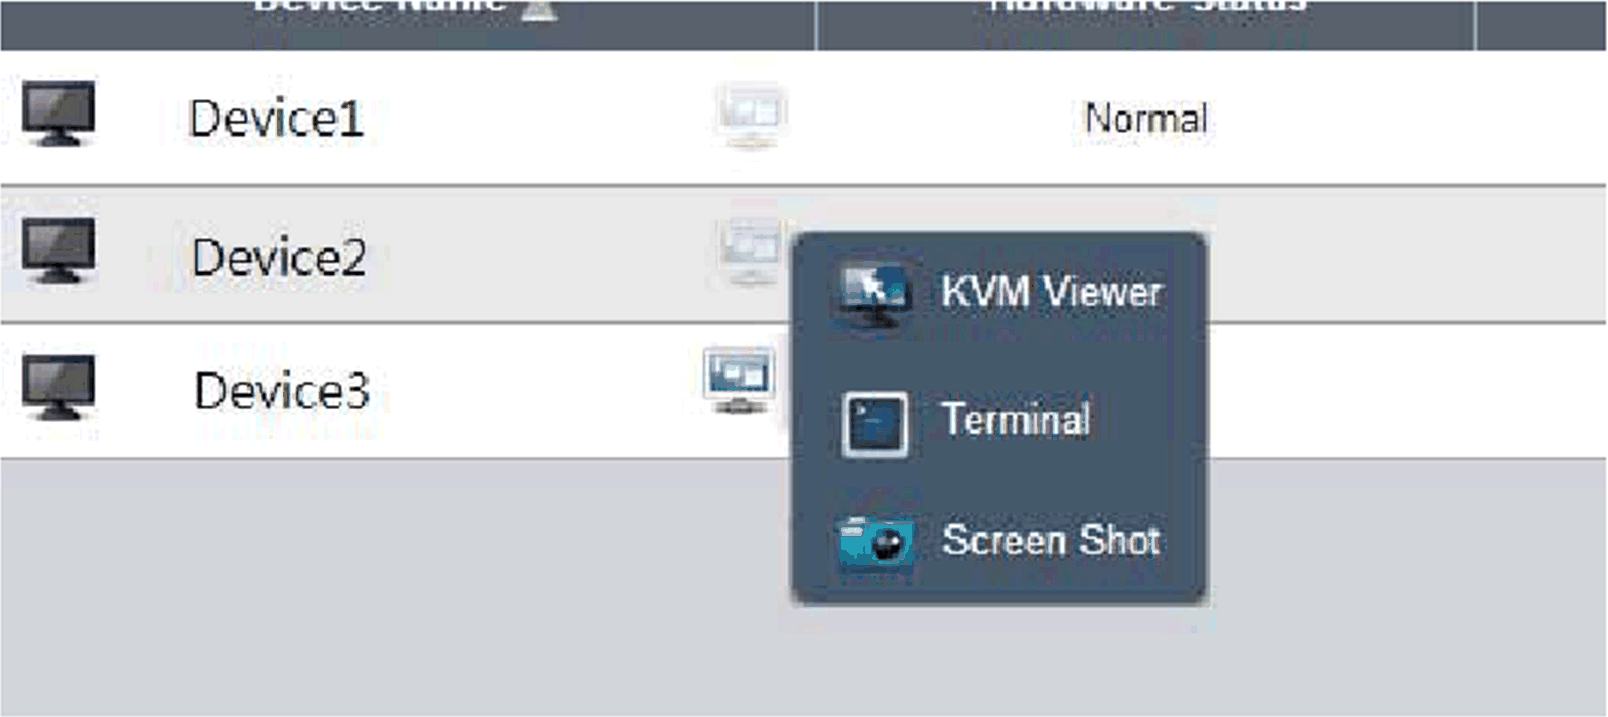
|
|
2 |
KVM viewer Click the icon from the remote control menu to connect to the device for KVM control: 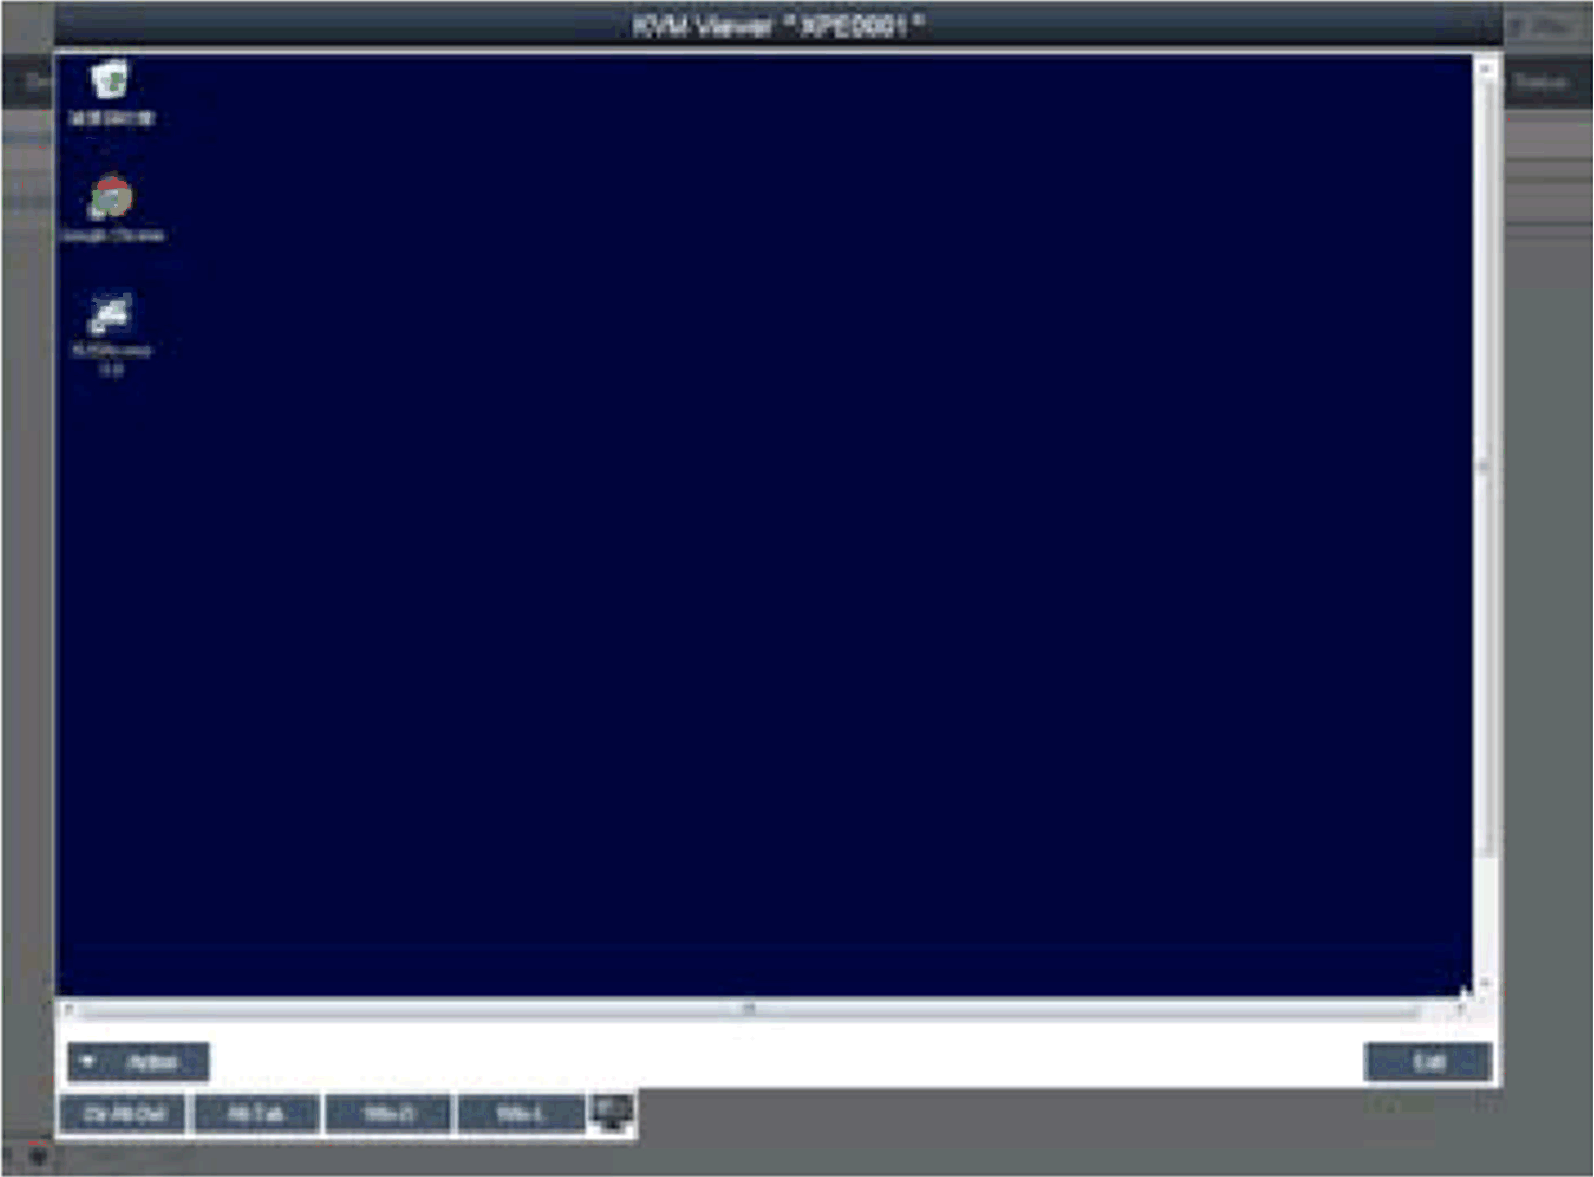
NOTE: you can select KVM connection method on the device agent side. System default is System Monitoring KVM (Ultra VNC), you can select other already-installed VNC, or disable this function for security concerns. |
|
Step |
Description |
|---|---|
|
1 |
Remote control – Terminal Click the icon from the remote control menu to connect to the device for terminal command-line control: 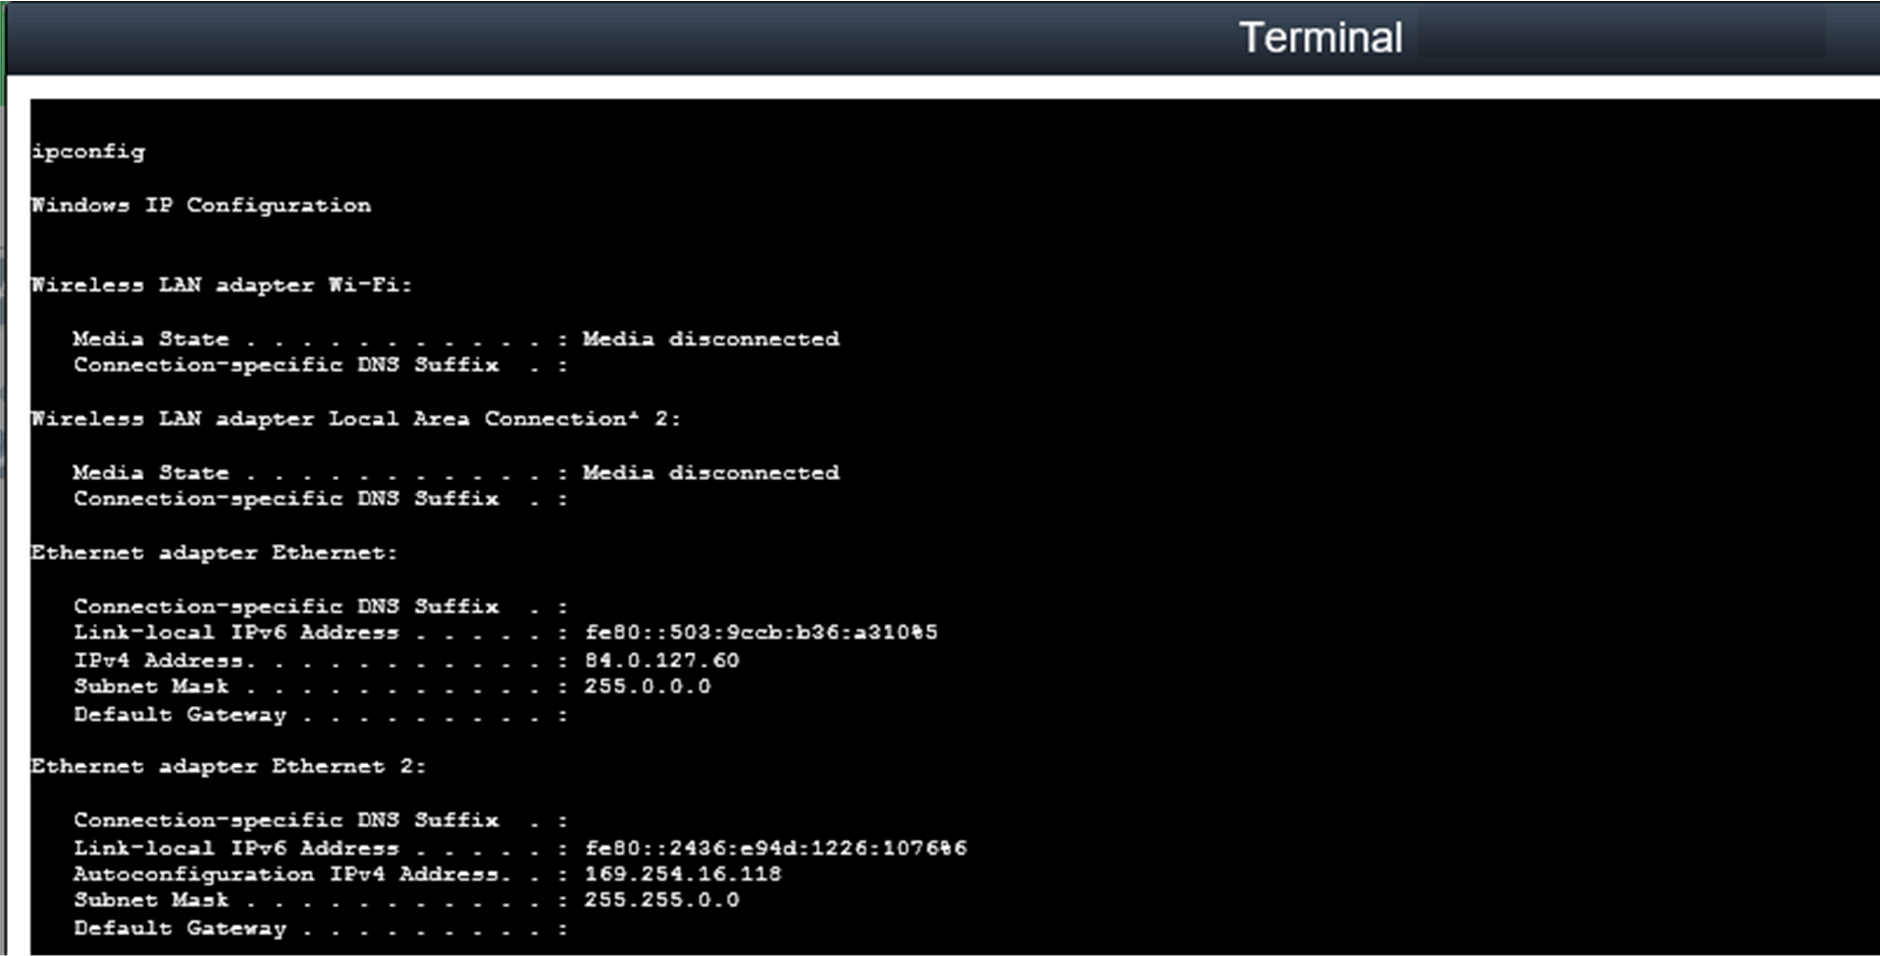
|
|
2 |
Remote control – Screen shot Click the icon from the remote control menu to snapshot the desktop screen of the remote device and save it on the local client side: 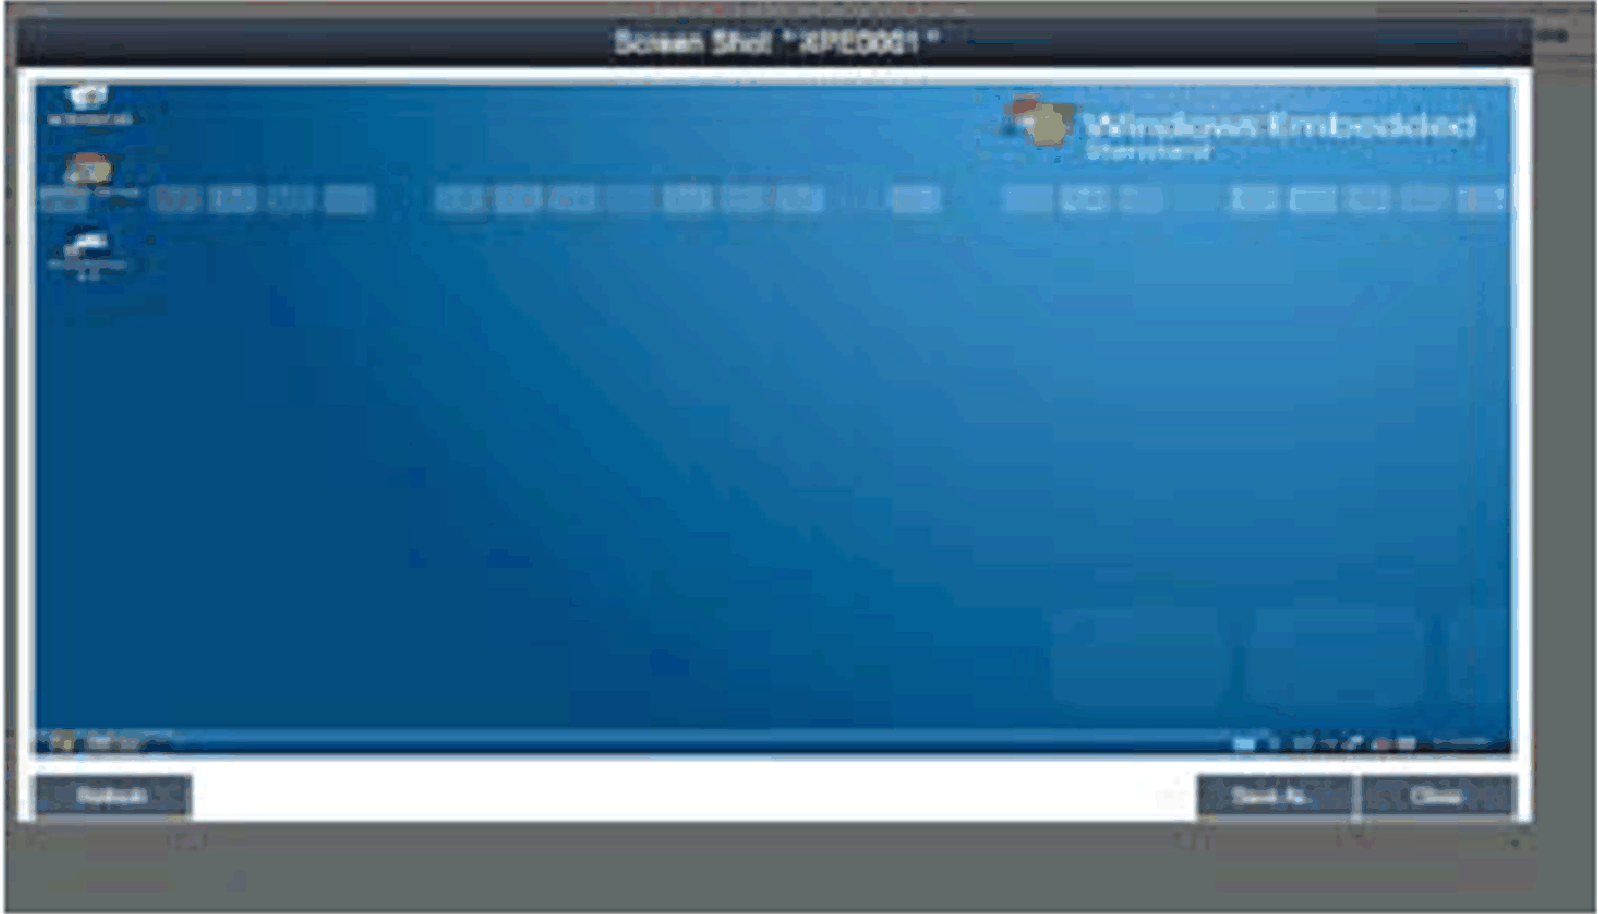
|
|
3 |
Hardware monitoring status Real-time monitoring chart: Click the field Hardware Status of the device list item to display graphically hardware real-time parameters (memory, CPU usage, temperature, and HDD health status). Click the parameter name to disable/enable displaying of the parameter curve: 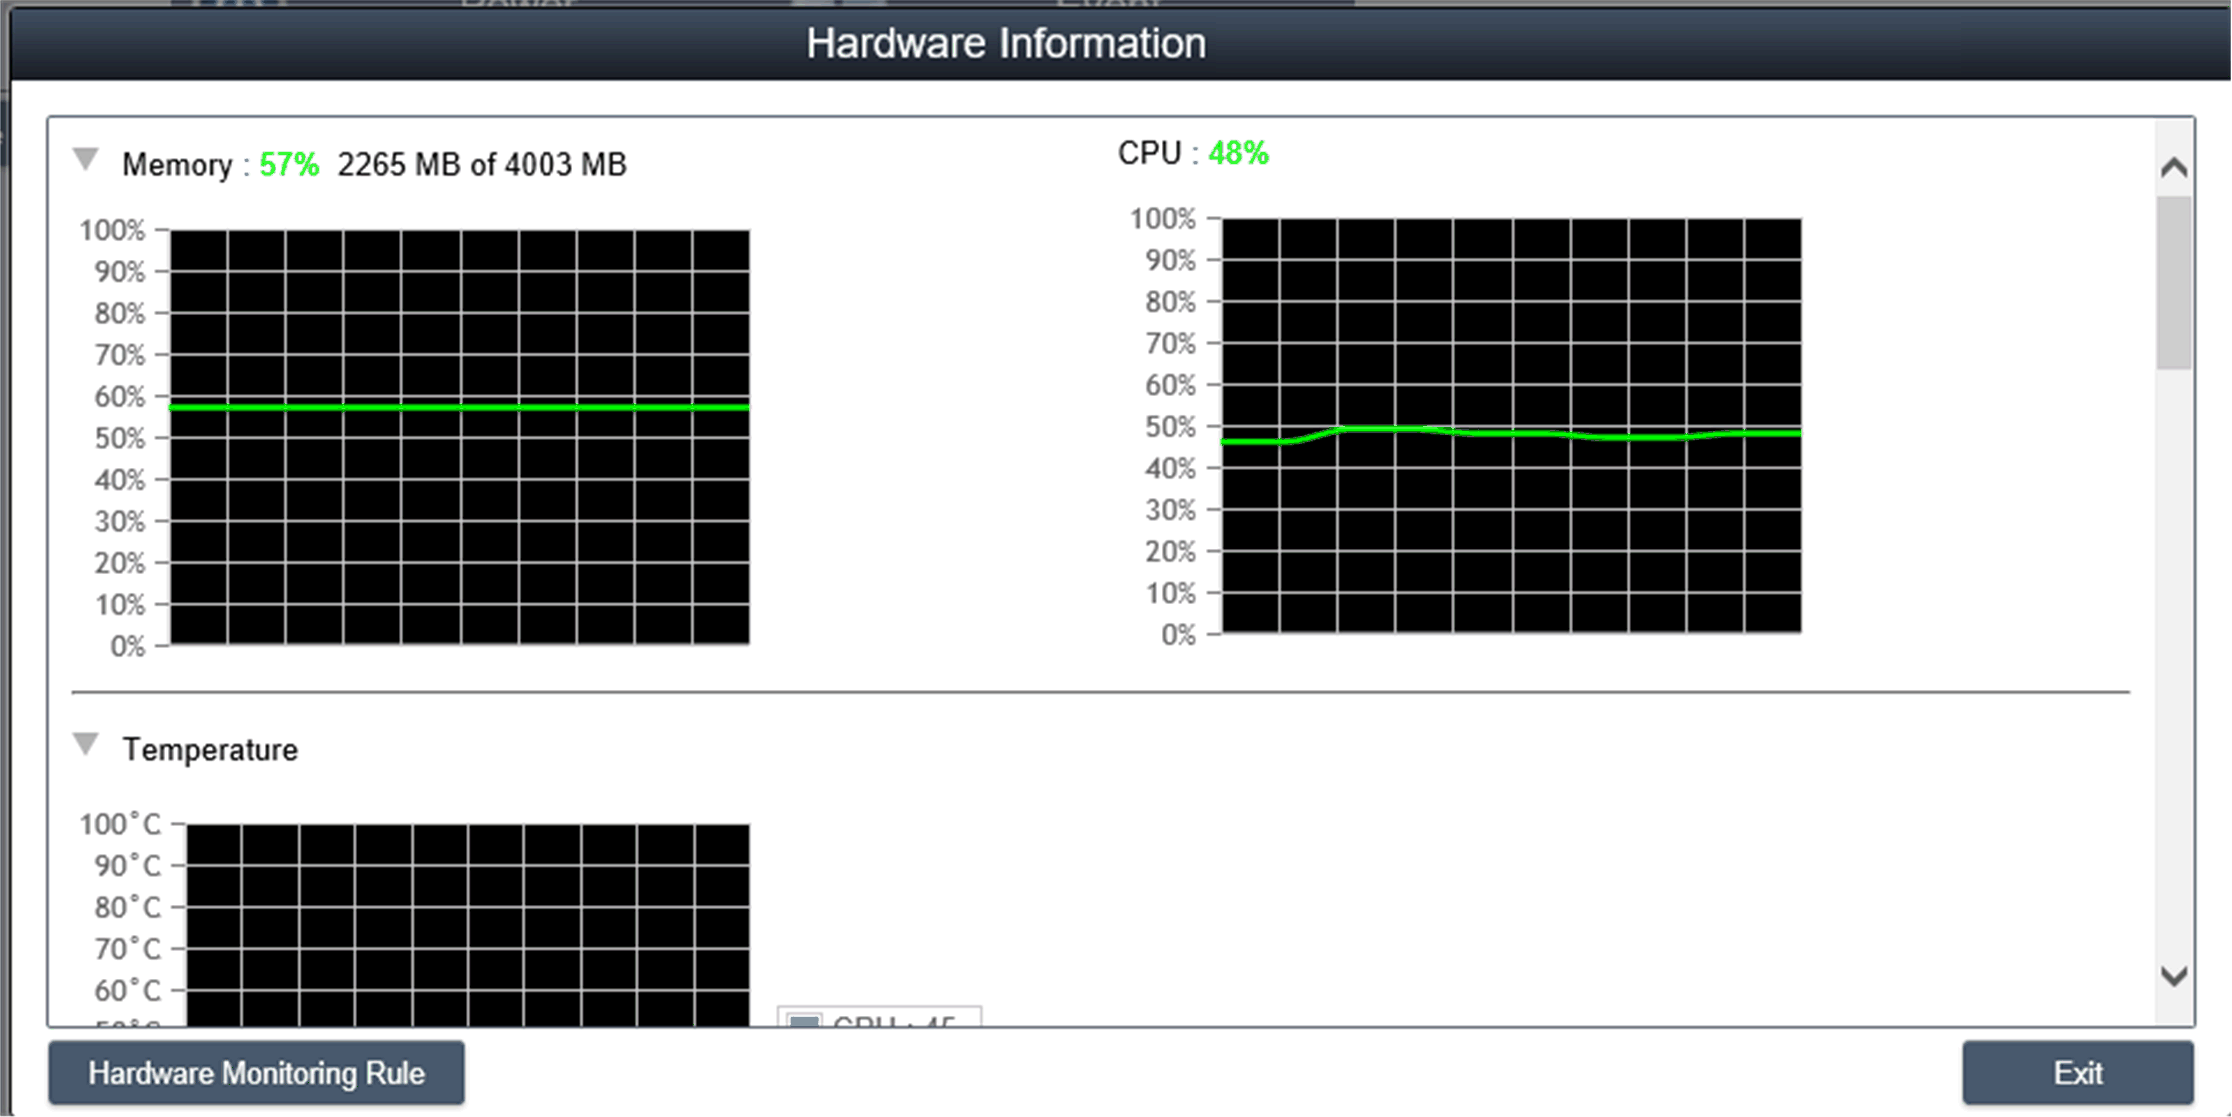
|
|
4 |
Hardware monitoring fan status If the fan kit is not installed or the fan rpm is 0 a message will notify: fan kit not installed or defective. To get notification about status of the system fan you need to set the appropriate rules, see step Hardware monitoring rules:
|
|
5 |
Hardware monitoring UPS health status If the UPS kit is t installed a message will notify the health status of the battery: fHealth status of the battery : Battery OK : Green color. To get notification about status of the system fan you need to set the appropriate rules, see next step: 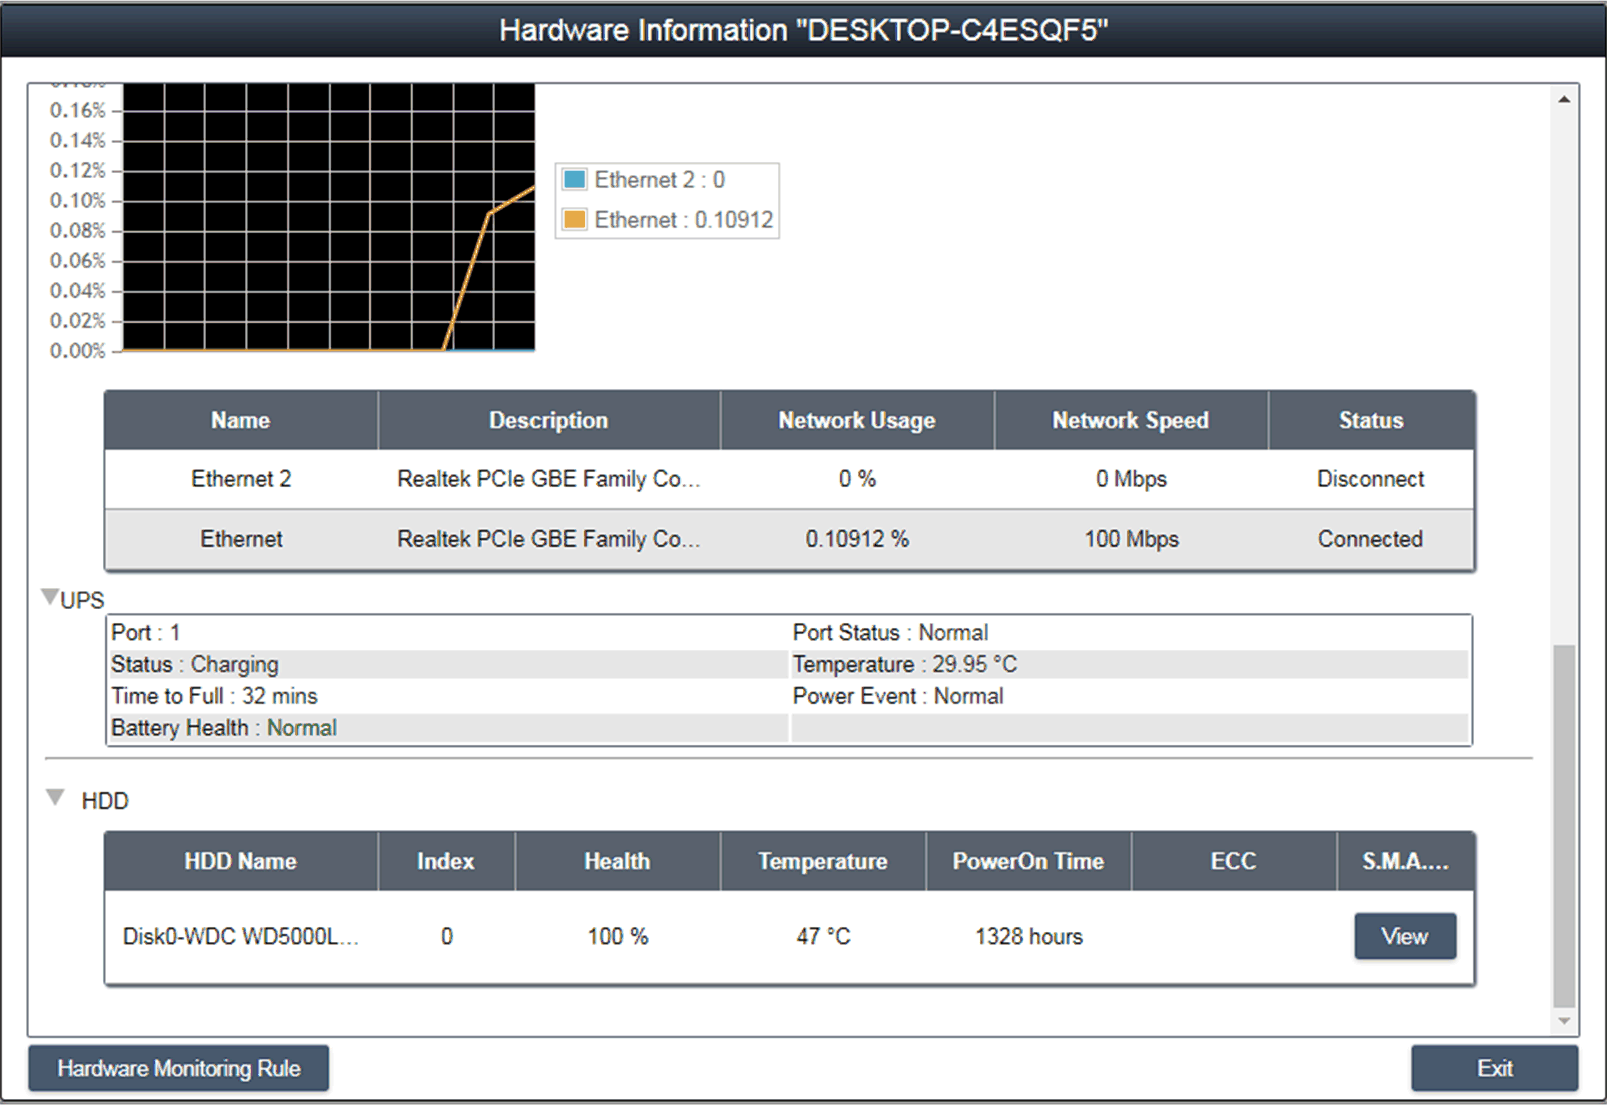
|
|
6 |
Hardware monitoring rules Click the button Hardware Monitoring Rule to pop up the hardware monitoring dialog. The dialog lists current monitoring rules for hardware parameters includes CPU, voltage, HDD, and so on: 
|
|
7 |
Add rules Click the button Add Rules button to add a new rule for hardware monitoring. You can select the type of monitoring hardware from the menu, input threshold values for the corresponding parameter, the last time in seconds for reaching that threshold and a notice interval for 2 contiguous events. Before clicking OK, you can check the option Enable Monitor Rule to enable/disable this new rule: 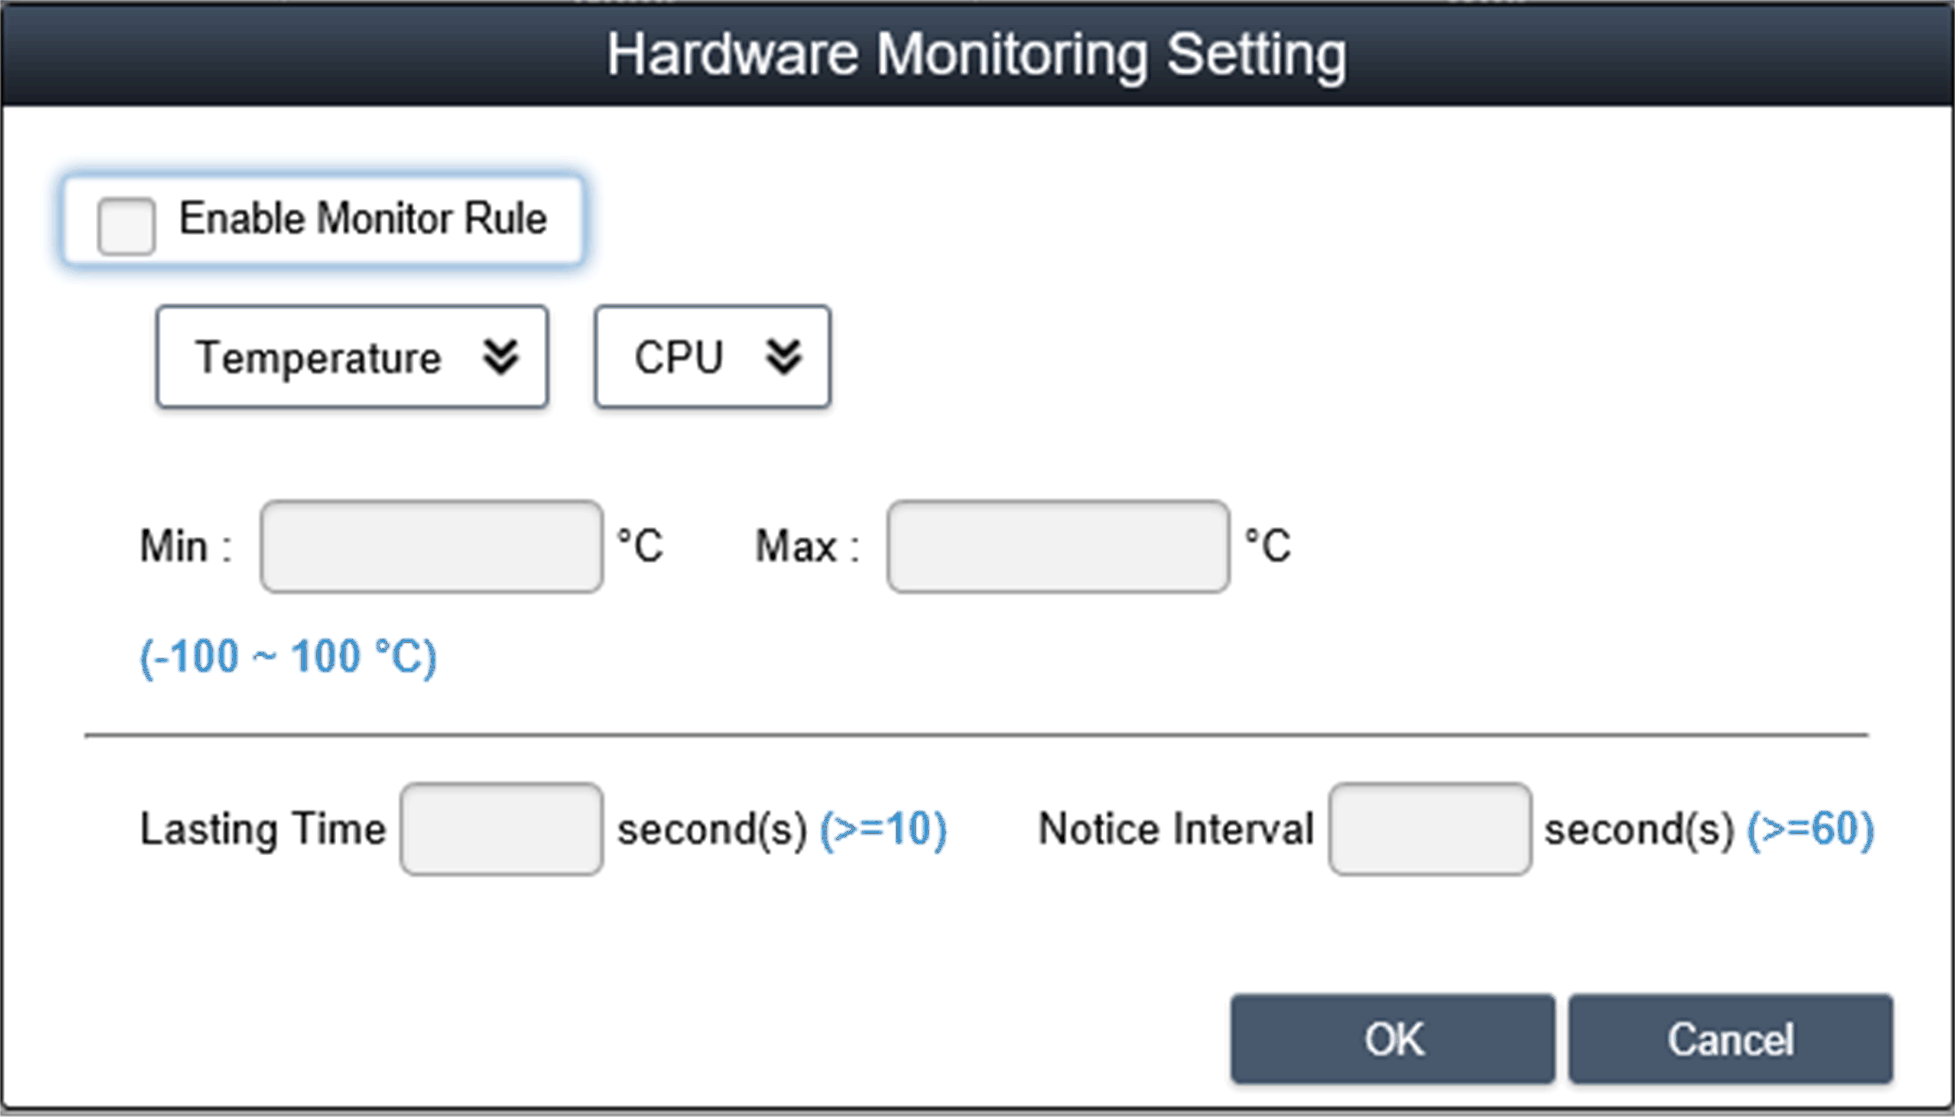
|
|
8 |
Edit rules Click a row in the Hardware Monitoring Rule box to pop up the Hardware Monitoring Setting dialog box: 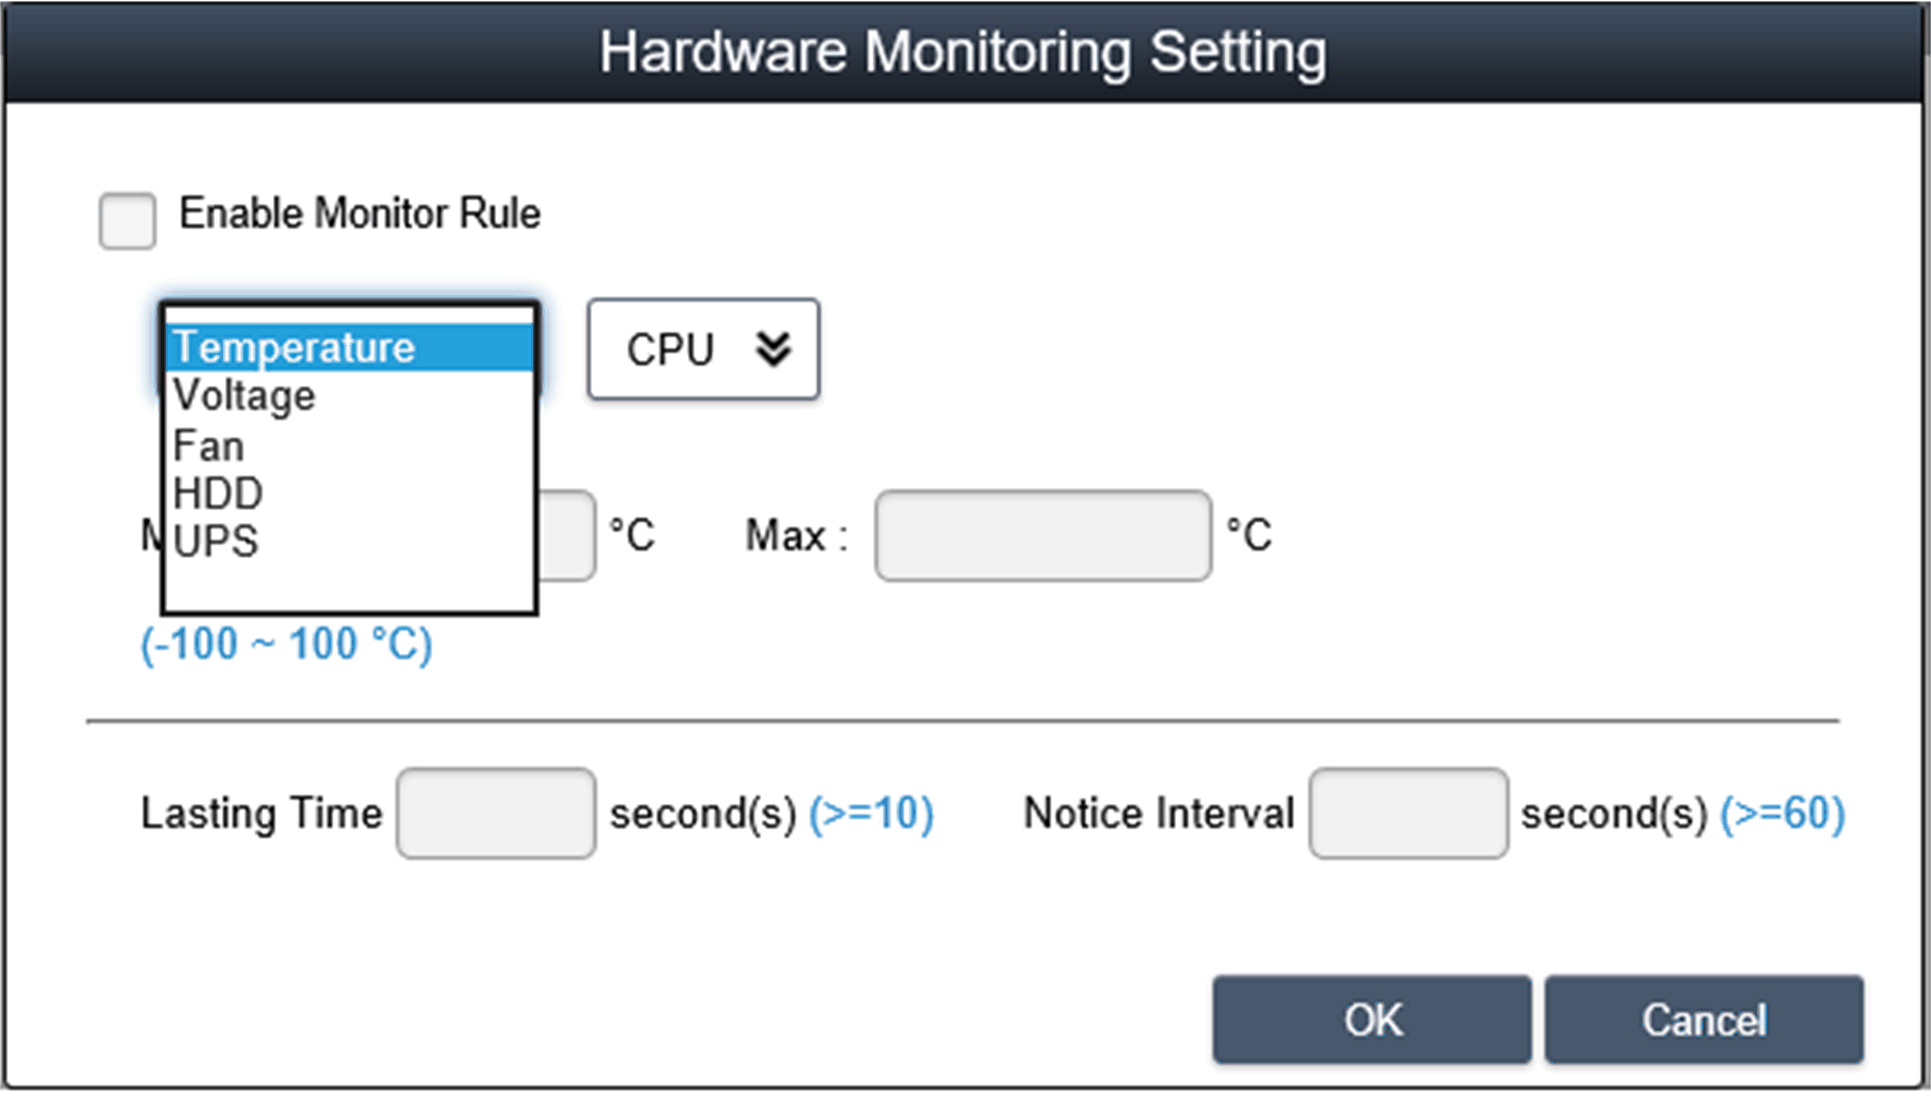
Delete rules: Click the X icon on the left side of the schedule item to delete the schedule. Enable/Disable schedule: Check the enable check box in the schedule row to enable/disable the schedule. |
|
9 |
Software monitoring status Real-time process list: Click the Software Status field in the device list to display the status list for active real-time software (name, status, CPU usage, and memory): 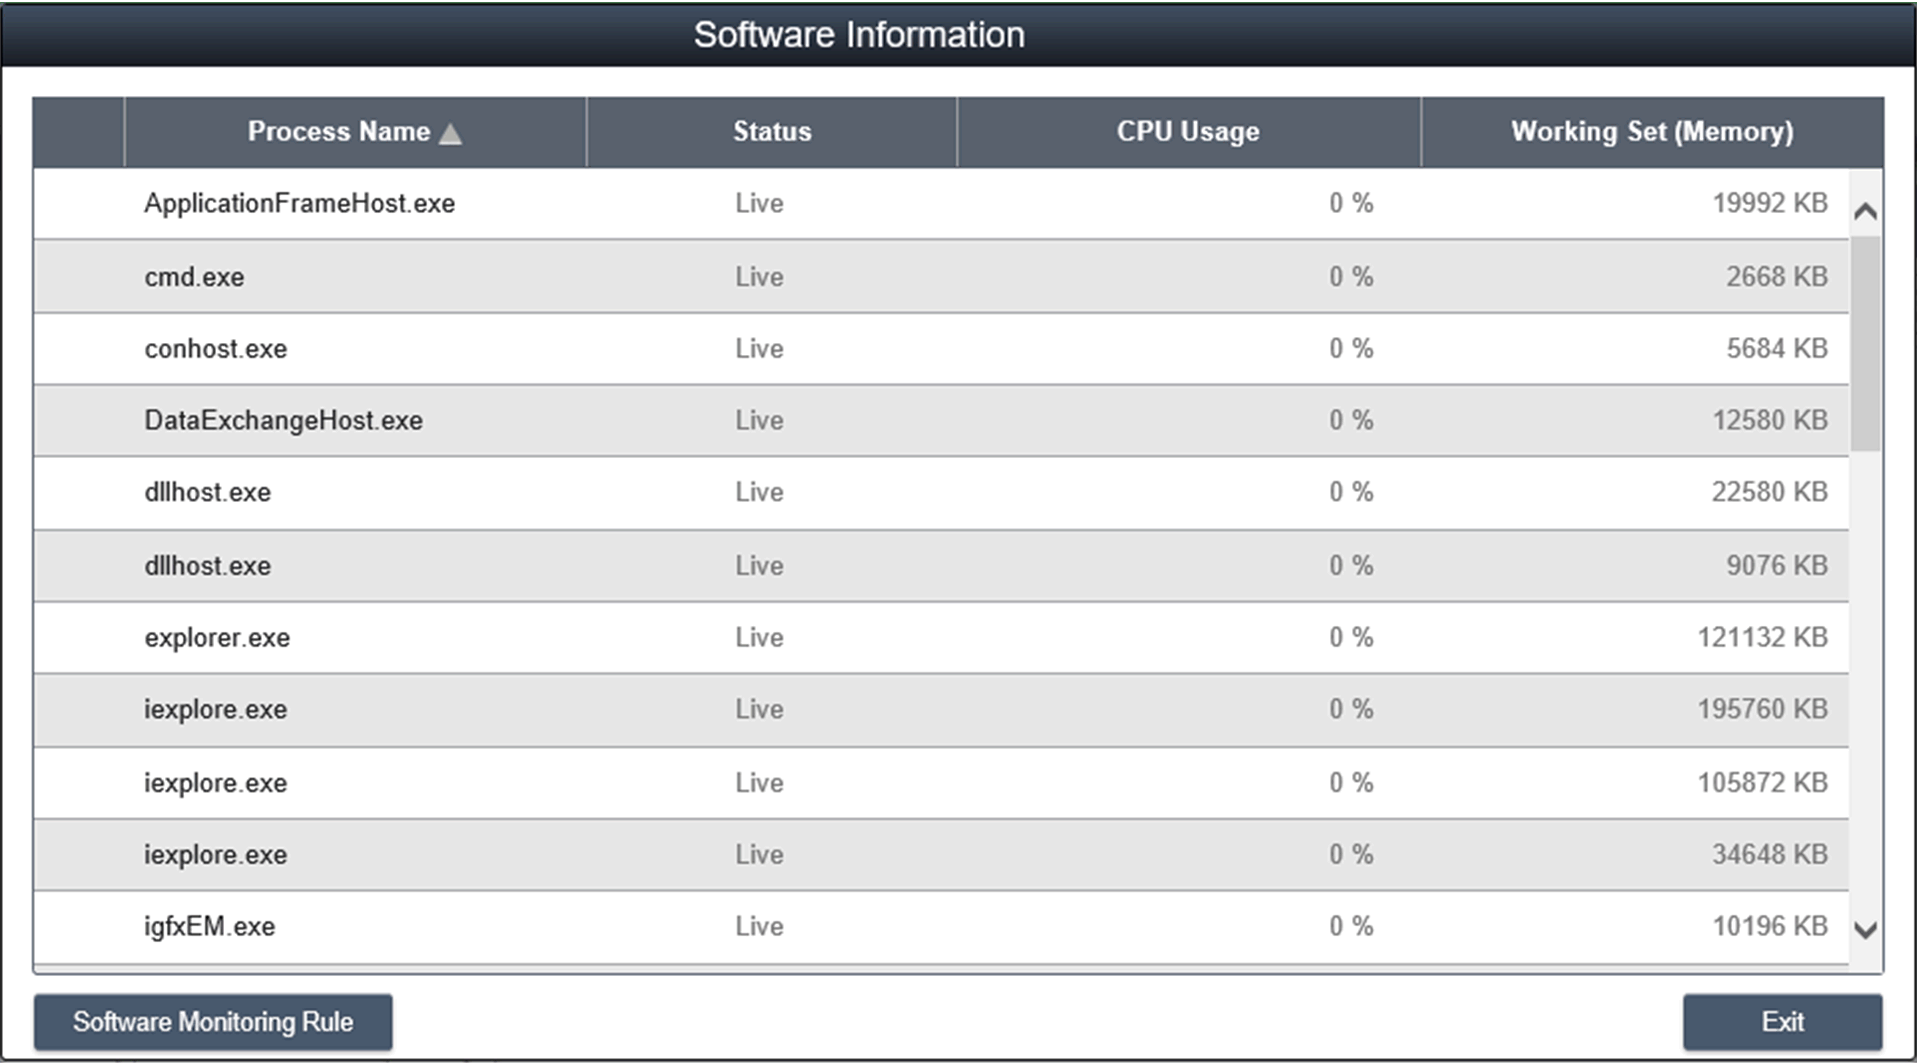
Click the process name to pop up the confirm dialog for killing a specified process, after confirming, you can kill and force the process to terminate: 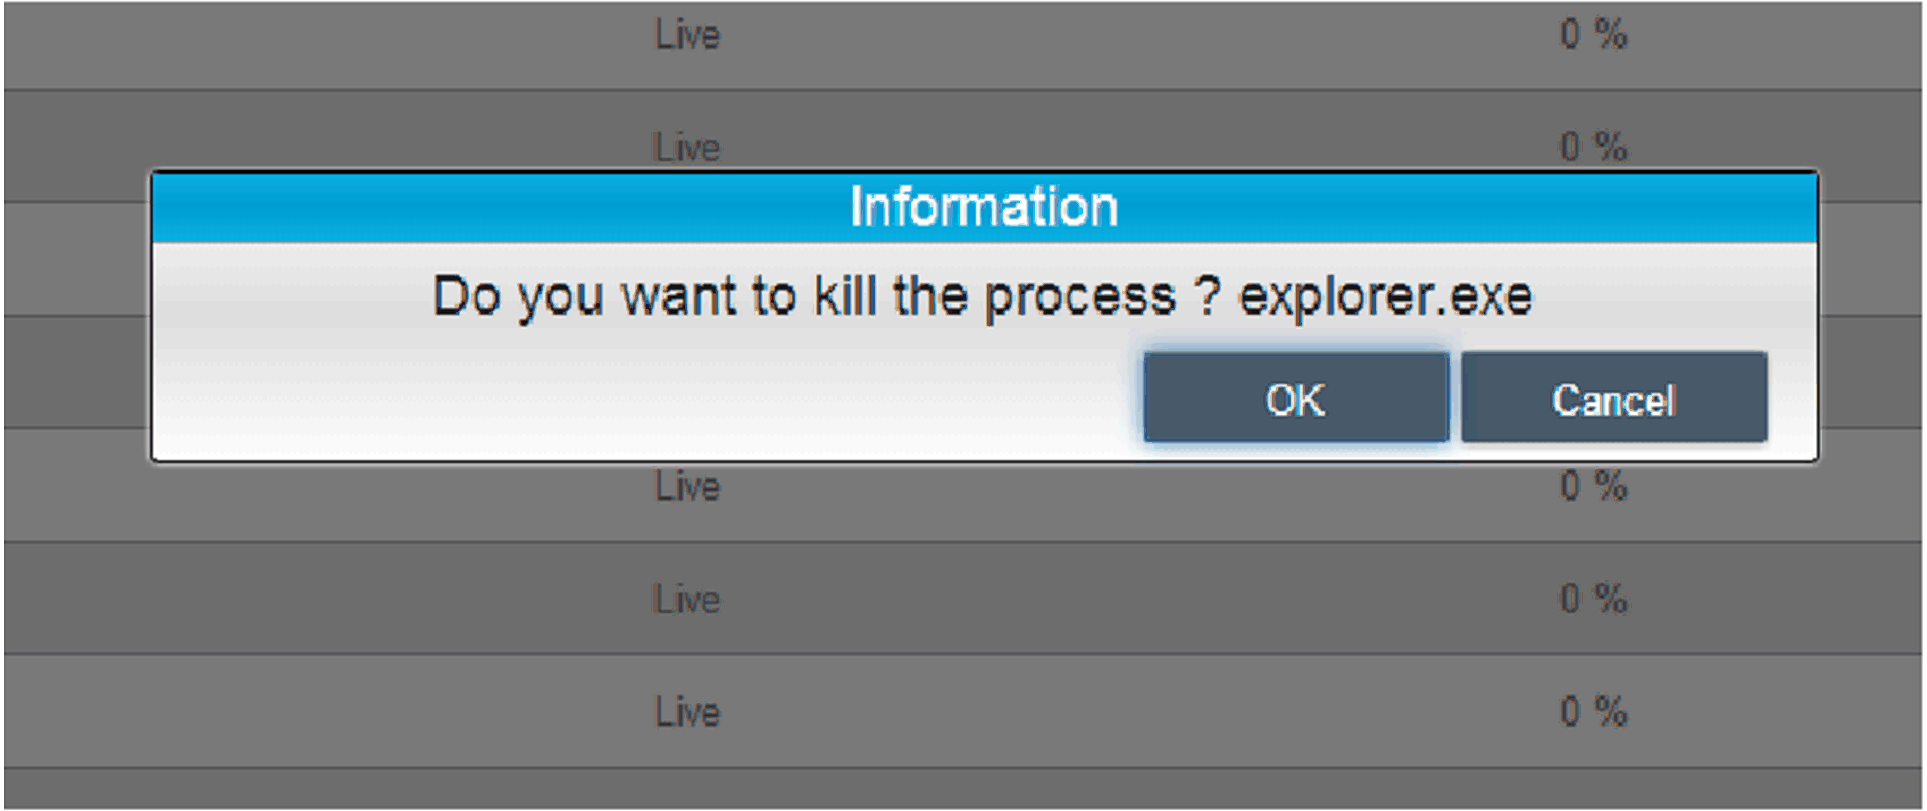
|
|
10 |
Software monitoring rules Click the button Software Monitoring Rules to pop up the dialog for set software monitoring rule. The dialog lists current monitoring rules for software processes: 
|
|
11 |
Add rules Click the button Add Rules to add a new rule for software monitoring. You can input the process name that they want to monitor, the threshold values of the CPU and memory, the last time in seconds for reaching the threshold, and the notice interval for 2 contiguous events and corresponding action. Before clicking the OK button to add the rule, you can check the option Enable Monitor Rule to enable/disable this new added rule: 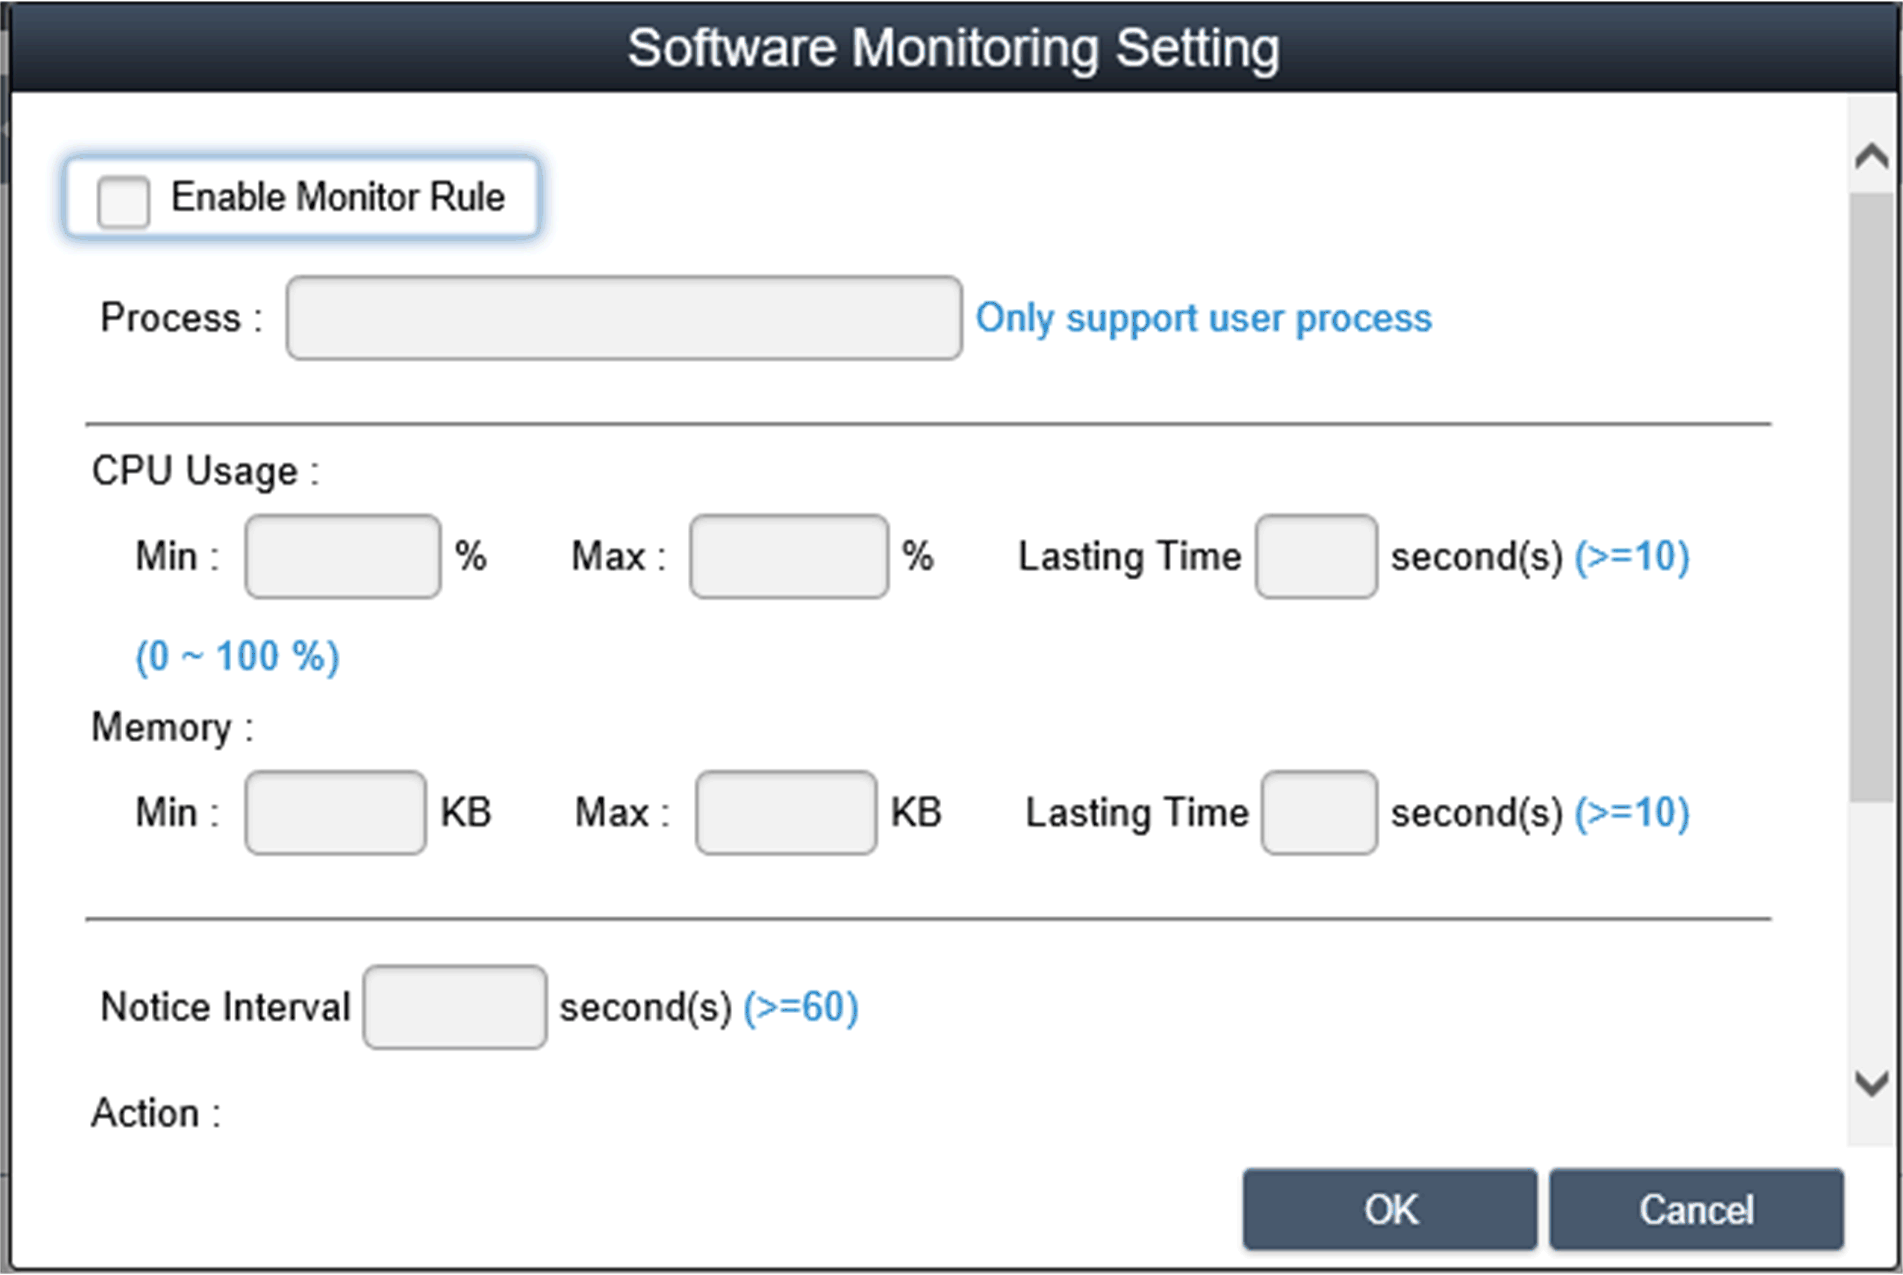
NOTE: The software monitoring can only monitor and execute actions for the user process. |
|
12 |
Edit rules Click one of the fields to pop up the Software Monitoring Setting dialog for editing: 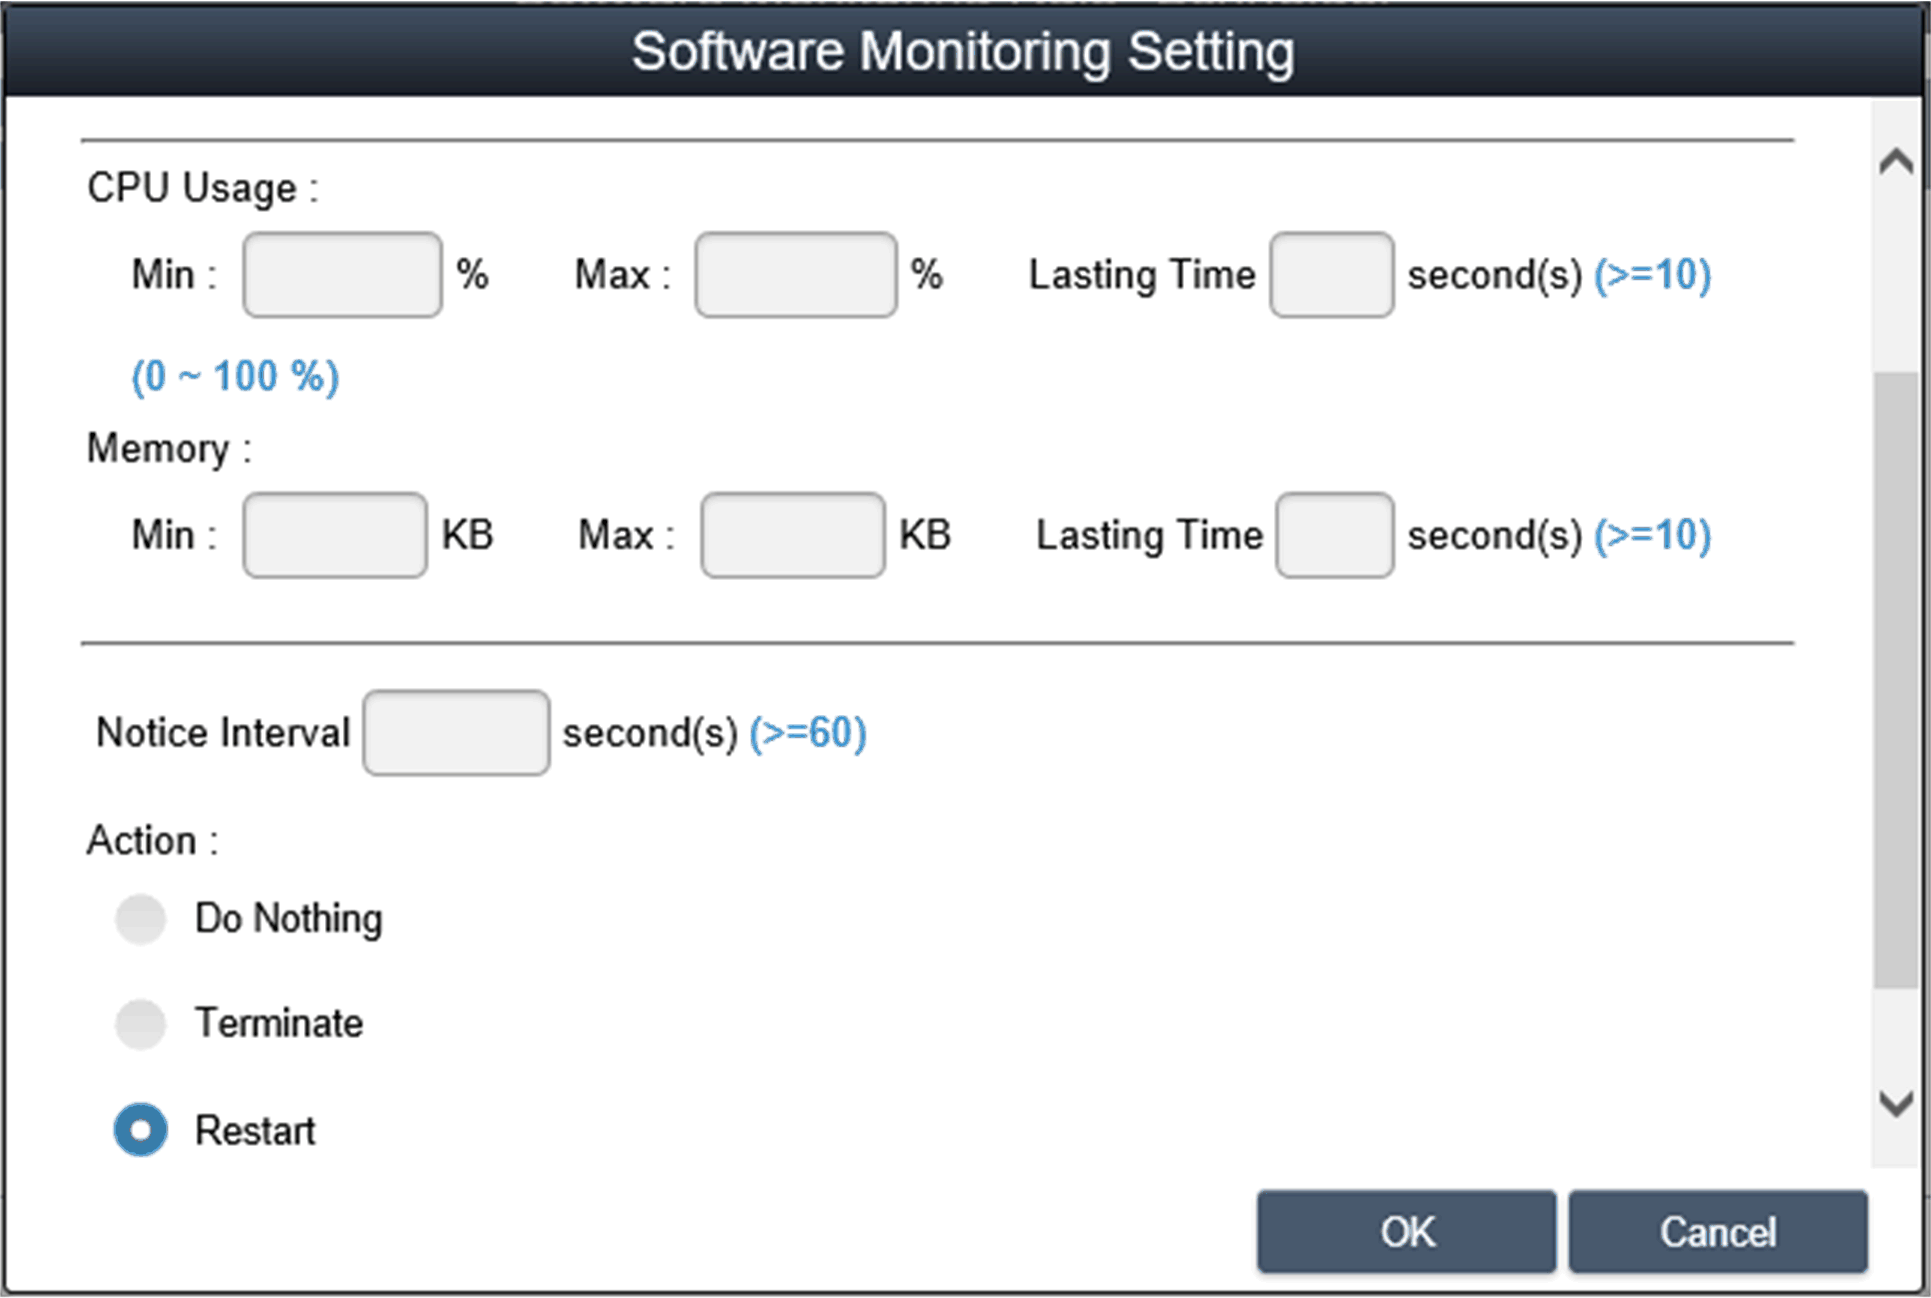
Delete rules: Click the icon X on the left side of the schedule item to delete the schedule. Enable/Disable schedule: Check the enable check box in the schedule row to enable/disable the schedule. |
|
Step |
Description |
|---|---|
|
1 |
Maintenance status You can modify the maintenance status (none / to be maintained / maintaining / finished) from the menu for each device: 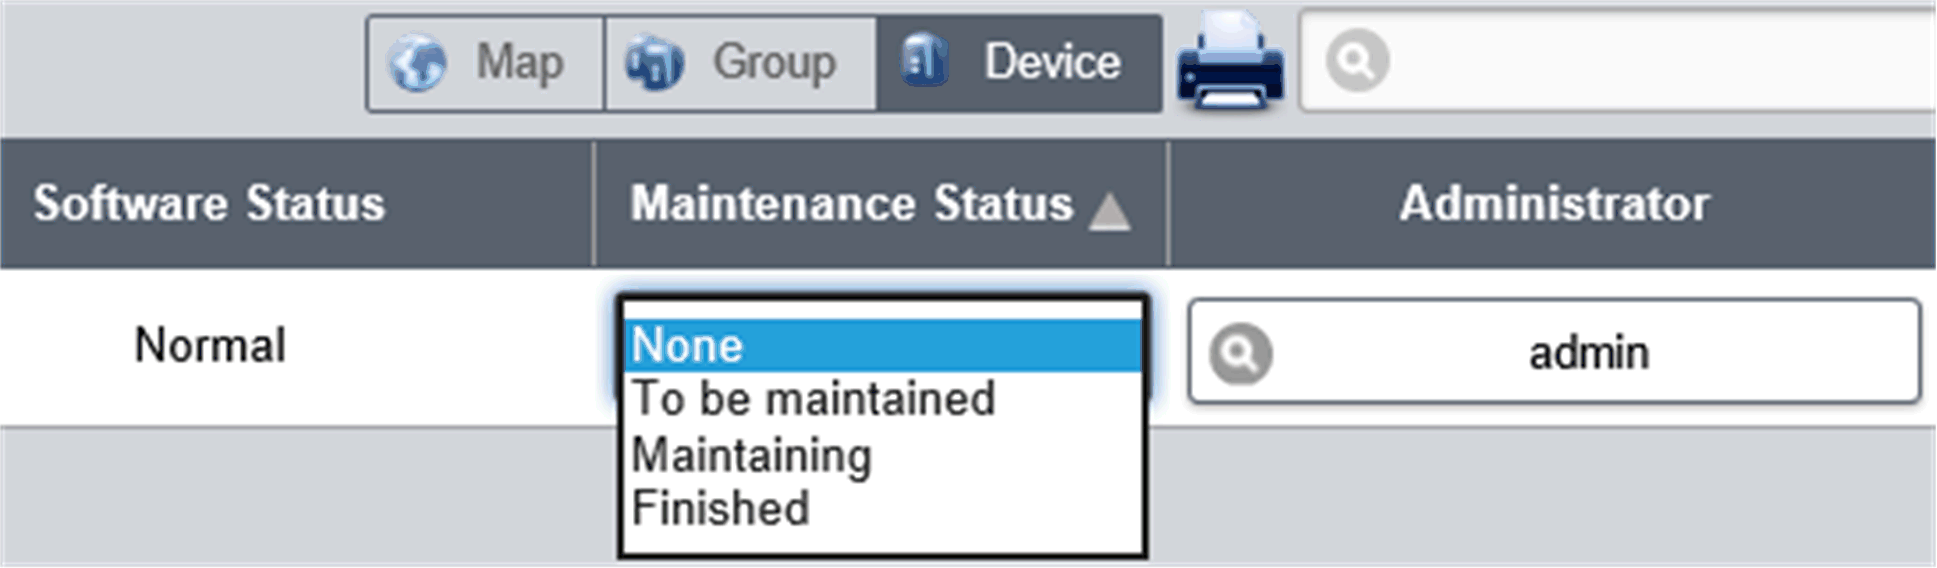
|
|
2 |
Devices administrator Users with device management permissions can click the Admin field to pop up the selection dialog for administrator to reassign device administrator status to another account: 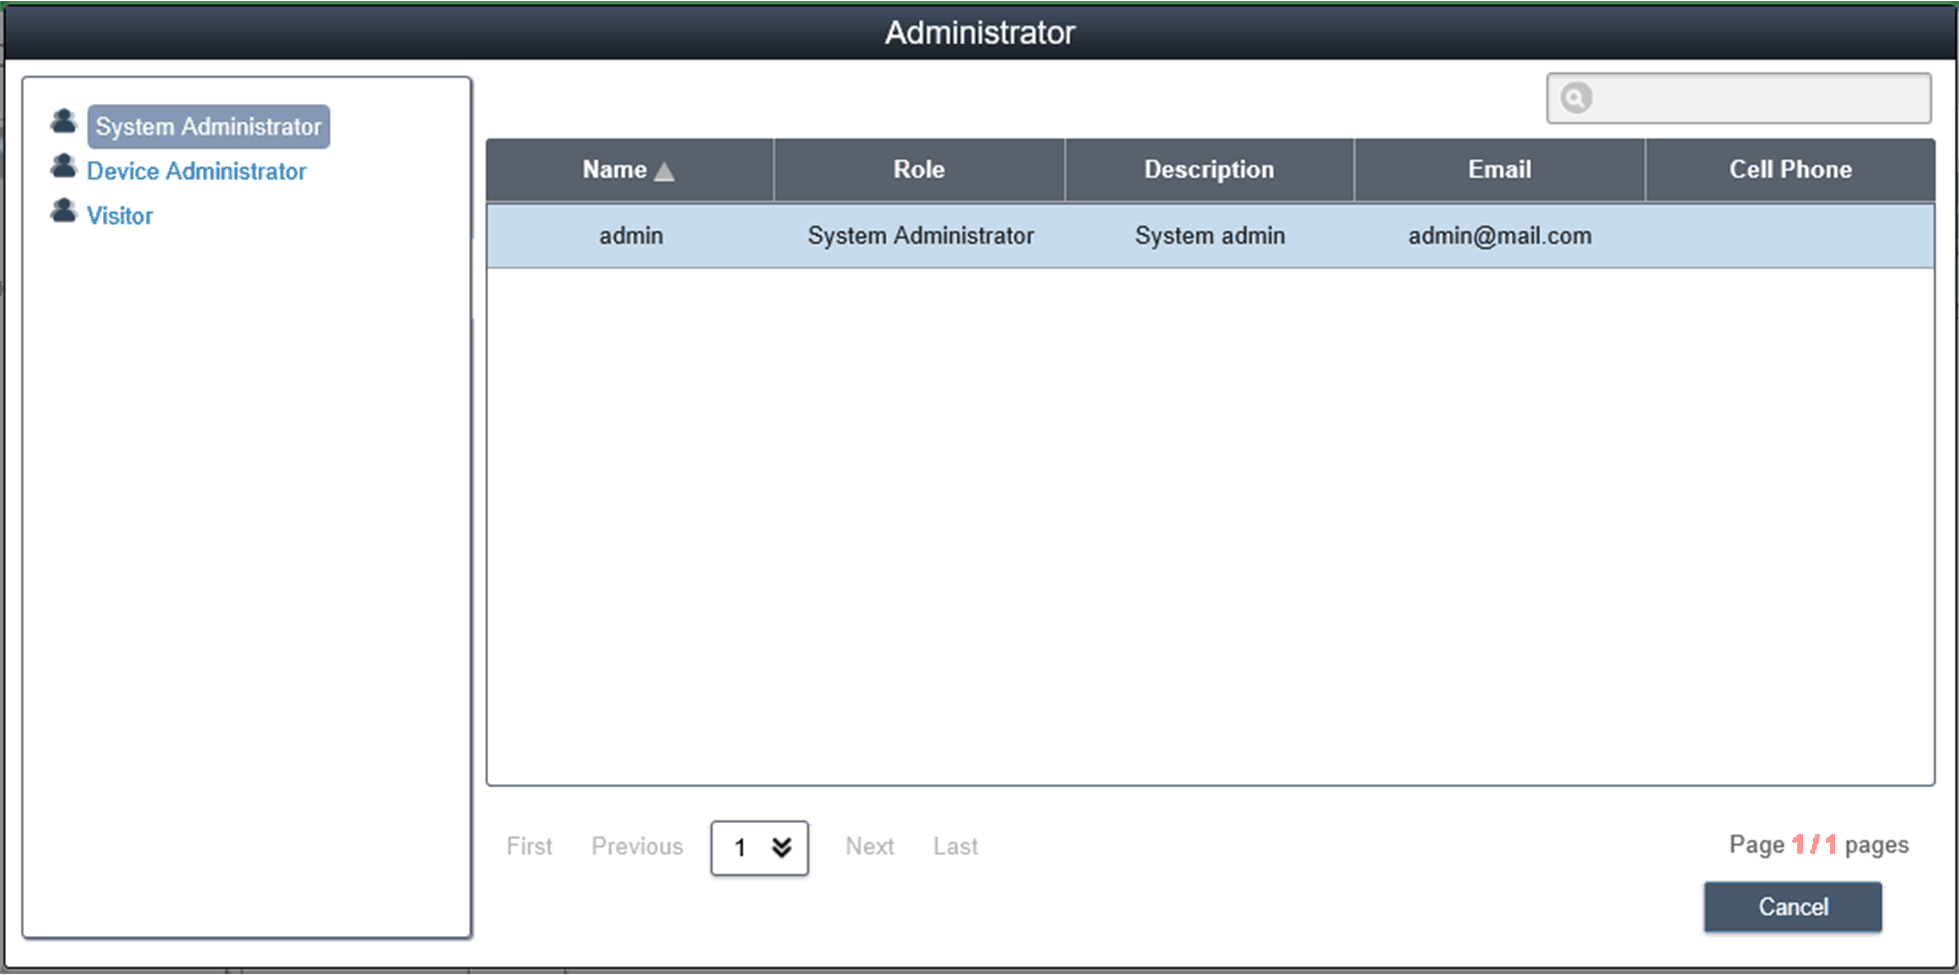
|
|
3 |
View mode - Group status list Click the Group tab to list groups under the selected account or group node. The group list shows all group names, group hardware status, and group software status: 
Group hardware status: This field shows the number of all registered devices and incorrect hardware devices under this group. Group software status: This field shows the number of all registered devices and incorrect software devices under this group. |
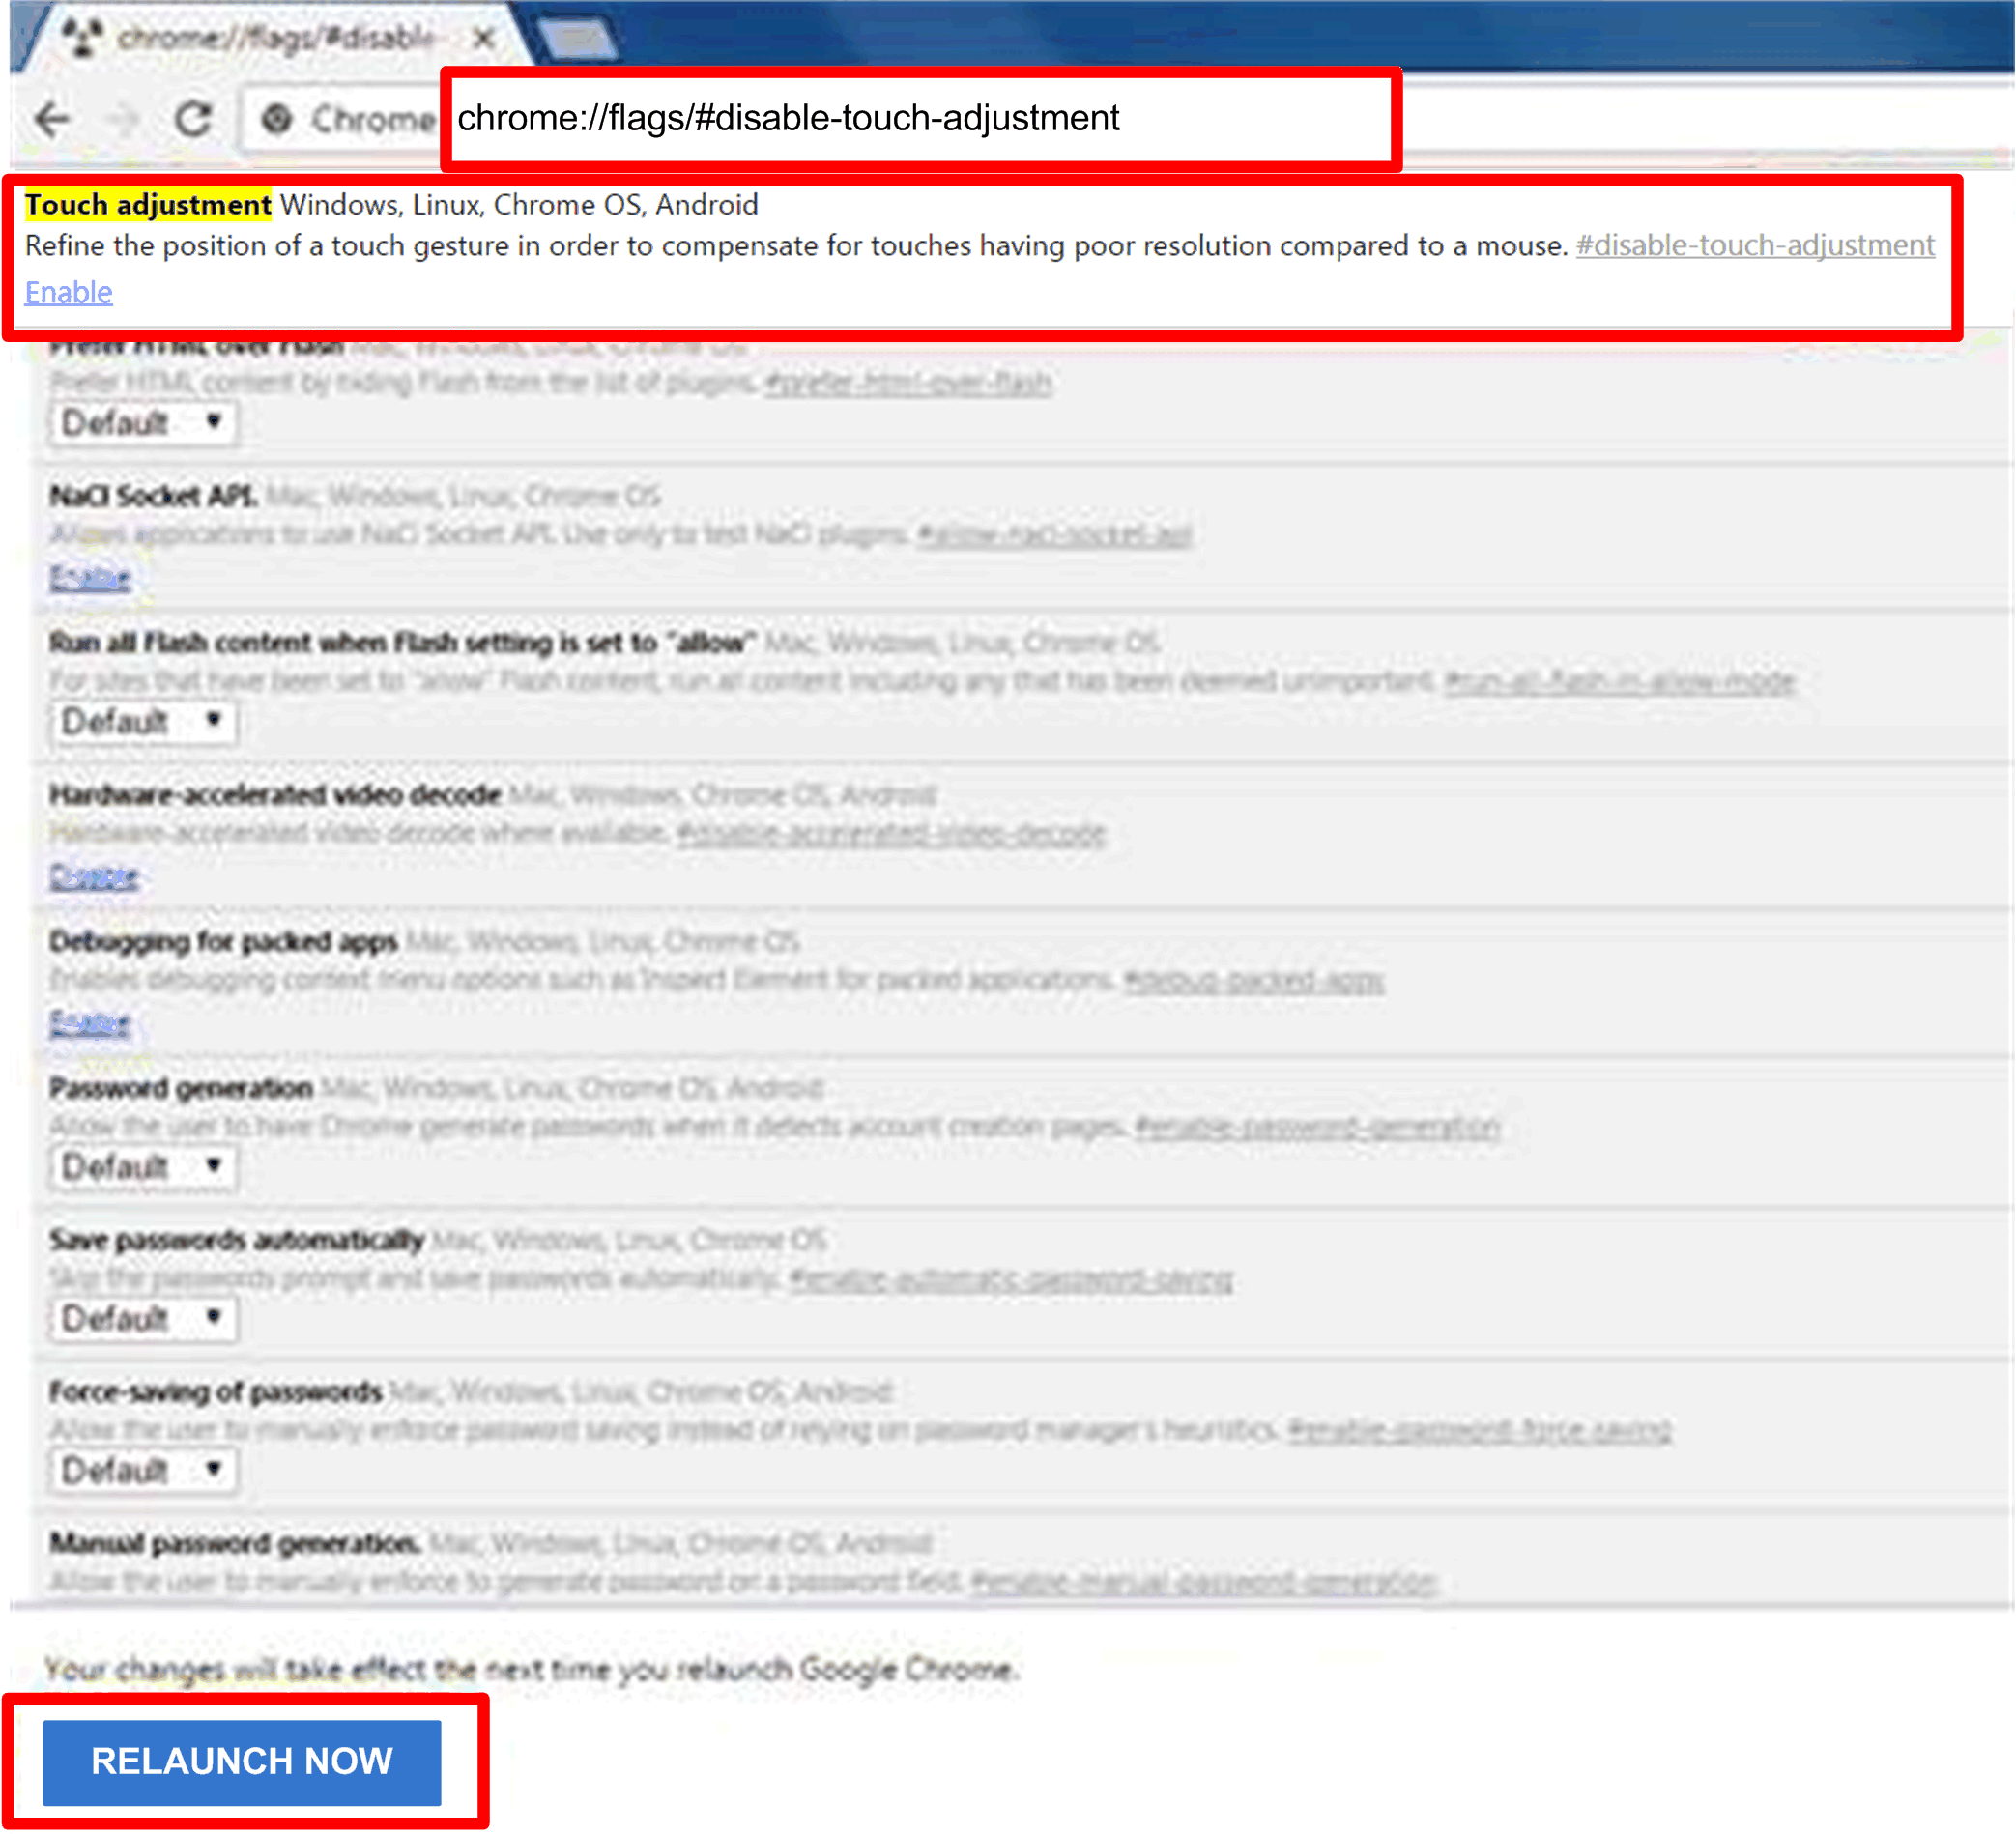
NOTE: Use Chrome as default browser for System Monitor.
In the case, you experience difficulties to Add Devices with Touch, then:
oIn Chrome search bar, key in chrome://flags/#disable-touch-adjustment
oReplace the status of Touch adjustment from disable to enable.
oClick RELAUNCH NOW button.
Group Hardware and Software Monitoring Rules
|
Step |
Description |
|---|---|
|
1 |
Group hardware monitoring rules Click the icon on the right to pop up the dialog Set Hardware Monitoring Rule. The dialog lists current monitoring rules and parameters of each group's devices including CPU, voltage, HDD, and so on. Add group rules: Click the Add Rule button to add a new rule for hardware monitoring. You can select the type of monitoring hardware from the menu, input threshold values of corresponding parameter, last time in seconds of reaching the threshold, and notice interval for 2 contiguous events. Before clicking OK to add the rule, you can check the option Enable Monitor Rule to enable/disable this new rule. Edit group rules: Click the rule field to pop up the Hardware Monitoring Setting dialog for editing. Delete rules: Click the X icon on the left side of the scheduled item row to delete the schedule. Enable/Disable schedule. Click the enable check box in the row item to enable/disable the schedule. |
|
2 |
Group software monitoring rules Click the icon in the field of group hardware status to pop up the Set Software Monitoring Rule dialog box. The dialog lists current monitoring rules for software processes of group devices. Add group rules: Click the button Add Rule to add a new rule for software monitoring. You can input the process name that wants to monitor, the threshold values of CPU and memory, the last time of reaching threshold, notice interval of 2 contiguous events and corresponding action when the monitoring rule is applied. Before clicking the button OK to add rule, you can check the option Enable Monitor Rule to enable/disable this new added rule. Edit group rules: Click the rule field to pop up the Software Monitoring Setting dialog for editing. Delete rules: Click the X icon on the left side of the scheduled item row to delete the schedule. Enable/Disable schedule: Click the enable check box in the row item to enable/disable the schedule |
|
Step |
Description |
|---|---|
|
1 |
View mode - Device map view Device Map View visualizes each physical device's location, separate user interface as left-side map hierarchy tree includes account, location, layout, and device node and right-side geography view includes online map and static image map. Different tree node support corresponding add, delete, and edit operations and intuitive drag device nodes as well: 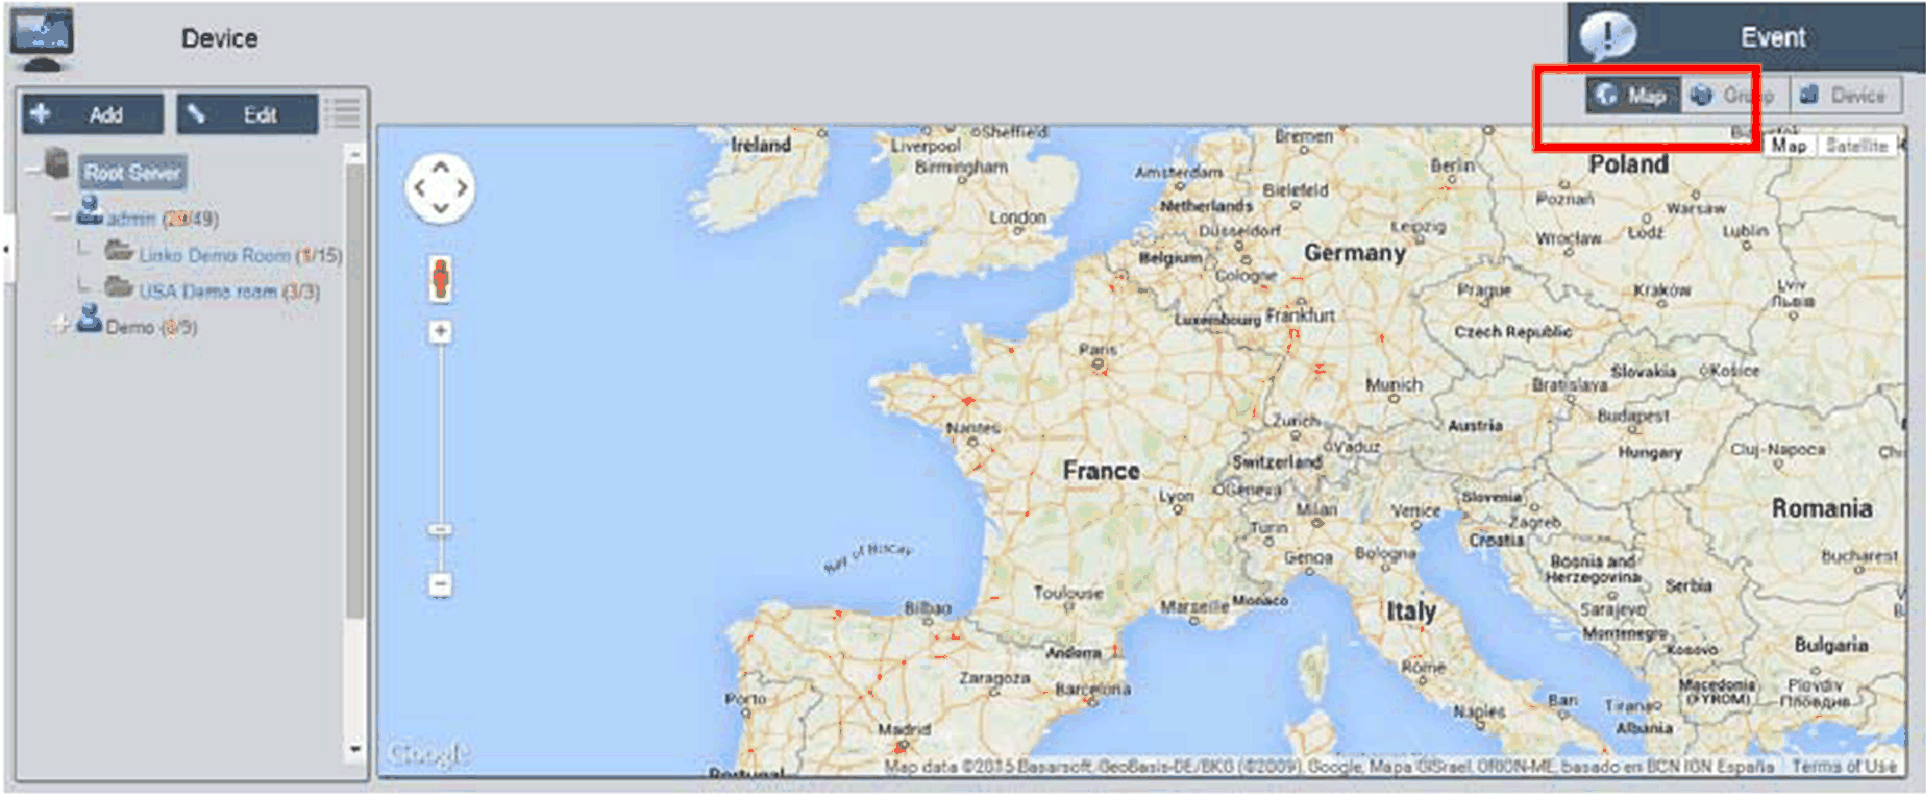
|
|
2 |
Add/Delete/Edit map location Add location: Select on one of account nodes and click Add button to add a new location: 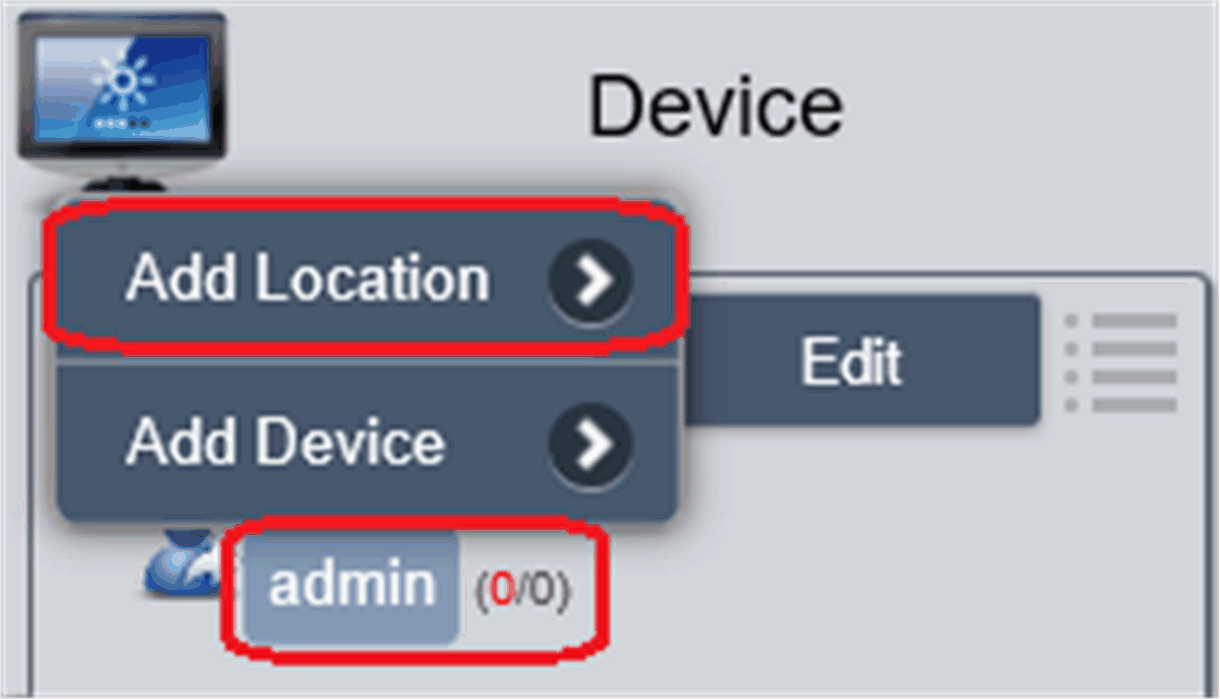
Input location name, address, or coordination (latitude and longitude), upload image for location displaying and click OK to add the new location: 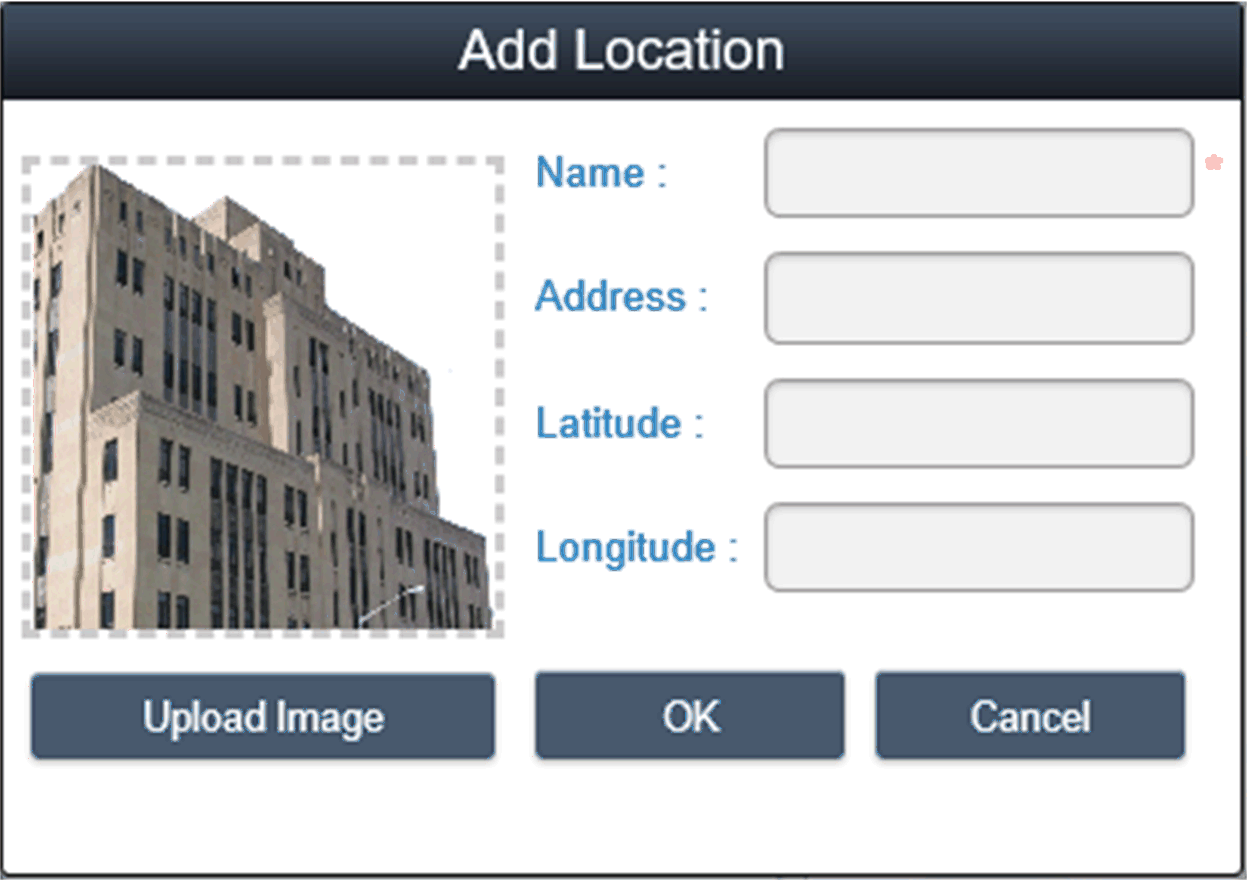
NOTE: Map view supports both Google and Baidu online map. These two maps adopt different coordination-system, you must input correct coordination according to online map selection (you can configure in the system settings). If you do not specify either address field or coordination, system will auto location this new added location at the center of current map view. |
|
3 |
Delete location Click Edit button to switch to edit mode, click X icon ahead of selected location node to delete this location: 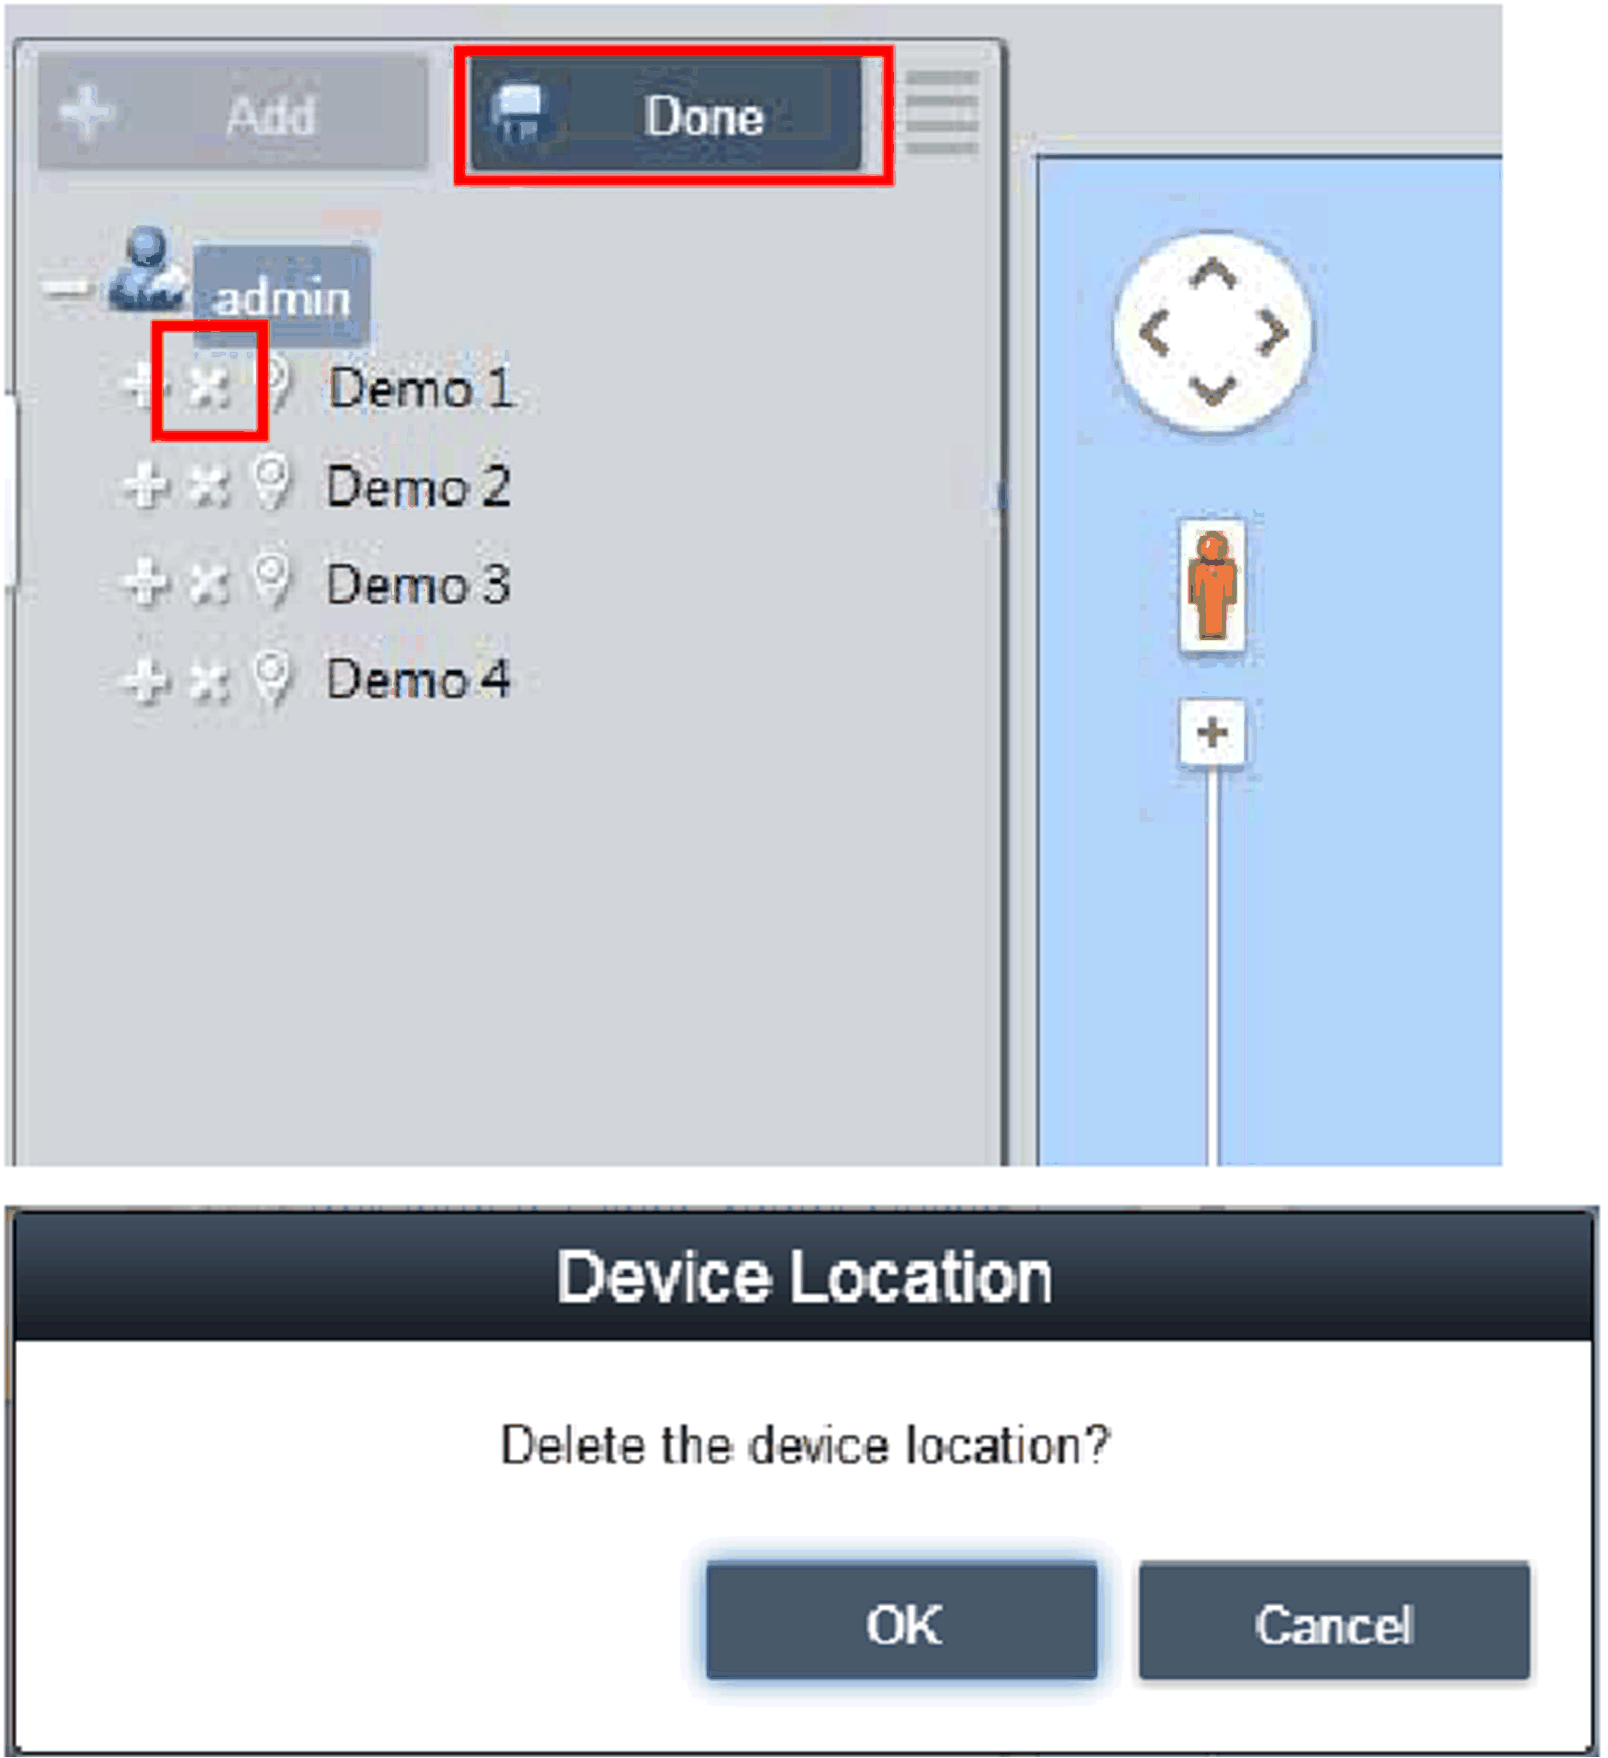
NOTE: If there are layouts or devices under selected location node, you must remove these nodes first before removing location node. |
|
4 |
Edit location Click Edit button to switch to edit mode, click the location node/name to pop up the dialog of Edit Location to edit the content: 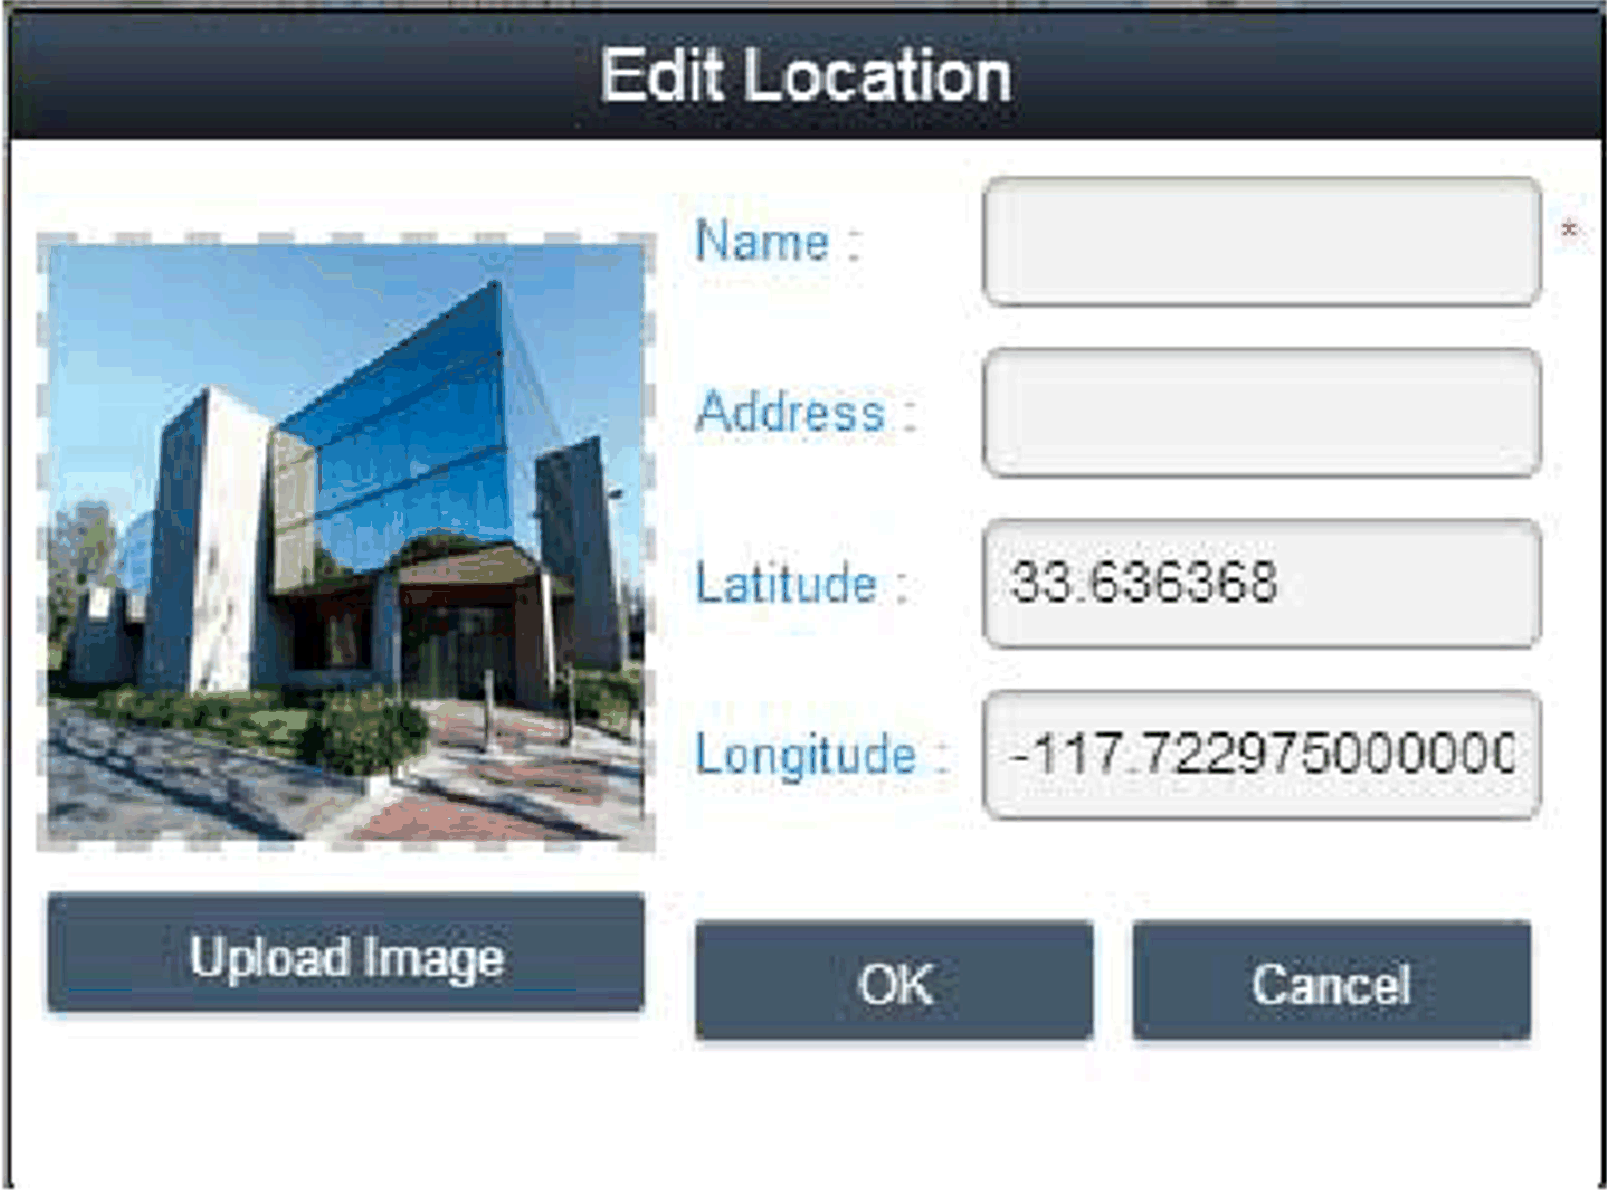
NOTE: Under this mode, drag the location icon on the right-side map view to relocate location. |
|
5 |
Add layout Select on one of location nodes and click Add button to add a new layout. Input layout name and description, upload image for location displaying and click OK to add the new layout: 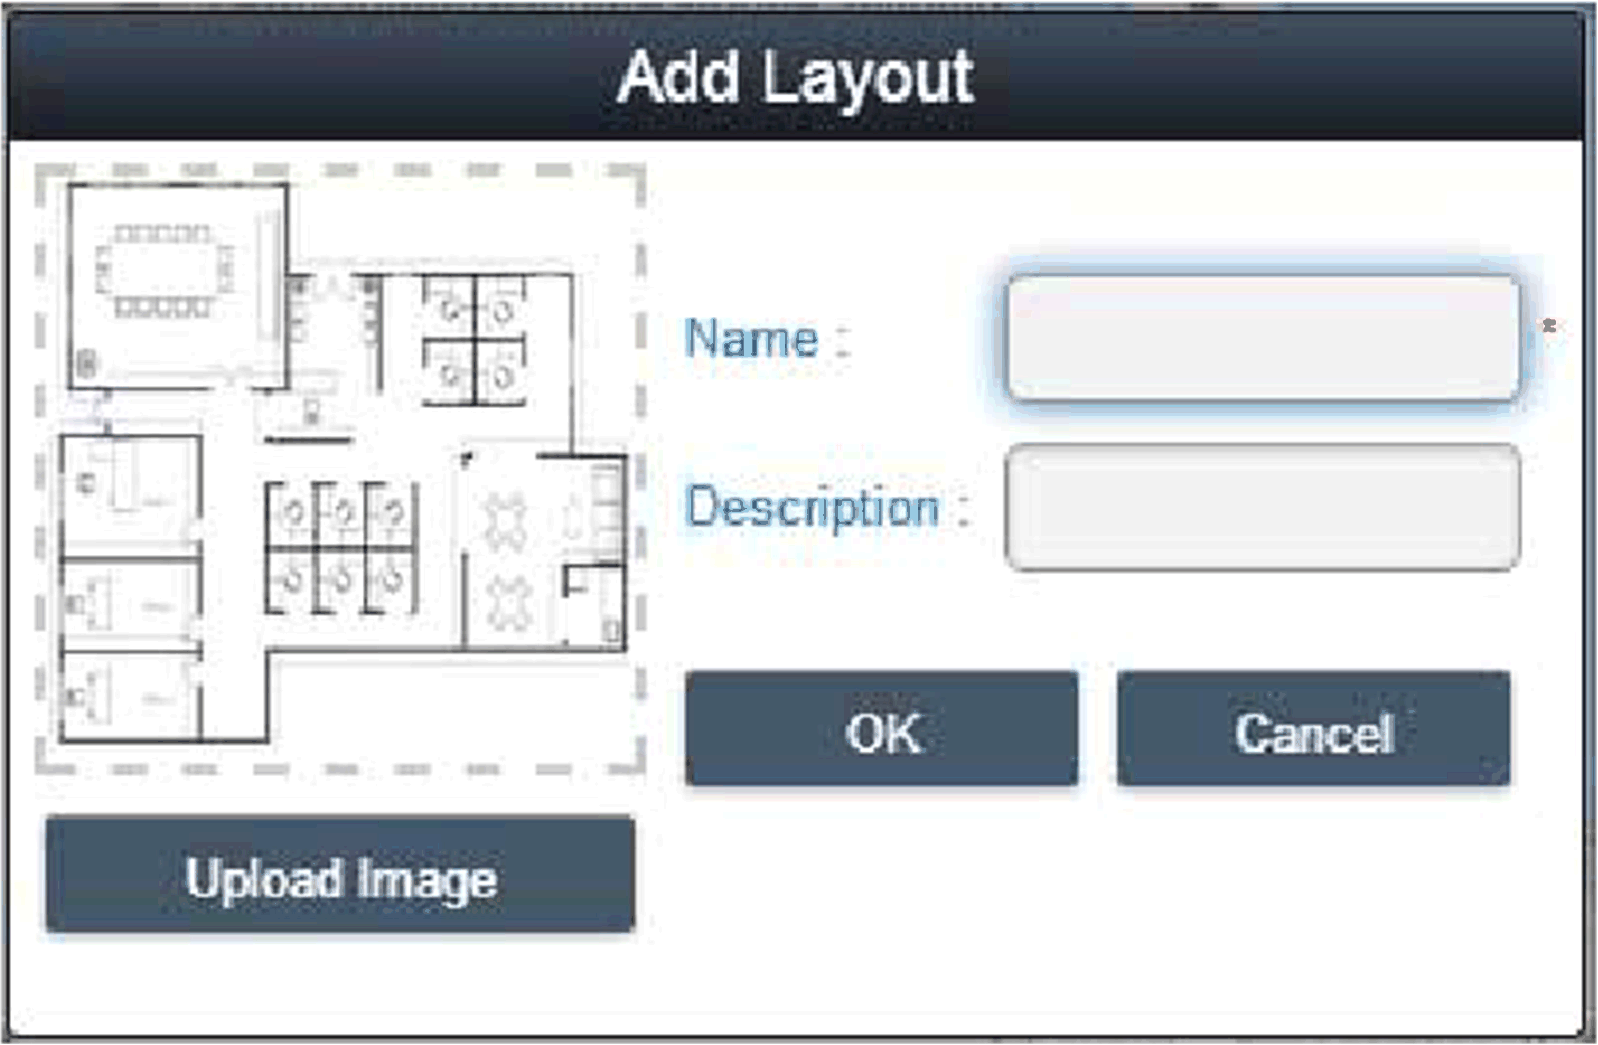
Delete layout: Click Edit button to switch to edit mode, click X icon ahead of selected layout node to delete this layout. NOTE: If there are devices under selected layout node, you must remove these nodes first before removing layout node. Edit layout: Click Edit button to switch to edit mode, click the location node/name to pop up the dialog of Edit Location to edit the content. |
|
6 |
Add/Delete/Edit map device Add device: Select on one of accounts, location, or layout node and click Add button to add a new device. Newly added devices are by default located at the center of online or static image map: 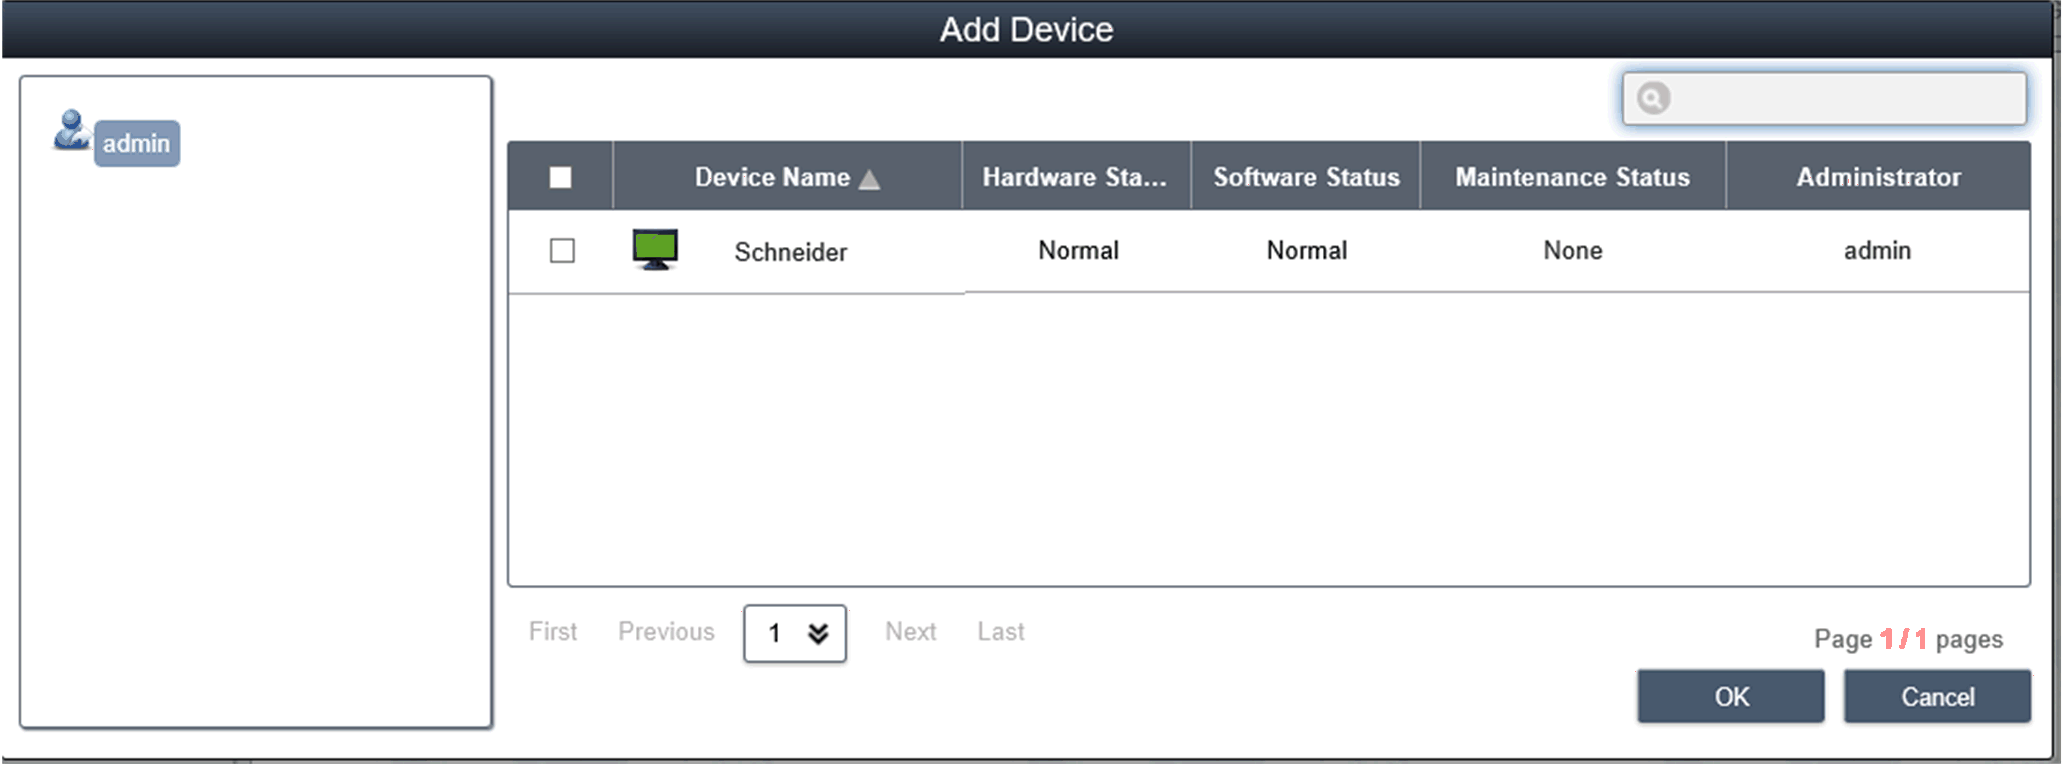
Delete device: Click Edit to switch to edit mode and click X icon ahead of selected layout node to delete this device. Edit device: Click Edit button to switch to edit mode, drag the device icon on the right-side map view to relocate device. Under this mode, you can drag the device icon from the right-side map view to left-side account or location or layout node to change pop-up its belonged level. |
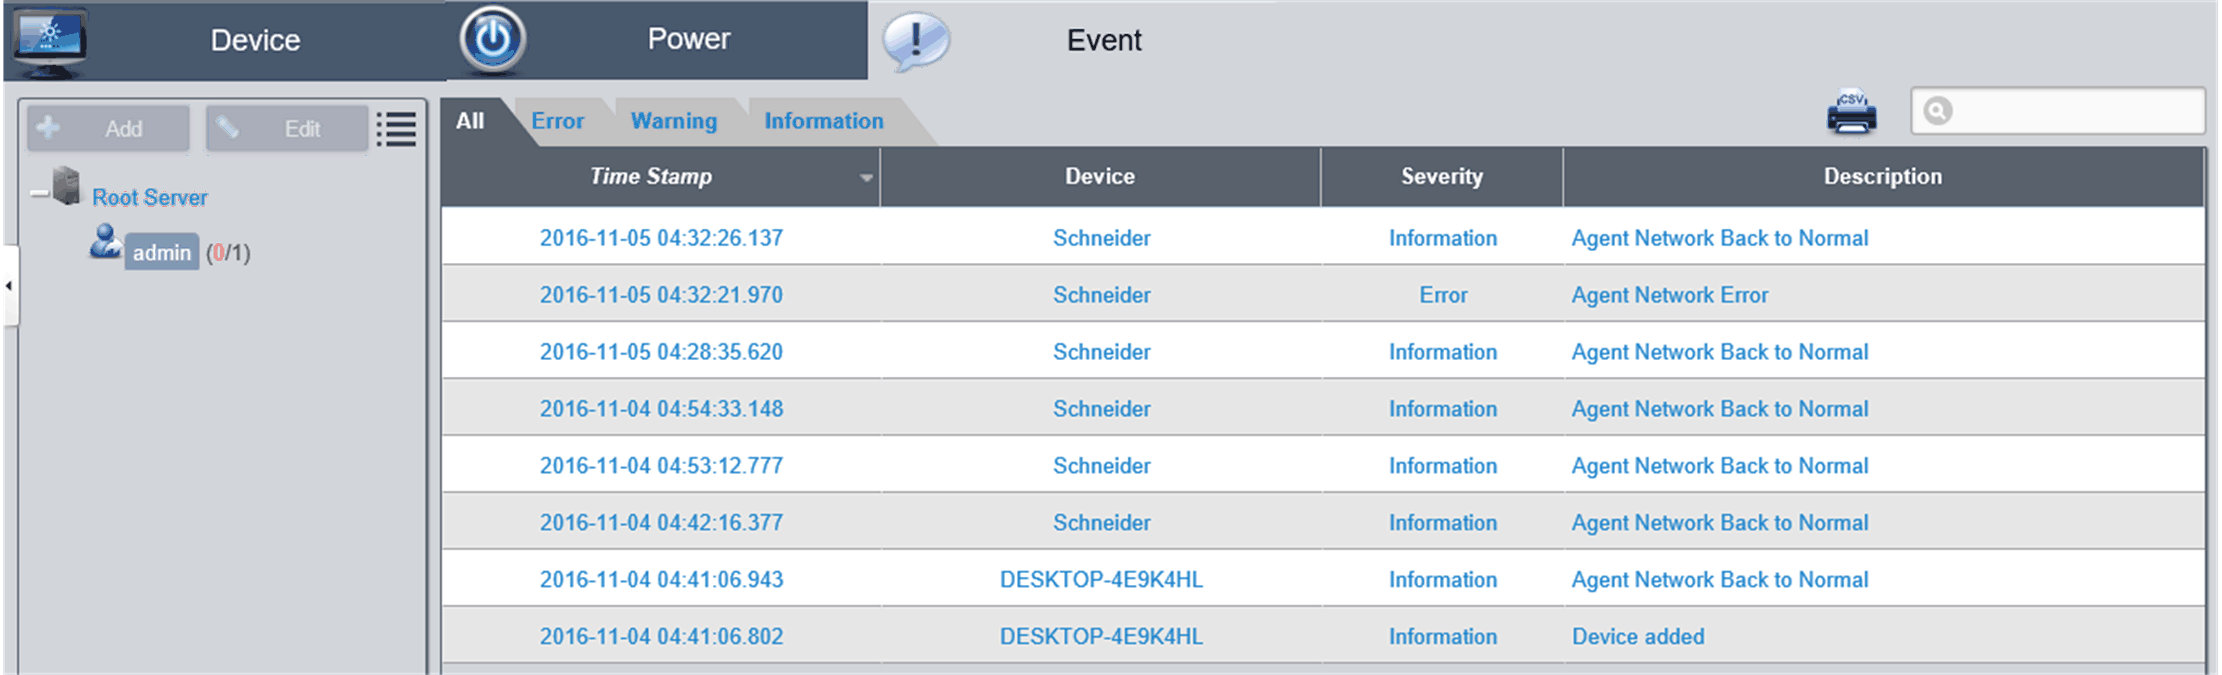
Device event list
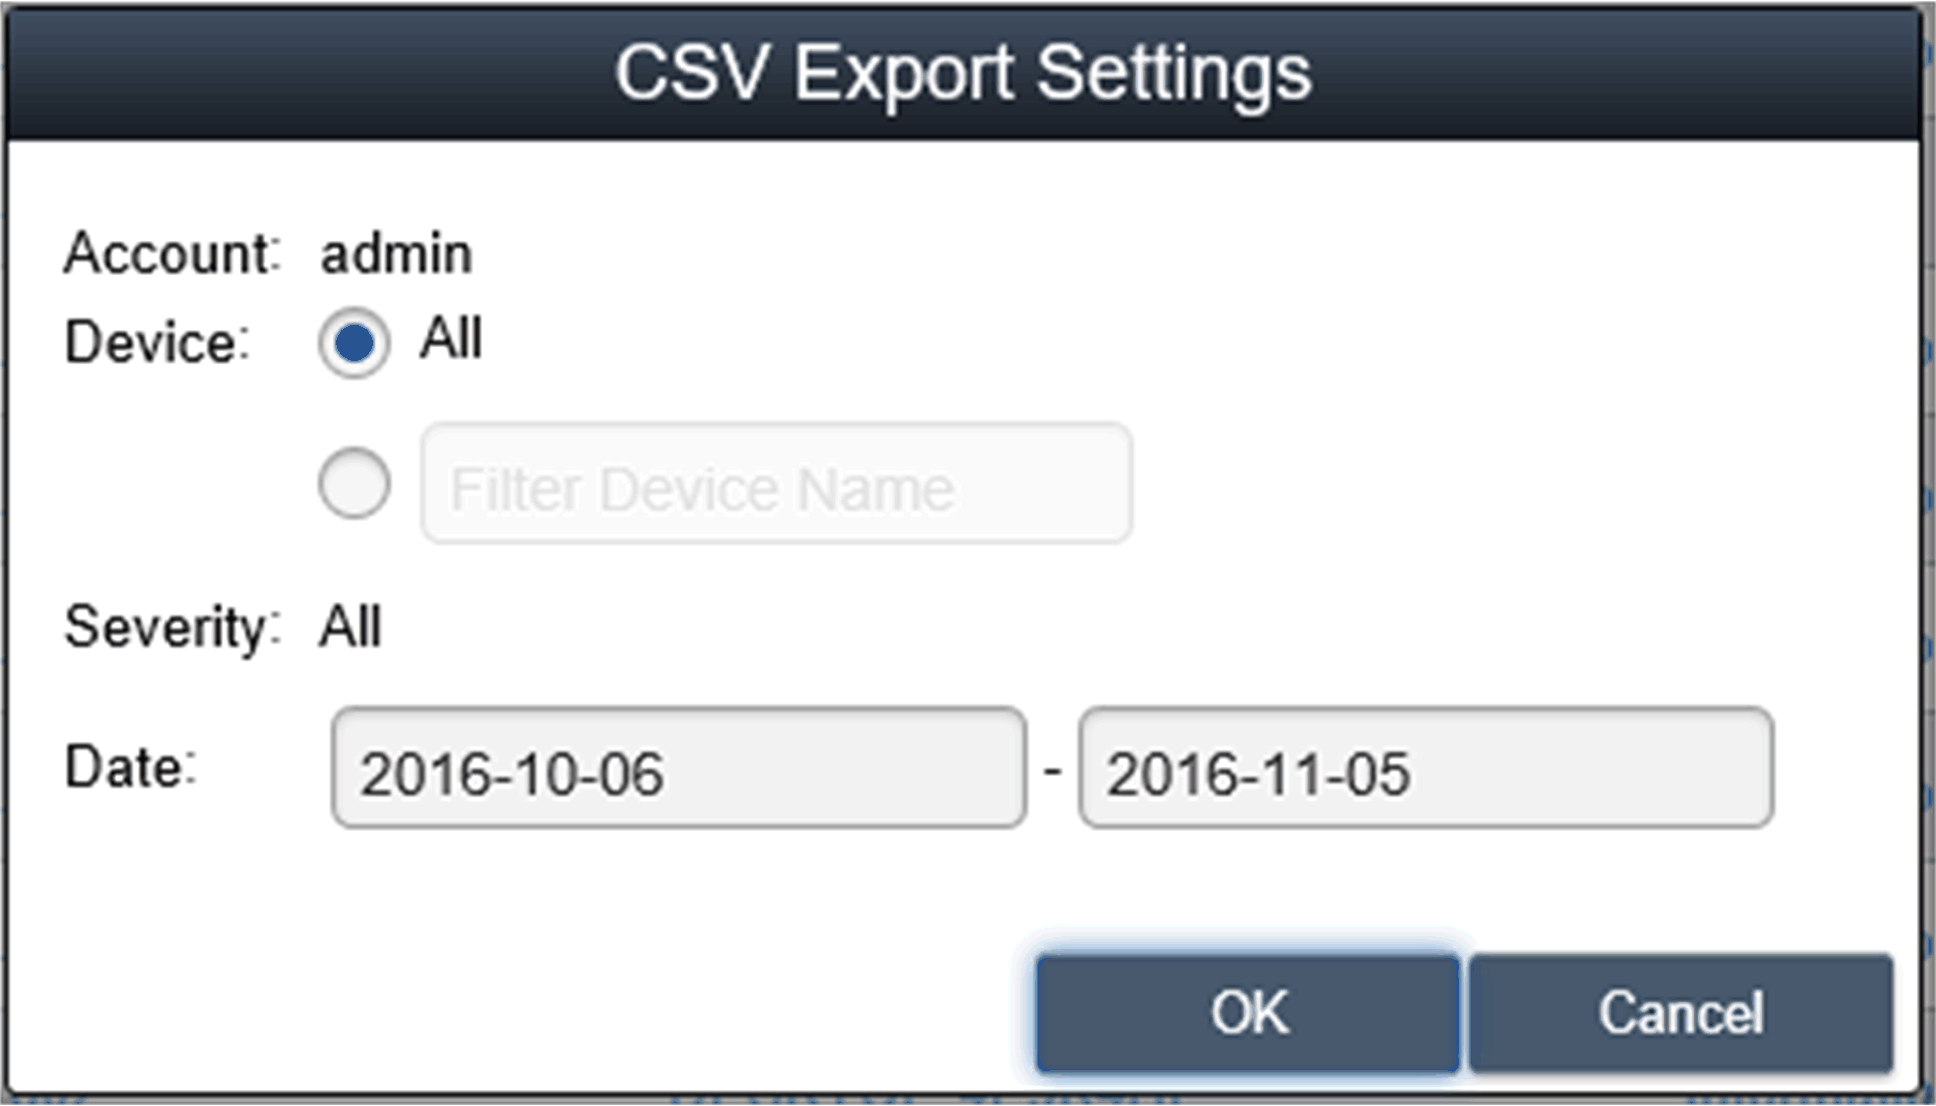
Select user account or group to decide event range and select event log type (All/Error/Warning/Information) to browse related device events:
Select device and data/time range to export event log as CSV format to local side: