Application Example (Flying Saw)
The application example with a simple flying saw was realized. A knife will run synchronously to the product during the cut.
To avoid that the knife gets jammed when it comes out of the material, an offset motion will overlie the synchronous motion.
The normal synchronous motion is realized through a cam function on channel A. Then, the offset motion is also performed as a cam function on channel B.
The example describes only the synchronous movement of the knife to the product. The up-and-down movement (cutting) of the knife is not described. In the example, the mentioned up-and-down movement is only simulated by the visualization.
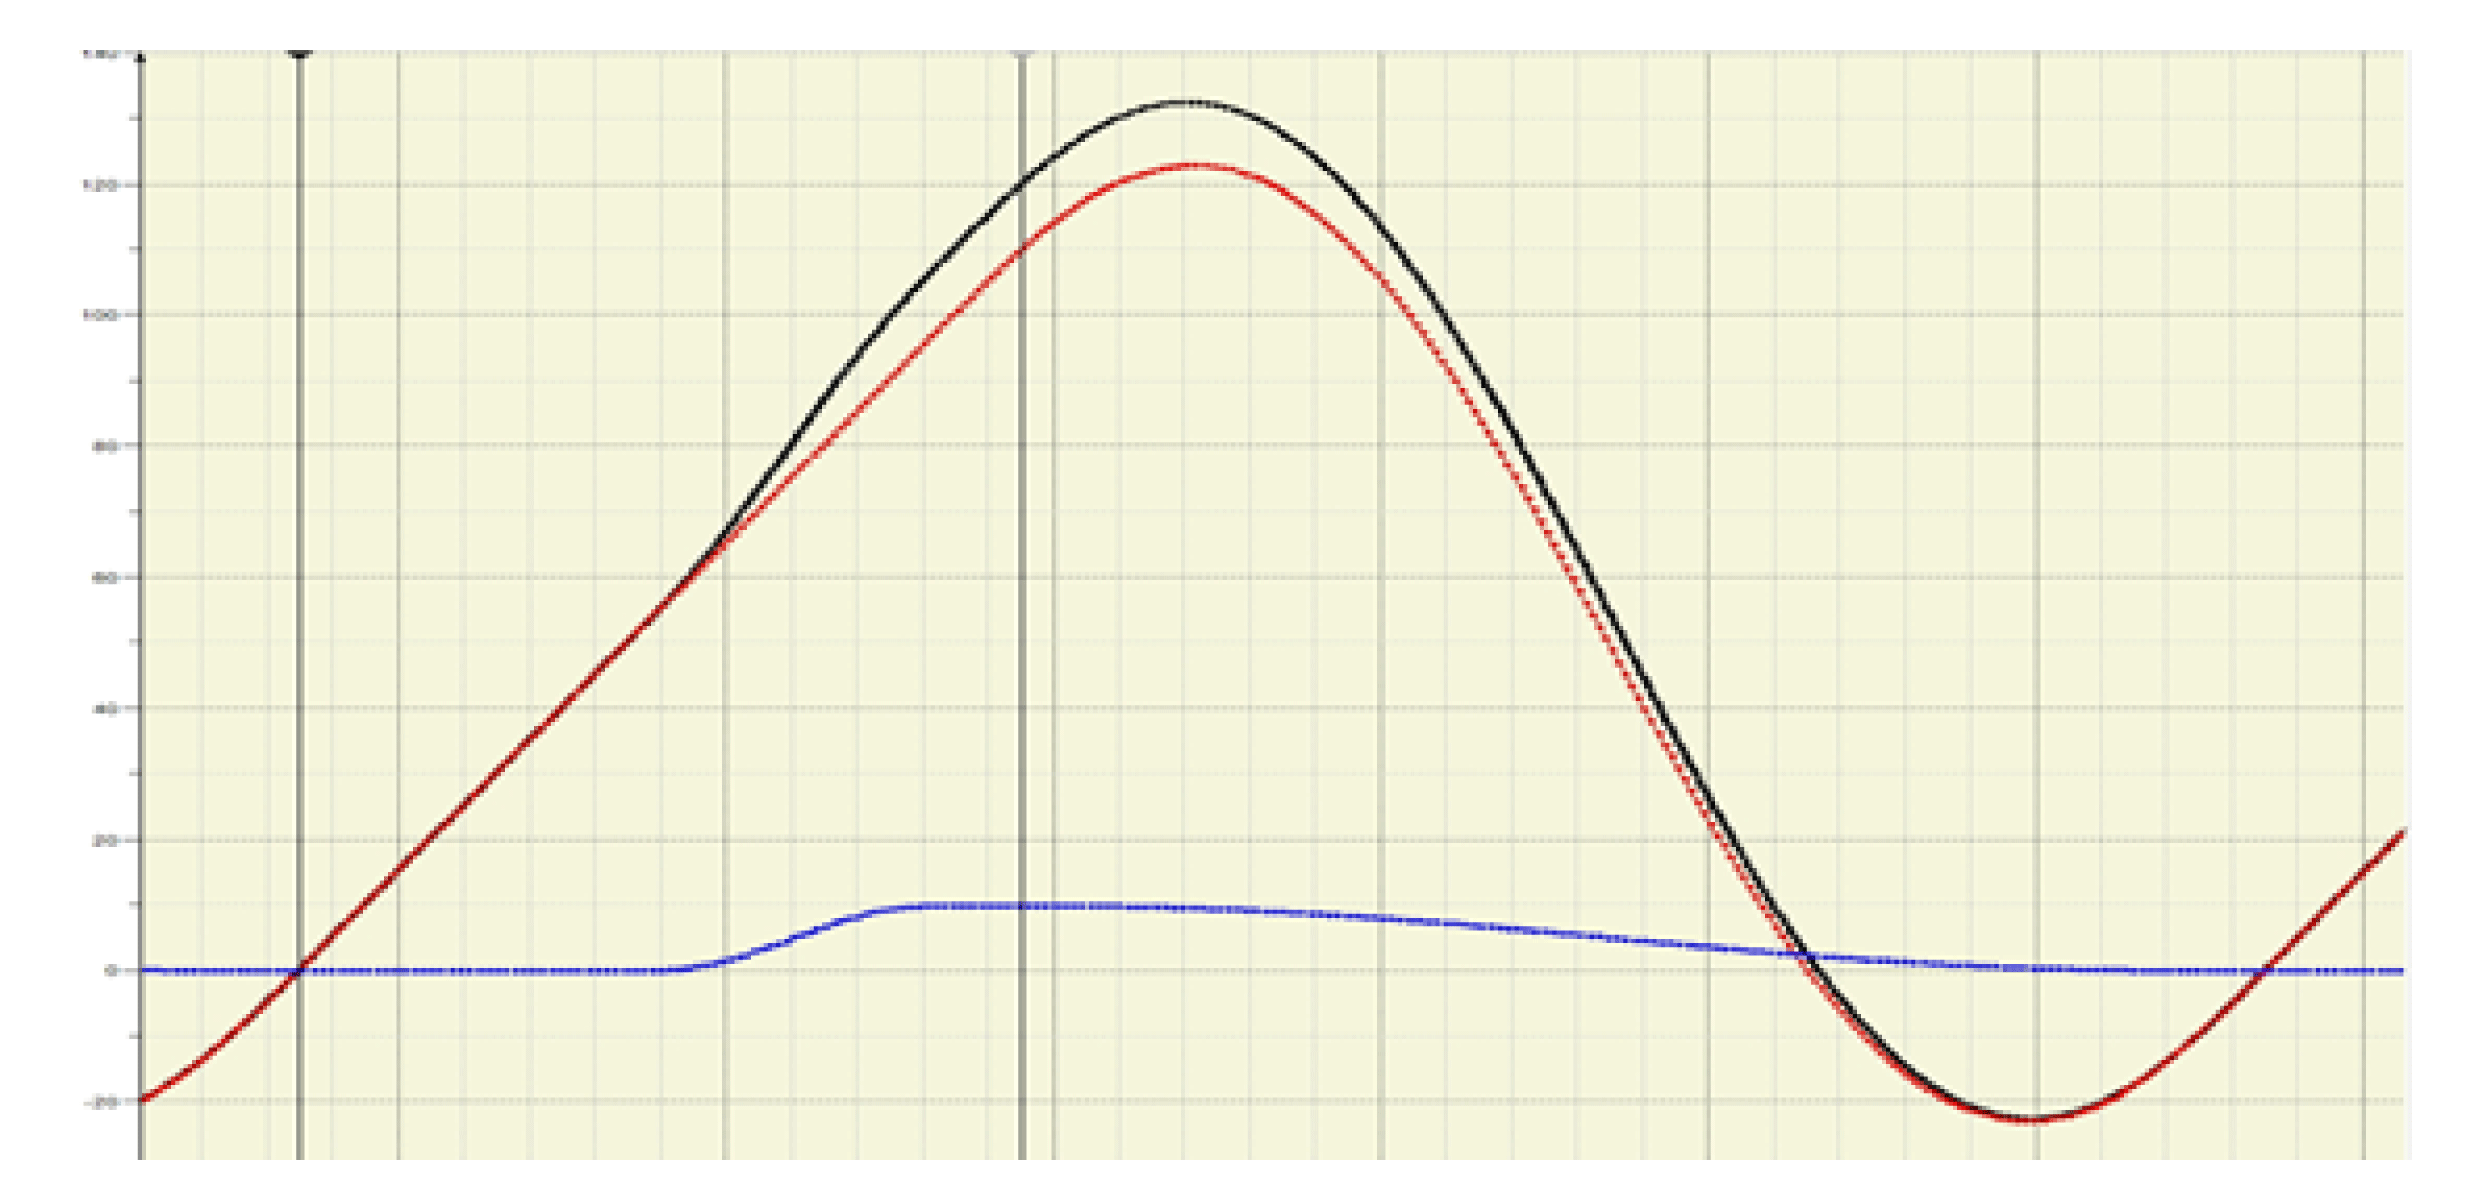
Reference values from channel A and B as well as the reference value of the axis.
|
Red cam |
Reference value from channel A |
|
Blue cam |
Reference value from channel B |
|
Black cam |
Reference value of the axis = Sum from the channels A + B |
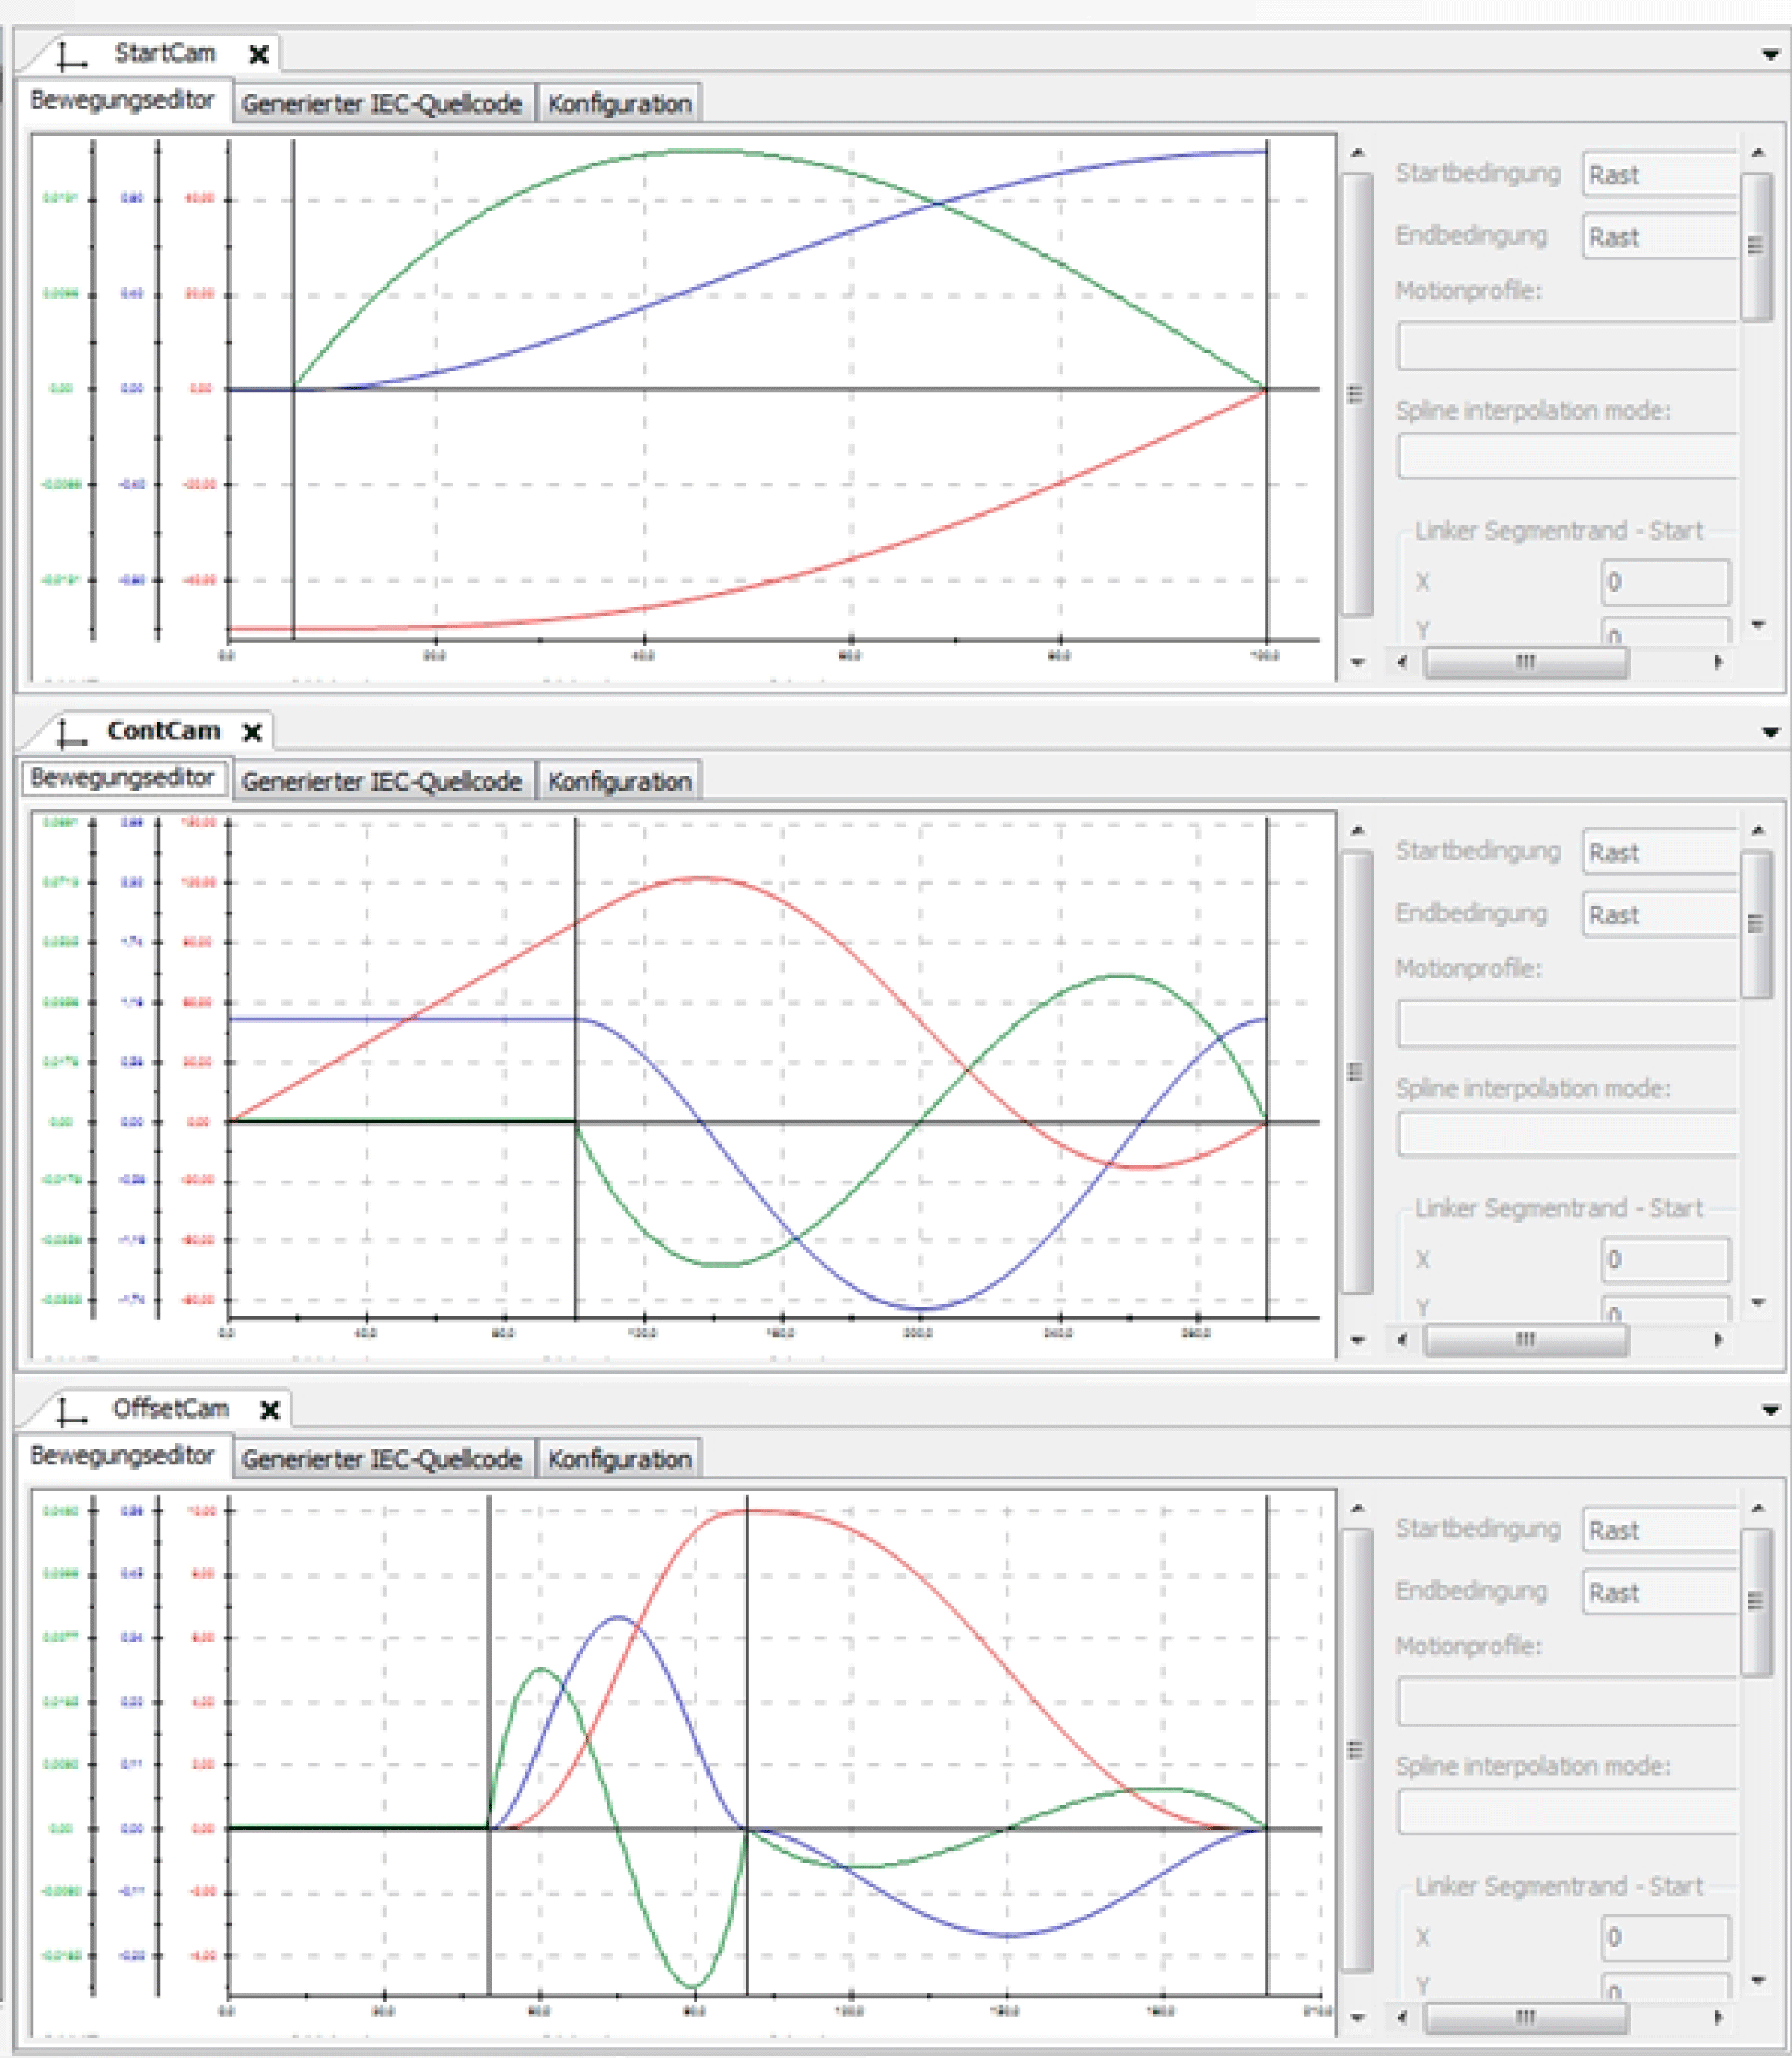
Via the Cam Design Tool (refer to the CAM Motion Editor integrated in EcoStruxure Machine Expert), the necessary cams are created (cam diagrams):
|
Curve |
Description |
|---|---|
|
1. StartCam |
Start the cam from the rest position in the synchronous phase. This is only performed during the cold start. |
|
2. ContCam |
Continuously run the cam with synchronous phase. Reverse the travel to the next synchronous phase or to the rest position by a stop. |
|
3. OffsetCam |
Overlap the cam for the offset motion of the knife. |
NOTE: Changes are made to the application parameters during the operation overwrite stage in the initialization values.
The flying saw application example is performed as a function block and called in the action logic of the equipment module. The function block is structured as a state machine.
When connecting the input iq_stApplicationItf.i_xEnable, the function block is activated and it is deactivated by the disconnection.
After the initialization, the state machine branches in the state 10 and waits for the input iq_stApplicationItf.i_xStart.
|
Condition |
Description |
|---|---|
|
State 10 |
Depending on the input, iq_stApplicationItf.i_xWsSelect, and the variable ,iq_xWsPossible, either a cold- or warm start is performed. The input, iq_stApplicationItf.i_xWsSelect, is set via the operation mode pre-selection of the module (AXM.ET_Cmd.AdditionalWs). The variable, iq_xWsPossible, is set by the function block as soon as the first continuously running cam is active and resets it by a stop or function block problem. Additionally, the iq_xWsPossible can be reset by the application. Cold start: By the cold start, the knife is moved to the start position (i_lrRestPosition). The method, iq_fbSmgAddOn.TakePosJob(), is called for channels A and B. Channel A moves to the rest position and channel B moves to a possible existing offset to zero. Afterwards, it branches to the state 20. Warm start: If a warm start is requested and possible, then the method, iq_fbSmgAddOn.DoWarmStart(), is called. Thereby it moves to the interrupted cam position. At that time, the master must still be at standstill. Afterwards it branches to the state 100. |
|
State 20 |
Here it waits until the cold start was executed. For this, the variable stRTDataTemp.xJobActive is queried. This is a variable of the SMG and refers to all the channels. When the cold start is completed, the start cam is written into the job buffer via the method, iq_fbSmgAddOn.TakeMultiCamJob(). It is also started directly, or else no job will be in process. Afterwards, it branches to the state 30. |
|
State 30 |
Here it waits until the start cam is active (only active, not finished). Then the continuous running cam is written into the job buffer. By using the variable, stRTDataTemp.stChannel_A.diCurrentJobId, the current active job can be determined. The JobId is a parameter that the user can choose freely. In this example, the following JobIds are assigned: oStartCam = 1 oContCam and OffsetCam Endless Mode = 2 oContCam and OffsetCam HighLimit Mode = 3 oApproach ContCam and OffsetCam RestPos = 4 Afterwards, it branches to the state 40. |
|
State 40 |
Here it waits until the continuous running cam is active. Then, the job for the offset cam is written into the channel B. Afterwards it branches to the state 50. |
|
State 50 |
Here it waits until either the start input is omitted or the segment length changes: Start is omitted: If the start is omitted, then it differentiates between two cases. As long the synchronous phase is in progress, the continuously running cam and the stop cam are equal and it is possible to switch directly to the stop cam. Otherwise, the currently continuously running cam has to be brought to an end and then it is possible to switch to the stop cam. oWhen the synchronous phase is in progress, the jobs for the stop cam are sent in the channel A and for the offset stop cam in the channel B. It is also important that the bit, xTerminateCurrentJob, is set to terminate the currently running jobs. Afterwards it branches to the state 70. oAfter the synchronous phase, a continuously running cam is offset again but with the HighLimit active. Afterwards, it branches in the state 60. Segment length changes: If the segment length changes, then it will differentiate between the following two cases: oAs long as the synchronous phase is in progress, the new and the old cams are equal and the job with the new cam can be written into the job buffer directly, with the result, that the old one is cancelled. The curent status remains in the state 50. oAfter the synchronous phase, a job is first in offset active with HighLimit with the old cam and then it branches to the state 90. |
|
State 60 |
Here it waits until the continuously running cam is active with HighLimit and then the job is sent to the stop cam. Afterwards it branches to the state 70. |
|
State 70 |
Here it waits until the stop cam is active and then the stop command is acknowledged (iq_stApplicationItf.iq_xActionCmdDone:= TRUE). Afterwards it branches to the state 80. |
|
State 80 |
Here it waits until the stop cam is completed. Afterwards it branches to the state 10. |
|
State 90 |
Here it waits until the old continuously running cam is completed after a segment length change. Afterwards the job is sent with the new segment length. Afterwards it branches to the state 50. |
|
State 100 |
Here it waits until the warm start is completed, then the job for the continuously running cam is sent. Afterwards it branches to the state 50. |
Error Handling in the Application
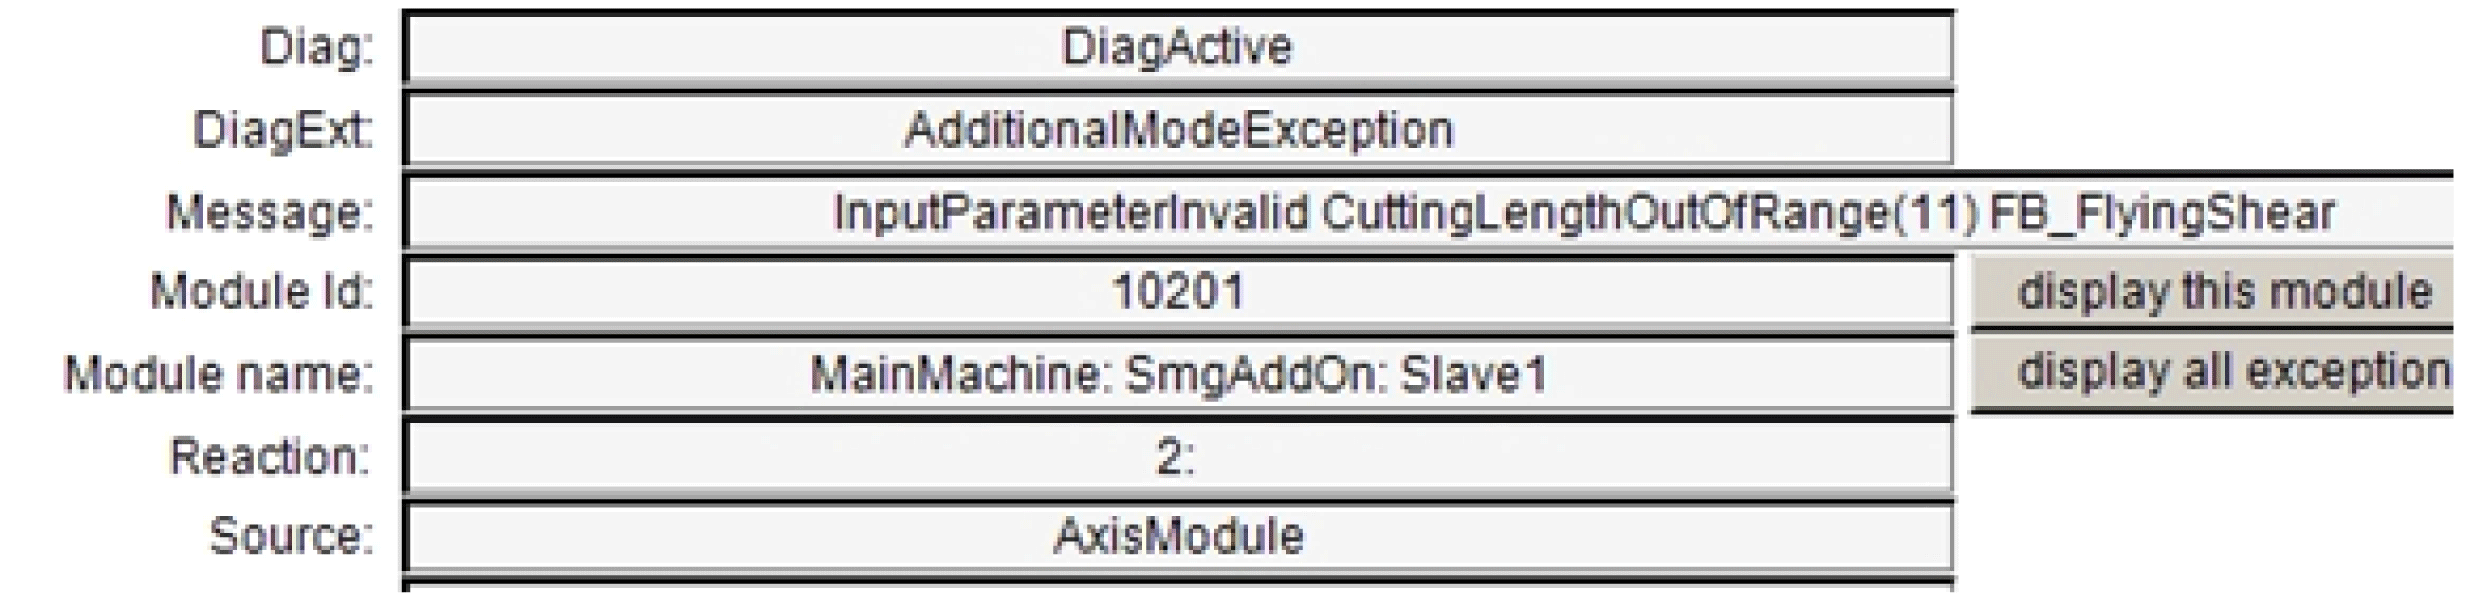
Errors that the application discovers are also sent to the FB_SmgAddOnModule via the variable stApplicationItf and from there to the axis module. In the method CheckParameter of the FB_FlyingShear, this mechanism is used.
The following figure shows the message that is generated through an invalid entry of the segment length:
In addition, a simple visualization is available for the application:
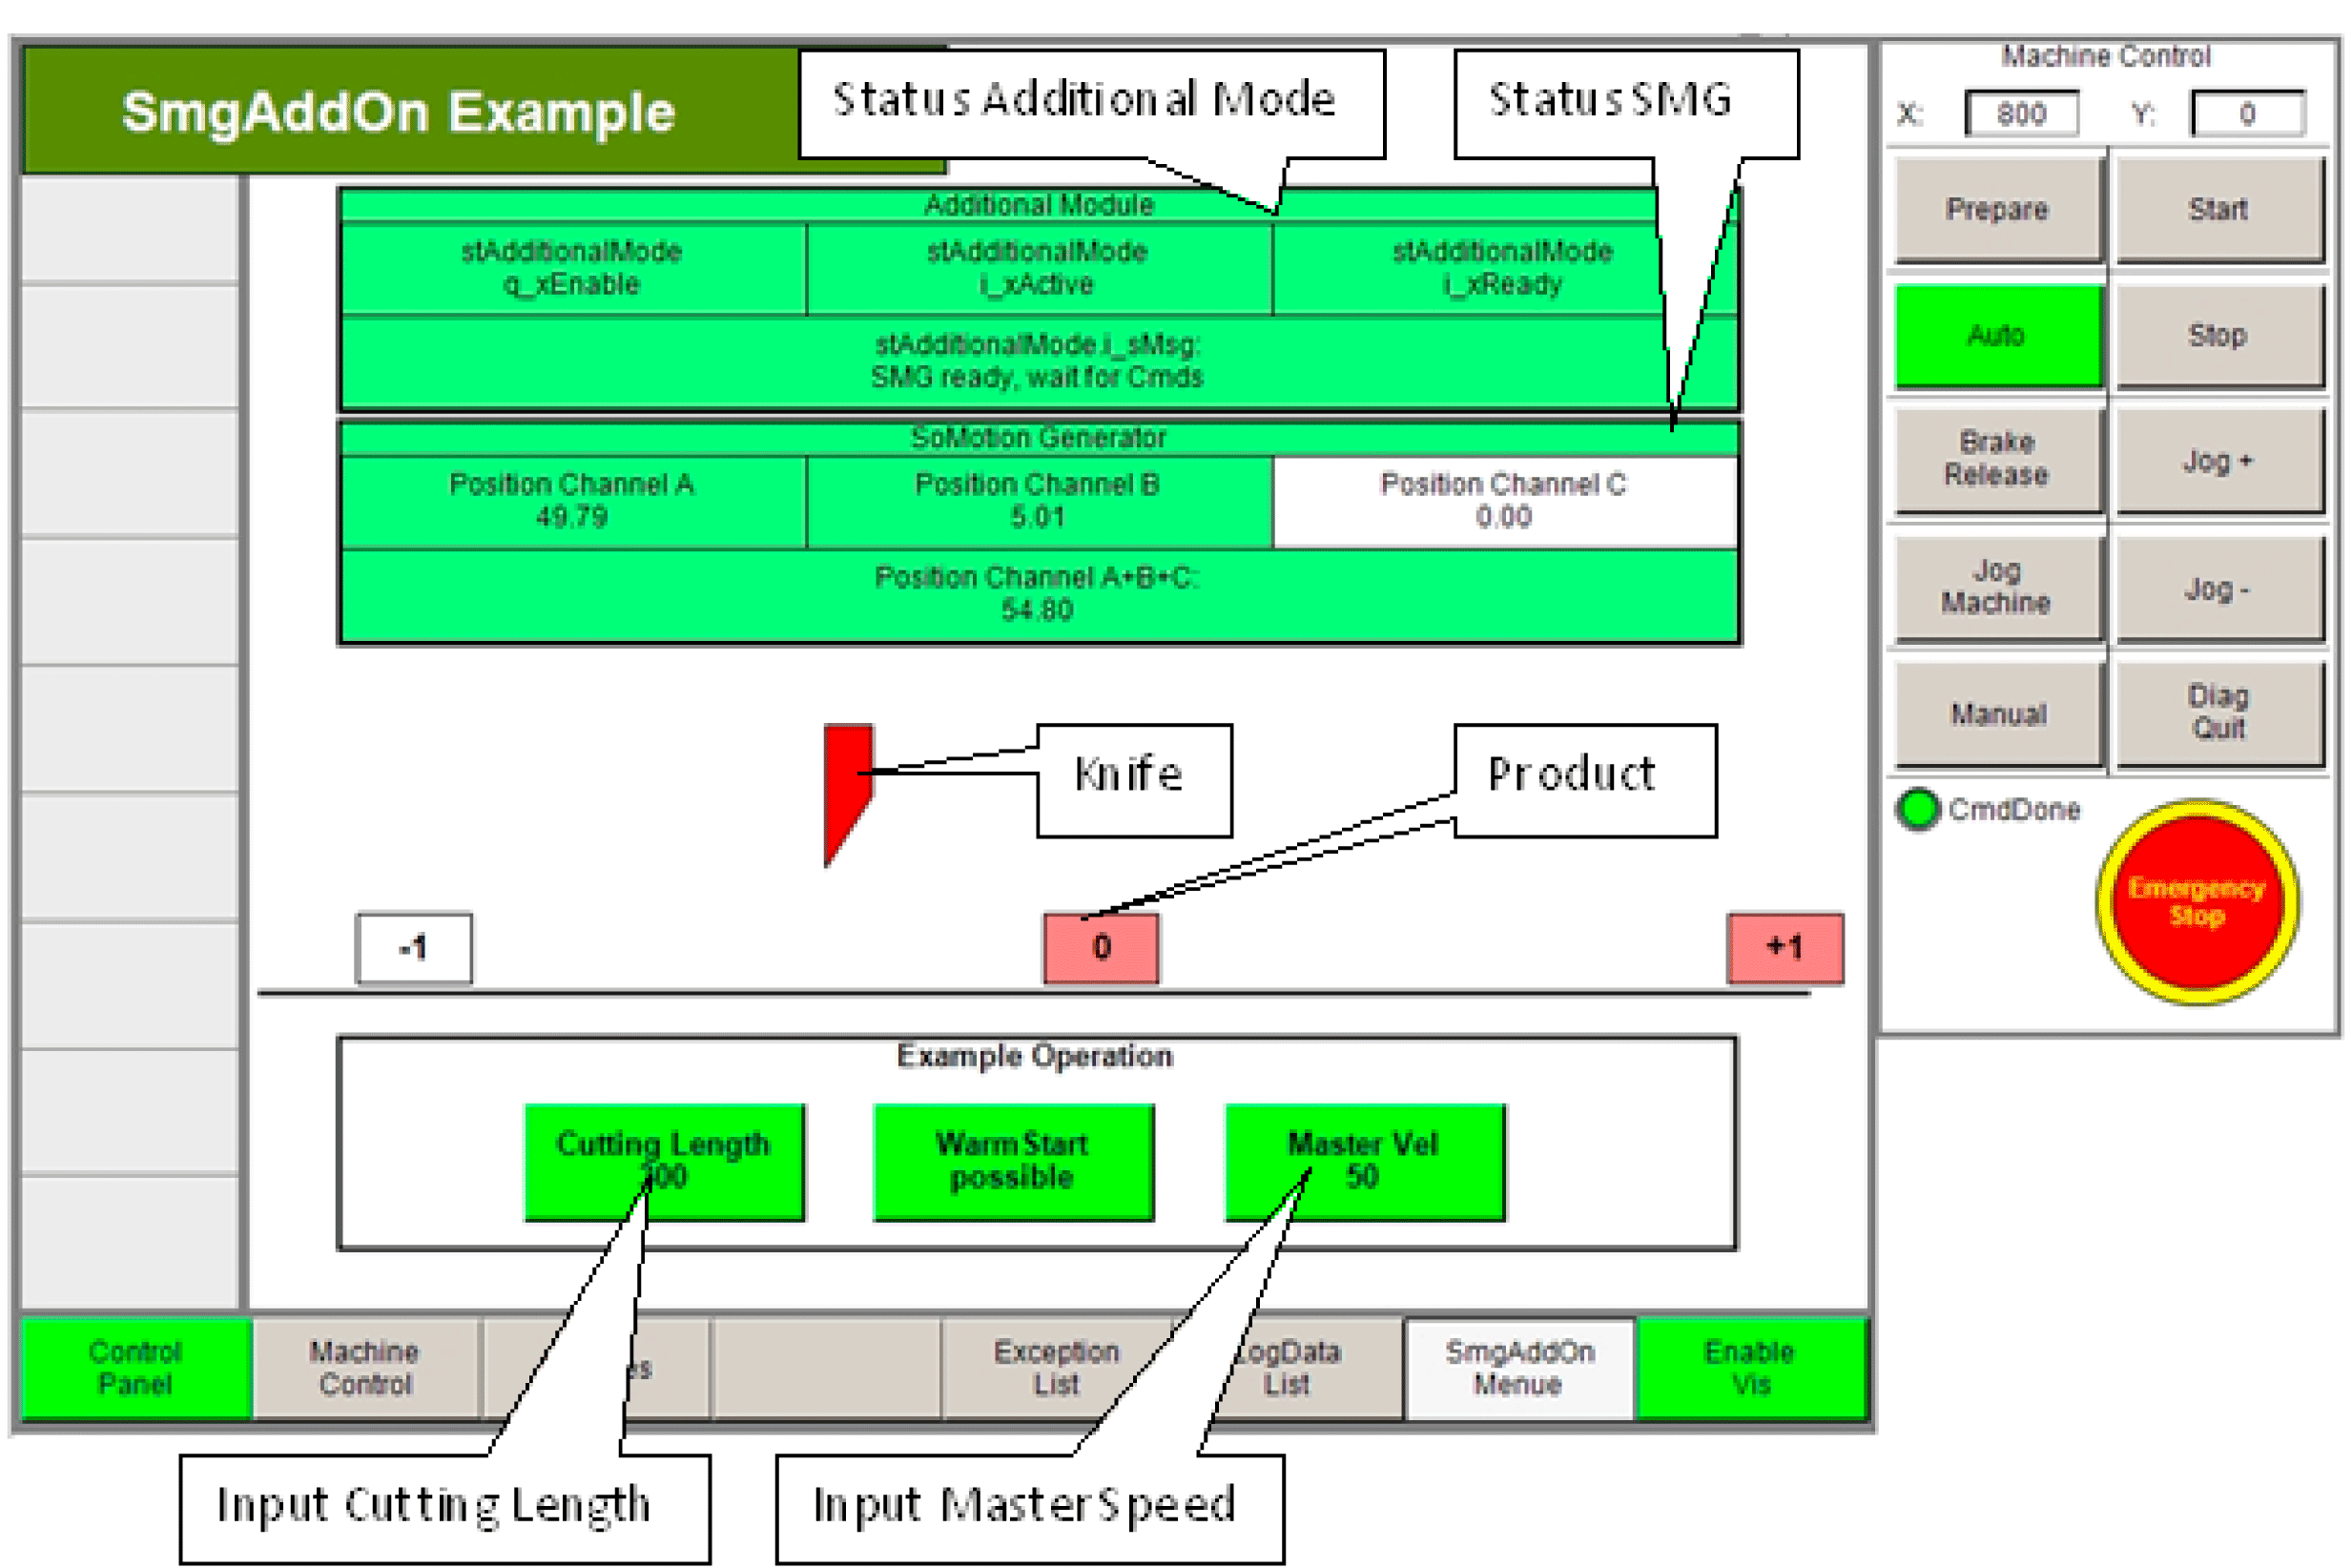
The parameters CuttingLength and MasterSpeed can be changed via the visualization. The variables of the visualization are updated in the action logic of the equipment module.