This tab provides:
oTo print the calibration plate
oTo configure image acquisition
oTo store the calibration results

|
Element |
Description |
|---|---|
|
Calibration Display |
Shows the image received from the camera. |
|
Information Bar |
The information bar at the bottom of the Calibration Display provides information on the job name and the operation mode (online / offline). |
|
|
Click this button to toggle between online and offline mode. |
|
|
Click the Start Calibration button to start the calibration. |
|
|
Click the Step Forward button to move one calibration step forward. |
|
|
Click the Step Backward button to move one calibration step backwards. |
|
Step |
Action |
|---|---|
|
1 |
Click the Start Calibration |
|
2 |
Switch to offline mode. (Click the The selected mode is displayed in the information bar at the bottom of the Calibration Display). |
|
3 |
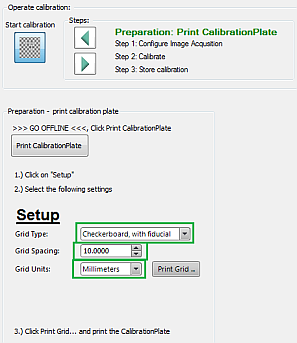
Click the Print Calibration Plate button. Result: The dialog to print a calibration grid is displayed. |
|
4 |
Click the Setup tab and select the following values: oGrid Type: Checkerboard, with fiducial oGrid Spacing: 10.000 oGrid Units: Millimeters |
|
5 |
Click Print Grid button. |
|
6 |
In the Print dialog, select your printer settings and print the calibration plate. |
After printing the calibration plate, click the step forward  button to go to the Configure Image Acquisition dialog.
|
Step |
Action |
|---|---|
|
1 |
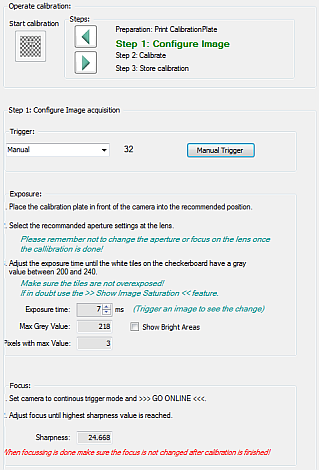
For Trigger, select Manual. (Every time you click the Manual Trigger button, a new image is retrieved from the camera). |
|
2 |
Place the printed calibration plate in front of the camera. |
|
3 |
Select the desired aperture value at the camera. |
|
4 |
Adjust Exposure Time until the white tiles on the checkerboard show a gray value from 200...240. You have to click the Manual Trigger button to see the effect of changing exposure time. NOTE: Keep in mind not to overexpose the white tiles. The image saturation |
|
5 |
For Trigger, select Continuous Trigger. |
|
6 |
Switch to online mode. |
|
7 |
Increase / decrease the focus value at the camera until the maximum Sharpness value is reached. |
NOTE: Do not modify aperture value or focus value after calibration is finished.
After configuring image acquisition, click the step forward button to go to the Calibrate Camera dialog.
|
Step |
Action |
|---|---|
|
1 |
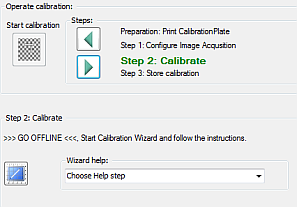
Switch to offline mode. NOTE: The Wizard help list provides additional help. |
|
2 |
Click the Start Calibration Wizard Result: The BandCamera - CalibrateGrid dialog is displayed. |
|
3 |
Click Setup and select the same values as in the Print Calibration Plate dialog: oGrid Type: Checkerboard, with fiducial oGrid Spacing: 10.000 oGrid Units: Millimeters |
|
4 |
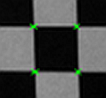
Click Pose. Result: If calibration points are detected by the camera, the Calibration Display is refreshed and green dots are displayed at the corners of the tiles of the checkerboard.
|
|
5 |
Click the Calibrate button. Result: The calibration algorithm is executed, and the Results dialog provides feedback on calibration quality. |
|
6 |
If you agree with the results, confirm with OK. Else go back to the Configure Image Acquisition dialog and modify the settings. |
After calibrating the camera, click the step forward button to go to the Store Calibration dialog.
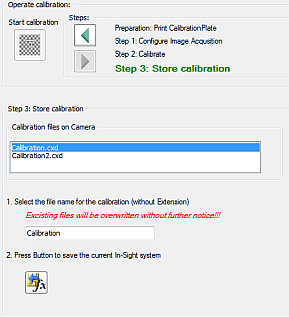
|
Step |
Action |
|---|---|
|
1 |
The Calibration Files on Camera lists the files already stored on the camera. |
|
2 |
Enter a name for your calibration file (without extension) to be stored on the camera. |
|
3 |
Click the Save button. NOTE: Existing files are overwritten without requesting confirmation. |
NOTE: The SchneiderElectric_Calibration.job file is provided with the Camera Module.


 button and the
  button.