|
|
|
oRemove the AUX connector from this product prior to wiring. oStrip wires only to the required length. oDo not solder the wire itself. |
|
Failure to follow these instructions will result in death or serious injury. |
|
Step |
Action |
|---|---|
|
1 |
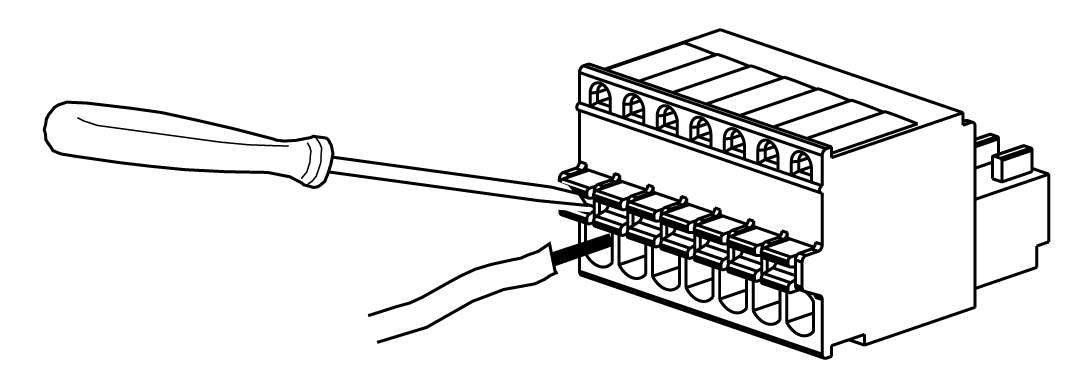
Align the flat-head screwdriver with the groove of the orange spring release button, and while depressing the button insert the electric wire into the wire insertion slot (round-shaped hole). |
|
2 |
Pull out the screwdriver from the release button. The wire insertion slot is then closed and the wire is held securely in place. To remove the wire, align the flat-head screwdriver with the groove of the release button, and while depressing the button pull the wire out. 
|
|
3 |
Insert the wired AUX connector into the Auxiliary Output/Speaker Output Interface (AUX) of this product. |
Recommendations:
oAUX Connector: HMIZGAUX by Schneider Electric
oScrewdriver: Be sure the screwdriver has the following dimensions:
- Blade thickness: 0.4 mm (0.02 in)
- Blade width: 2.0 mm (0.08 in)
Point shape should have isolation properties meeting DIN 5264 and EN60900.
NOTE:
oWire should be AWG 28 to AWG 20 thick and twisted.
oApplicable wire sizes are Style 1015 and Style 1007.
oBe sure to strip 8.0 mm (0.31 in) of cover from the wire.
oUse copper wire rated for 75 °C (167 °F) or higher.