Cabling the VRKP•L0•WF / VRKP•L0•NF
Procedure Overview
Perform the following procedures to cable the robot:
oCabling the robot
oGrounding the robot
oReducing risks around the robot
NOTE: The VRKP•L0•WD / VRKP•L0•NO do not have any cable gland.
Cabling the Robot
|
Step
|
Action
|
|
1
|
Select the connector from of the ILM hybrid cable on motor side: D1 (for example, cable ref.: VW3E1142R•••)
NOTE: For equipment that you are supplying that is not described in the present document, consult the documentation for those products.
|
|
2
|
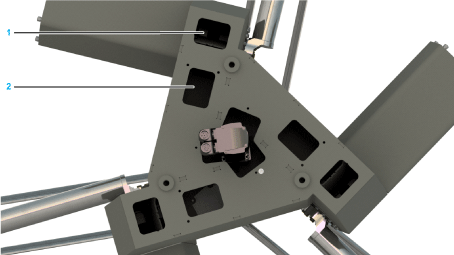
Feed a hybrid cable for each of the three main motors from a Lexium 62 Distribution Box through one of the upper housing apertures (1) or (2) and connect them there.
NOTE: Feed each cable with a minimum cable length of 1.0 m (39.4 in) from the cable connection to the motor connector.
|
|
3
|
Feed the ground cable for each of the three main motors through one of the upper robot housing apertures (1) or (2).
|
|
4
|
Only for VRKP4L0R:
Connect the fourth motor used for the rotational axis.
|
|
5
|
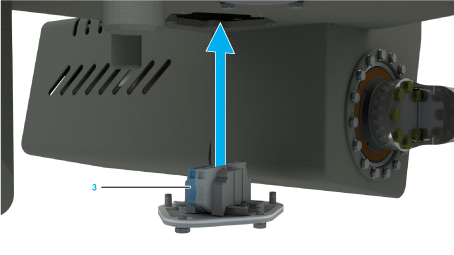
Feed in the 24 Vdc supply through the upper housing apertures, presented as (1) and (2) in the figure above, to the terminal strip (3) inside the housing.
|
|
6
|
Connect the 0 Vdc conductor to the blue multiple terminal.
|
|
7
|
Connect the +24 Vdc line with the gray multiple terminal.
For the distribution of the +24 Vdc supply for further customer-specific installations, use the following Schneider Electric accessory parts:
oBlue terminal: NSYTRR24BL
oGray terminal: NSYTRR24
oEnd stop bracket: NSYTRAABV35
|
|
8
|
Verify the correct routing and fastening of the cables to help prevent any collision of cables and moving parts.
|
|
9
|
Verify that the fans take air from the central area of the housing and blow it out through the slits in the motor covers.
|
|
  DANGER DANGER
|
|
LOOSE WIRING OR CABLING CAUSES ELECTRIC SHOCK
|
|
Tighten wiring or cabling connections in conformance with the torque specifications.
|
|
Failure to follow these instructions will result in death or serious injury.
|
|
NOTICE
|
|
INADEQUATE HEAT DISIPPATION
|
|
oDo not close more than 50% of the apertures on the top of the robot.
oVerify that the fans are working correctly.
|
|
Failure to follow these instructions can result in equipment damage.
|
For further information on the connection of the Lexium 62 Distribution Box, refer to the document Lexium 62 ILM Hardware Guide.
Grounding the Robot
The procedure for grounding the VRKP•L0•WF / VRKP•L0•NF corresponds to the procedure for grounding the VRKP•L0•WD / VRKP•L0•NO.
Reducing Risks Around the Robot
|
Step
|
Action
|
|
1
|
Install external safety-related devices in accordance to local regulations and standards.
|
|
2
|
When designing the safety-related devices, assume that the robot cannot be stopped by internal logic and must be stopped by the external safety-related devices.
NOTE: More information about the circuitry of emergency stop and additional protection elements is contained in the document Lexium 52 Hardware Guide, Lexium 62 Hardware Guide, or Lexium 62 ILM Hardware Guide.
|
|
3
|
If necessary, mount an ILM62-DIO8 module on the telescopic axis drive (VRKP4L0R only).
NOTE: After assembling a DIO8 module, the performance can be affected due to decreased heat dissipation and possible overheating.
|