|
|
|
HAZARD OF ELECTRIC SHOCK, EXPLOSION, OR ARC FLASH |
|
oOnly use the sealing washers supplied. oOnly use stainless screws. oTighten the screws with the specified tightening torques in order to produce electric conductivity between the cover and the housing. oVerify that all motor supply cables are permanently connected to the motors before closing the housing. |
|
Failure to follow these instructions will result in death or serious injury. |
|
NOTICE |
|
LOSS OF IP65 DEGREE OF PROTECTION |
|
Replace each sealing gasket every time you remove the maintenance cover(s). |
|
Failure to follow these instructions can result in equipment damage. |
|
Step |
Action |
|---|---|
|
1 |
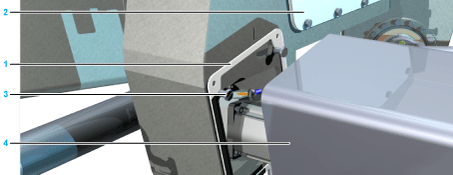
Mount all the maintenance covers (2) including the seal to the robot. Tightening torque: 6 Nm (53 lbf-in) 
NOTE: For transportation, the maintenance covers are loosely bolted with a few screws for a fast assembly. The screws and washers necessary for mounting are located among the small parts supplied in the interior of the housing. For information on screws and washers, refer to the respective detail drawing in Mechanical and Electrical Data. |
|
2 |
Hook the motor cover seal (1) to the capture screws of the housing. |
|
3 |
Hook the motor covers (4) on the capture screws (3) and ensure that the seals are positioned correctly. A motor cover protrusion of approximately 3 mm (0.118 in) is intended. |
|
4 |
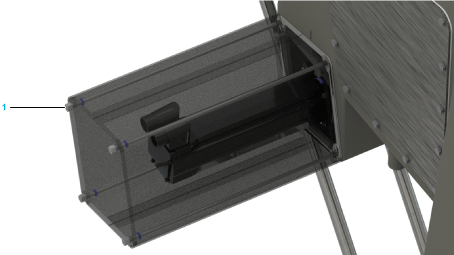
Tighten the four threaded rods at the rear end of each motor cover (1). Tightening torque: 6 Nm (53 lbf-in) 
|
|
5 |
Tighten all the screws of the media covers on the upper and the bottom side of the robot. Tightening torque: 6 Nm (53 lbf-in) |