Configuration with ARMIO Board
In the ARMIO board version, the robot is supplied with integrated digital and analog inputs/outputs on the tool flange.
Connection at the Level of the Base (or Console)
In its configuration with an ARMIO board the robot is supplied with the following connectors:
oBINDER 5-point connector (connection X1210)
Fit the complete connection cable with a female BINDER connector to the connection X1210 to provide the function (24 V cable – for example, to release the joint brake). The cable is set with open wires at the other end and it is available in different lengths (reference VW3E1169R•••).
oBINDER 6-point connector (connection X1202)
As an option, you can fit a complete connection cable with a female BINDER connector to the connection X1202 to provide the function (CAN bus). The cable is set with a 9-point connector at the other end and it is available in different lengths (reference VW3E3067R•••).
Connection at the Level of the Arm 2
Digital inputs:
oNominal voltage: 24 Vdc (minimum 20 Vdc, maximum 28 Vdc)
oVoltage for logical 0: 0…11 Vdc
Voltage for logical 1: 16…28 Vdc
oInput current: 11 mA maximum
oResponse time (hardware and software): 6 ms
Digital outputs:
oNominal voltage: 24 Vdc (minimum 20 Vdc, maximum 28 Vdc)
oMaximum current per output: 0.5 A
oMaximum current for all outputs: 2 A
oResponse time (hardware and software): 6 ms maximum
Analog inputs:
oInput voltage: +/-10 V
oResolution: 78 mV
oAccuracy: 5%
oResponse time: 6 ms
Analog outputs:
oOutput voltage: 0/+10 V
oResolution: 2.4 mV
oAccuracy: 5%
oResponse time: 6 ms
Identification Marks on the ARMIO Board
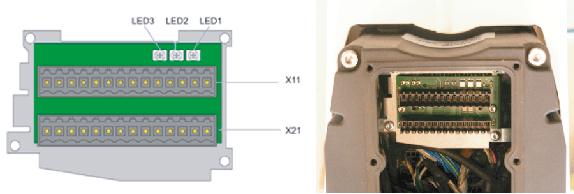
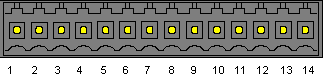
X11
|
Pin |
Correspondence |
|---|---|
|
1 |
cAout 0 |
|
2 |
cAout 1 |
|
3 |
cDout0 |
|
4 |
cDout1 |
|
5 |
cDout2 |
|
6 |
cDout3 |
|
7 |
cDout4 |
|
8 |
cDout5 |
|
9 |
cDout6 |
|
10 |
cDout7 |
|
11 |
+24 Vdc |
|
12 |
0 V |
|
13 |
cAout2 |
|
14 |
cAout3 |
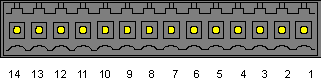
X21
|
Pin |
Correspondence |
|---|---|
|
14 |
cDin0 |
|
13 |
cDin1 |
|
12 |
cDin2 |
|
11 |
cDin3 |
|
10 |
cDin4 |
|
9 |
cDin5 |
|
8 |
cDin6 |
|
7 |
cDin7 |
|
6 |
cAin3 |
|
5 |
0 V analog |
|
4 |
cAin2 |
|
3 |
cAin1 |
|
2 |
0 V analog |
|
1 |
cAin0 |
Electrical diagram
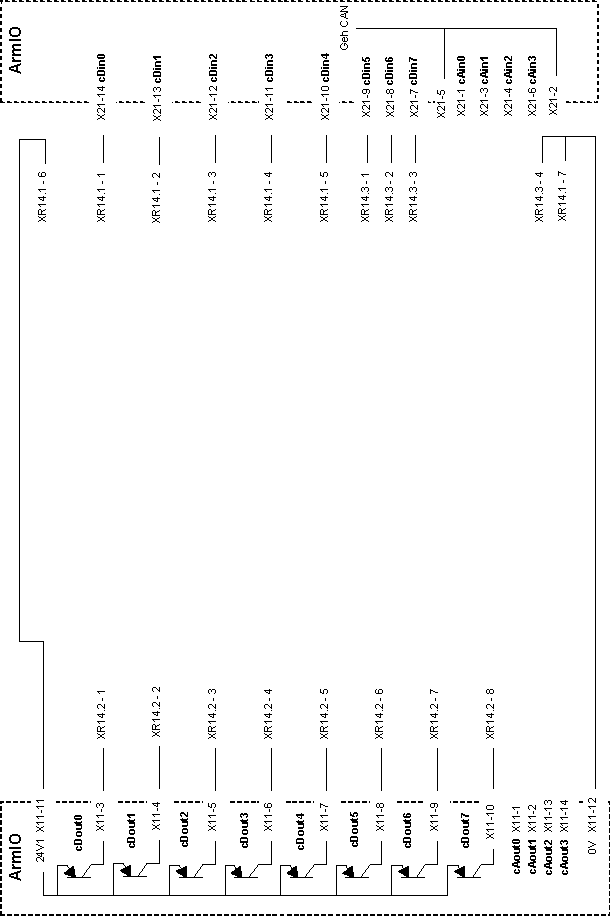
Identification of the Connections
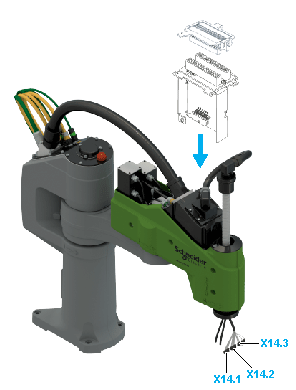
This connection uses the ARMIO board fitted under the cover of arm 2.
The user cable is connected on the arm 2 to X11 and X21 before leading to the tool interface. Once the cable has been installed, the X14.1, X14.2 and X14.3 sockets are connected as shown in the following table.
|
Socket |
Pin |
Color |
Socket |
Pin |
Function |
|---|---|---|---|---|---|
|
X21 |
14 |
Gray |
X14.1 |
1 |
cDin0 |
|
13 |
White, green |
X14.1 |
2 |
cDin1 |
|
|
12 |
White, yellow |
X14.1 |
3 |
cDin2 |
|
|
11 |
White, brown |
X14.1 |
4 |
cDin3 |
|
|
10 |
White, orange |
X14.1 |
5 |
cDin4 |
|
|
9 |
Orange |
X14.3 |
1 |
cDin5 |
|
|
8 |
Yellow |
X14.3 |
2 |
cDin6 |
|
|
7 |
Green |
X14.3 |
3 |
cDin7 |
|
|
X11 |
3 |
White |
X14.2 |
1 |
cDout0 |
|
4 |
White, black |
X14.2 |
2 |
cDout1 |
|
|
5 |
White, violet |
X14.2 |
3 |
cDout2 |
|
|
6 |
Blue |
X14.2 |
4 |
cDout3 |
|
|
7 |
Black |
X14.2 |
5 |
cDout4 |
|
|
8 |
White, gray |
X14.2 |
6 |
cDout5 |
|
|
9 |
White, blue |
X14.2 |
7 |
cDout6 |
|
|
10 |
White, red |
X14.2 |
8 |
cDout7 |
|
|
X11 |
11 |
Red |
X14.1 |
6 |
+24 V |
|
12 |
Violet |
X14.3 |
4 |
0 V |
|
|
12 |
Brown |
X14.1 |
7 |
0 V |
|
|
X21 |
5 |
Green, yellow |
Protective ground (earth) |
– |
– |
|
X21 |
2 |
Blue |
Protective ground (earth) |
– |
– |
Setting Up the Tool Interface Connection for the Configuration with ARMIO Board
Type of connections Molex 2.50 mm (0.098 in) SPOX:
oTwo 8-pins, article: 22-01-1084
oOne 4-pin, article: 22-01-10449

NOTE: These connections are also suitable for the Tool Connector.