Saving a Project as Project Archive
Overview
Before you install a different version of EcoStruxure Machine Expert software, or when your project is completed, it is a good practice to create an archive of your project. The archive contains the files included and referenced in the project with settings and profiles.
Project archives provide the following advantages:
-
You can extract the project archive to another computer with EcoStruxure Machine Expert installed. In this way, you can share your projects with others or run it on another computer.
-
Creating an archive can help reduce compatibility concerns with later versions of EcoStruxure Machine Expert.
When you create an archive, you can save additional information that is not included in a *.project file:
-
Download information files
-
Referenced (third-party) libraries
-
Referenced devices (with EDS files)
When you extract your archive in EcoStruxure Machine Expert, the files contained in your archive are automatically installed in your present EcoStruxure Machine Expert version.
Create a Project Archive on Your Computer
To create a project archive on your computer, proceed as follows:
|
Step |
Action |
Result/Comment |
|---|---|---|
|
1 |
Execute the command . |
The dialog box opens. 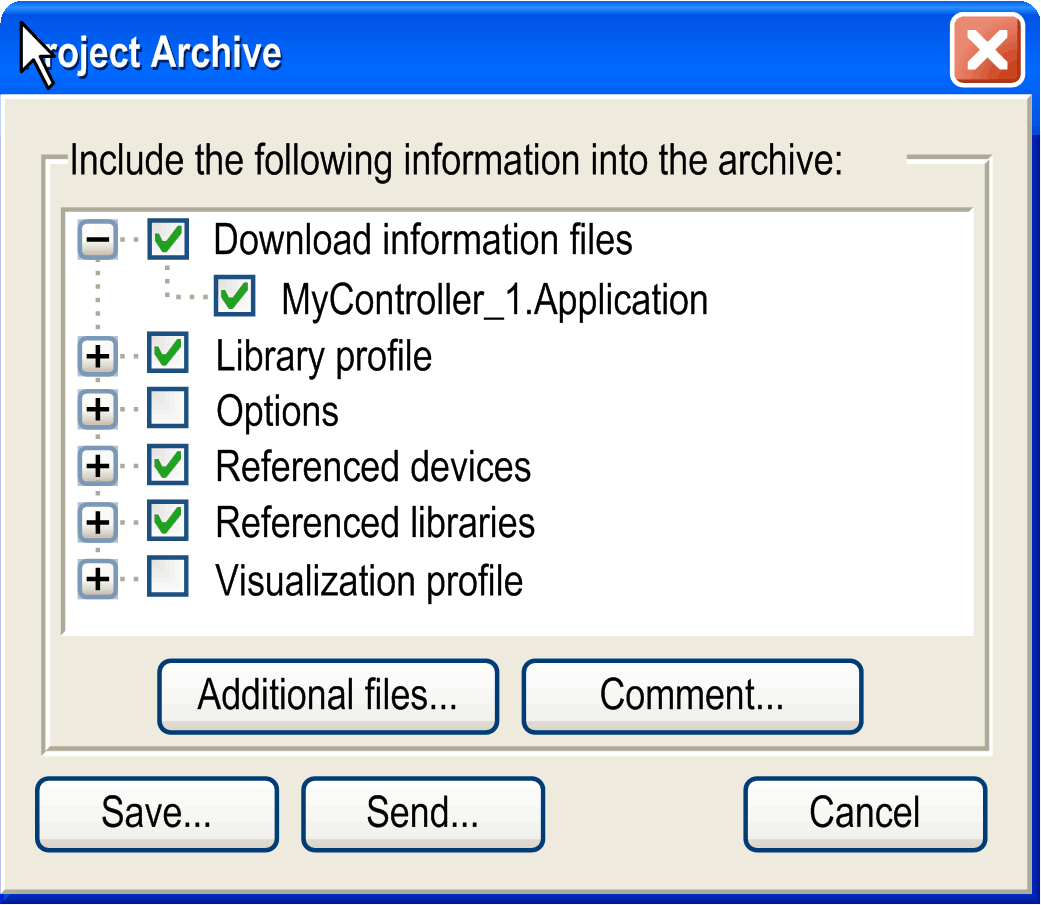
|
|
2 |
Select the information to include in the archive by selecting / deselecting the check boxes of the different categories.
NOTE: Entries that are displayed red require your attention. Move the mouse pointer over the red library to display a tooltip for more information.
|
The individual categories are described below this table. |
|
3 |
Click . |
The dialog box opens. |
|
4 |
In the dialog box , enter a , browse to the folder where you want to save the archive, and click the button. |
The project archive file is created and saved at the specified location. |
Categories of the Dialog Box
The dialog box allows you to select information from the project to include in the project archive. You can select an entire category or specific information within a category:
|
Category |
Description |
|---|---|
|
|
Select the option to include the compile information (the compileinfo file) to the archive of your project. This allows you to log in to the controllers with the archived project without rebuilding the project. |
|
|
Select the option to include DTM information in the project archive. |
|
|
Select the libraries from the list of libraries in the library profile used in the project. |
|
|
Select the options to include in the archive, as they are defined in the dialog box. You can distinguish between local settings and user settings, but also all settings and project-specific settings. |
|
|
Select the devices used in the project to include in the archive. Select this category to help to preserve compatibility. |
|
|
Select the libraries located in the of your project to include in the archive. Select this category to help to preserve compatibility |
|
|
Select the smart template located in the of your project to include in the archive. Select this category to help to preserve compatibility |
|
|
Select the visualization profile in use to include in the archive of the project. |
Buttons of the Dialog Box
The dialog box contains the following buttons providing further functions:
|
Category |
Description |
|---|---|
|
|
Click the button to select individual files or folders to be included in the archive. |
|
|
Click the button to open an input field allowing you to enter a comment. This comment will be available when extracting the project archive. |
|
|
Click the button to save the project archive. |
|
|
Click the button to send the archive file via email. The email client installed on your computer is started and opens a new email with the archive file in the attachment. |
|
|
Click the button to close the dialog box without creating a project archive. |