Using Texts
You can have text displayed in an element by assigning a string in the property . For example, all basic elements have this property. You can also have a text shown as a tooltip (element property ). Texts assigned in this way are static. They are managed in the GlobalTextList object in the POUs view and can be changed neither programmatically nor by user input during the runtime of the visualization.
However, you can expand a static text by (exactly) one placeholder with a formatting specification in order to output the content of a variable at this point. The current value of the variable that you have assigned in the property will then be output at runtime.
For the possible formatting specifications, see: Placeholders with Format Definition in the Output Text.
You can animate the purely visual text display through dynamic configuration.
You can localize the static texts if you have set up multilingualism in the project.
For a few examples of the text configuration of visualization elements, see the sections below.
See also
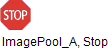
Labeling an image element with a static text
Requirement: A project is open with a visualization. You have an image file for a stop symbol.
-
Under the application, insert an Image Pool object named
ImagePool_A. -
Add an image with the
StopID toImagePool_A.⇒

-
Open the visualization and drag an Image element to the editor.
⇒ The input assistant opens.
ImagePool_Ais listed in theCategorytab. -
Select the
Stopimage and click OK to close the dialog. -
Configure its Text property:
ImagePool_A, Stop -
Configure the property :
Left. -
Configure the property :
Bottom.⇒
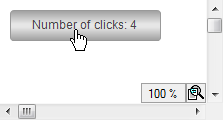
Text output: Element outputs the result of an ST code executed upon a mouse click in text form.
Requirement: A project is open with a visualization.
-
Open the visualization and added a Button element.
⇒ The Properties view opens for the new button.
-
Configure the Text property:
Number of clicks: %i.⇒ The string contains the placeholder
%i. -
In the application, declare a variable with matching type in the
PLC_PRGPOU:iClicks : INT;. -
Configure the Text variable property of the button as
PLC_PRG.iClicks.⇒ The variable value is output instead of the placeholder at runtime.
-
In the Input configuration property, click the Configure button in the
OnMouseClickline. -
Select
Execute ST Codefrom the list of possible actions. -
Program the code for the action in the editor in Execute ST Code:
PLC_PRG.iClicks := PLC_PRG.iClicks + 1; -
Click OK to close the dialog.
⇒ The user input is configured.
-
Compile, download, and start the application.
⇒ The application runs. The visualization opens. The element is labeled and the number of clicks is output. The number is increased if you as the user click on the button.
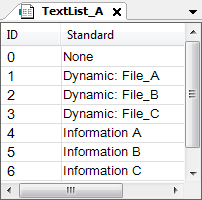
Text output: Dynamic from a text list
You can dynamically output text with the help of the Text Field element. You can implement a text output by a user input or programmatically.
Requirement: A project is open with a visualization.
-
Open the visualization and add a Text Field element.
⇒ The Properties view shows the configuration of the element.
-
Below the application, add a text list with text list entries:
TextList_A.⇒
-
In the application in the POU
PLC_PRG, declare the text variable:strTextID : STRING := '0'; -
Also declare there the variable
strTooltipID : STRING := '0'; -
Also declare there the variable
iText : INT; -
Configure the property with
'TextList_A'. -
Configure the property with
PLC_PRG.strTextID. -
Configure the property with
PLC_PRG.strTooltipID. -
In the application in the POU
PLC_PRG, program the CASE instruction as shown below.⇒ The variables in the property are programmed.
-
Configure the property for
Execute ST CodewithPLC_PRG.iText := (PLC_PRG.iText + 1) MOD 4;⇒ A user input is configured for the Text Field element.
-
Compile, download, and start the application.
⇒ The application runs. The visualization opens. The text
Noneis output in the text field. If you as the user click on the element, the text changes toDynamic_ File_A. In addition, the matching tooltip is shown:Information A. The text changes with each click according to the CASE instruction.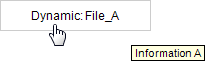
CASE instruction
CASE iText OF
0:  strTextID := '0';
    strToolTipID := '0';

1:  strTextID := '1';
    strToolTipID := '4';

2:  strTextID := '2';
    strToolTipID := '5';

3:  strTextID := '3';
    strToolTipID := '6';
ELSE
    strTextID := '0';
    strToolTipID := '0';
END_CASE;
Text output: Configure static + dynamic text output
You can define a text in in order to output it statically. A text in is shown as a tooltip. You can configure the text in such a way that the content of a variable is output with it.
You can expand a static text by (exactly) one placeholder with a formatting specification in order to output the content of a variable at this point at runtime. The variable that you have assigned in the property is output. If the variable changes in the application code, then its output in the visualization changes at the same time.
Requirement: A project is open with a visualization.
-
Open the visualization and add a Text Field element.
⇒ The Properties view shows the configuration of the element.
-
Configure the property :
File name: %s⇒ The text contains the placeholder
%s. -
In the application in the POU
PLC_PRG, declare a type-compliant variablestrFileName : STRING := 'File_A'; -
Configure the Text variable property of the button with
PLC_PRG.strFileName.⇒ The content of the variable will be output instead of the placeholder at runtime.
-
Compile, download, and start the application.
⇒ The application runs. The visualization opens. The element outputs the text:
File name: File_A
See also
Text input in the text field
You can drag the Text Field element into your visualization in order to display text in it or to give the user an option to input to this variable.
In addition, you can configure a text input. Upon a user input, an input field then appears in the window area of the Text Field element. This necessitates configuring a user input in the property.
You can find a sample project for using text fields in visualizations in the CODESYS Store.
See also
Showing text as a tooltip
Requirement: A project is open with a visualization.
-
Open the visualization and add a Text Field element.
⇒ The Properties view shows the configuration of the element.
-
Configure the property :
File name: %s⇒ The text contains the placeholder
%s. -
Configure the property :
Storage location: %s -
In the application in the POU
PLC_PRG, declare a type-compliant variablestrFileName : STRING := 'File_A'; -
In the application in the POU
PLC_PRG, declare the variablestrFileDir : STRING := 'D:/Data'; -
Configure the Text variable property of the text field with
PLC_PRG.strFileName.⇒ The content of the variable will be output instead of the placeholder at runtime.
-
Configure the Tooltip property of the text field with
PLC_PRG.strFileDir. -
Compile, download, and start the application.
⇒ The application runs. The visualization opens. The element outputs the text:
File name: File_AWhen the mouse pointer moves over the text field, the tooltip appears:Storage location : D/Data.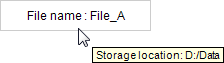
See also
Configuring a Text Field element for text input
So that the user can enter text in a text field, configure an input of the type Write a Variable to a text output variable. This text output variable will save the user's input and display it the output text in place of the placeholder ( %s in the example below). You specify the text output variable in the property .
Requirement: A project is open with a visualization.
-
In the application in the POU
PLC_PRG, declare a string variable:strInput : STRING; -
Open the visualization and add a Text Field element.
⇒ The Properties view shows the configuration of the element.
-
Configure the property with
Input: %s. -
In the Input configuration property for the OnMouseClick mouse action, click on Configure to open the Input Configuration dialog. Select the Write a variable action in the dialog and activate the Use text output variable option for this purpose. Click OK to close the dialog.
-
Now assign the text output variable
PLC_PRG.strInputin the property . -
Compile, download, and start the application.
⇒ The application runs. The visualization opens. The element outputs the text:
Input:. Click on the element. An input field then appears in which you can enter a string. The text is accepted when you press the Enter key.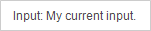
Animating a text display
You can configure the property in order to animate the display of text. All basic elements have this property as well as tables, scrollbars and text fields.
See also
Configuring an element 'Label'
Requirement: A project is open with a visualization.
-
Open the visualization and add a Label element.
⇒ The Properties view opens with its default properties.
-
Configure the property :
Visualization A.
Hiding an element
You can configure the property in order to hide an element.
Requirement: You have a text field in the visualization that is shown only if a specific application variable is TRUE. For example, in order to display instructions or an explanation for a specific state only.
-
Configure the property for the text field with
Error detected: Do the following....Configure the property with Dark red.
-
In
PLC_PRG, declare the variablebIsInvisible : BOOL : TRUE;(the initialization here for the example; otherwise the variable is set to TRUE by the application program under certain conditions. -
Configure the property with
PLC_PRG.bIsInvisible. -
Compile, download, and start the application.
⇒ The application runs. The visualization opens and the text field is invisible. If you now set bIsInvisible to TRUE, the text field appears.