Configuring Text Input with the Virtual Keyboard
A visualization is usually configured so that it calls a virtual keyboard for a text input event when an input device is not available. For this purpose, the follow-up action Write variable is preset accordingly in the user input: The value Standard is selected for the Input type setting.
For example, controllers that are employed as CODESYS TargetVisu often do not have a keyboard. A visualization calls a virtual keyboard. In contrast, a CODESYS WebVisu usually has a keyboard. A users specifies text the by means of a keyboard.
However, you can also configure especially how text is input. For this purpose, more input types are available in the user input, such as Text input or the listed visualizations. These visualizations have the visualization type Numpad/Keypad and display virtual keyboards or numeric keypads.
In the Settings for default text input setting of the visualization manager you can preset a keyboard visualization that is called from all visualizations in the application when required. This is possible without having to customize the user inputs of the visualizations.
See also
Configuring ordinary text input
Requirement: A project is open with a visualization. The CODESYS TargetVisu does not have a keyboard.
-
Declare an input variable in the
PLC_PRGprogram.⇒
VAR_INPUT stInput : STRING; END_VAR -
Add a button to the visualization and select the element.
-
Configure the property with
Text input: %s. -
Configure the property with
PLC_PRG.stInput. -
Click Configure in the property .
⇒ The Input Configuration dialog box opens. The selected input event is printed below the caption.
-
Select the Write variable action.
-
Select the value
Standardin Input type of the implementation of the action.⇒ The input is configured as usual.
-
Compile, download, and start the application as CODESYS TargetVisu.
⇒ The visualization opens.
-
Click the button as a visualization user.
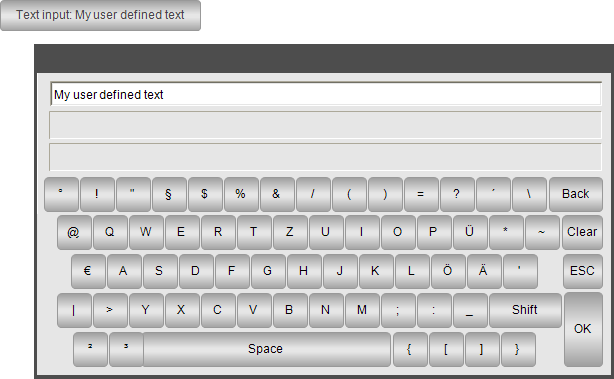
⇒ An input field appears with a virtual keyboard that allows text input by means of the mouse.
-
Compile, download, and start the application as CODESYS WebVisu.
⇒ The visualization opens.
-
Click the button as a visualization user.
⇒ An input field appears and prompts for text input.
See also
Configuring text input especially for virtual keyboards
Requirement: A project is open with a visualization.
-
Declare an input variable in the
PLC_PRGprogram.⇒
VAR_INPUT stInput : STRING; END_VAR -
Add a button to the visualization and select the element.
-
Configure the property with
Text input: %s. -
Configure the property with
PLC_PRG.stInput. -
Click Configure in the property .
⇒ The Input Configuration dialog box opens. The selected input event is printed below the caption.
-
Select the Write variable action.
-
Select the visualization
Visudialogs.Keypadin Input type of the implementation of the action.⇒ The virtual keyboard
Visudialogs.Keypadis selected as the input device. -
Compile, download, and start the application.
⇒ The visualization opens.
-
Click the button as a visualization user.
⇒ The virtual keyboard appears and allows text input by means of the mouse.
See also
Configuring numeric input especially for virtual numeric keypads
Requirement: A project is open with a visualization.
-
Declare an input variable in the
PLC_PRGprogram.⇒
VAR_INPUT iInput : INT; END_VAR -
Open the visualization and added a Rectangle element.
-
Select the element in the editor.
⇒ The properties are visible in the Properties view.
-
Configure the property with
Number input: %i. -
Configure the property with
PLC_PRG.iInput. -
In the Input configuration property, click the Configure button in the
OnMouseClickline.⇒ The Input Configuration dialog box opens. The selected input event is printed below the caption.
-
Select the
Write variableaction from the list of possible actions and click the symbol.
⇒ The action appears in the list of actions to be executed. The blank implementation of the action appears in the window area to the right of the list.
-
Select the following settings:
Input type set to
VisuDialogs.Numpad.Choose variable to edit set to Use text output variable.
Dialog title set to
'My virtual numpad'. -
Click OK to close the dialog box.
⇒ The user input is configured.
-
Compile, download, and start the application.
⇒ The application runs. The visualization opens. When a user clicks the rectangle, the numeric keypad opens.

Defining standard text input
Requirement: A project is open with a visualization and a user input configuration. For all Write variable follow-up actions, the value Default is selected for the Input type setting.
-
Double-click the visualization manager.
-
Click in the default text input in the Settings tab (Default text input group) and assign visualizations.
⇒ These visualizations are defined as default text input. If a display variant does not have a keyboard, then these visualizations are called without you having to adapt the user input.