The use of sensors can provide some protection against hazards (for example, collision with mechanical stop caused by incorrect reference values).
Fastening threads for sensors mounting are located at:
oSensor holding plate (CAR40)
oAxis body adapter plate (CAR41)
oAxis body (CAR42 / CAR43 / CAR44)
|
|
|
LOSS OF CONTROL |
|
oEnsure that sensors are installed if your application, based on your risk assessment, requires sensors. oVerify correct connection of the sensors. oVerify that the sensors are sufficiently distant from the mechanical stop to allow an adequate stopping distance. oVerify correct parameterization and function of the sensors. |
|
Failure to follow these instructions can result in death, serious injury, or equipment damage. |
You need the following tools to mount the sensors:
oFeeler gauge
oOpen-end torque wrench SW 13 (1/2 AF)
For suitable parts, refer to Replacement Equipment and Accessories.
Perform the following procedures to mount the sensors:
oPreparing the mounting of the sensors
Preparing the Mounting of the Sensors
|
Step |
Action |
|---|---|
|
1 |
Verify the sensors for correct type and function. |
|
2 |
Verify that your controller and your interface are suitable for the sensors. |
|
3 |
Clean all parts. |
|
4 |
Inspect all parts for damage. |
|
NOTICE |
|
UNINTENDED EQUIPMENT OPERATION |
|
oReplace any damaged parts immediately. oClean all parts before assembly and use. |
|
Failure to follow these instructions can result in equipment damage. |
Before you mount the sensors, be aware of the switching distance:
NOTE: Since the sensors operate inductively, the switching surface must have a specific distance from the end plate (CAR40) or from the contact block (CAR41 / CAR42 / CAR43 / CAR44). This switching distance is 0.5 +/- 0.1 mm (0.0197 +/- 0.0039 in).
|
Step |
Action |
|---|---|
|
1 |
For CAR40: Move the end plate until it is under the fastening thread in the sensor holding plate. For CAR41: Move the end plate (4) with the contact block (3) until the contact block is under the fastening thread in the axis body adapter plate. For CAR42 / CAR43 / CAR44: Move the end plate (4) with the contact block (3) until the contact block is under the fastening thread in the axis body. 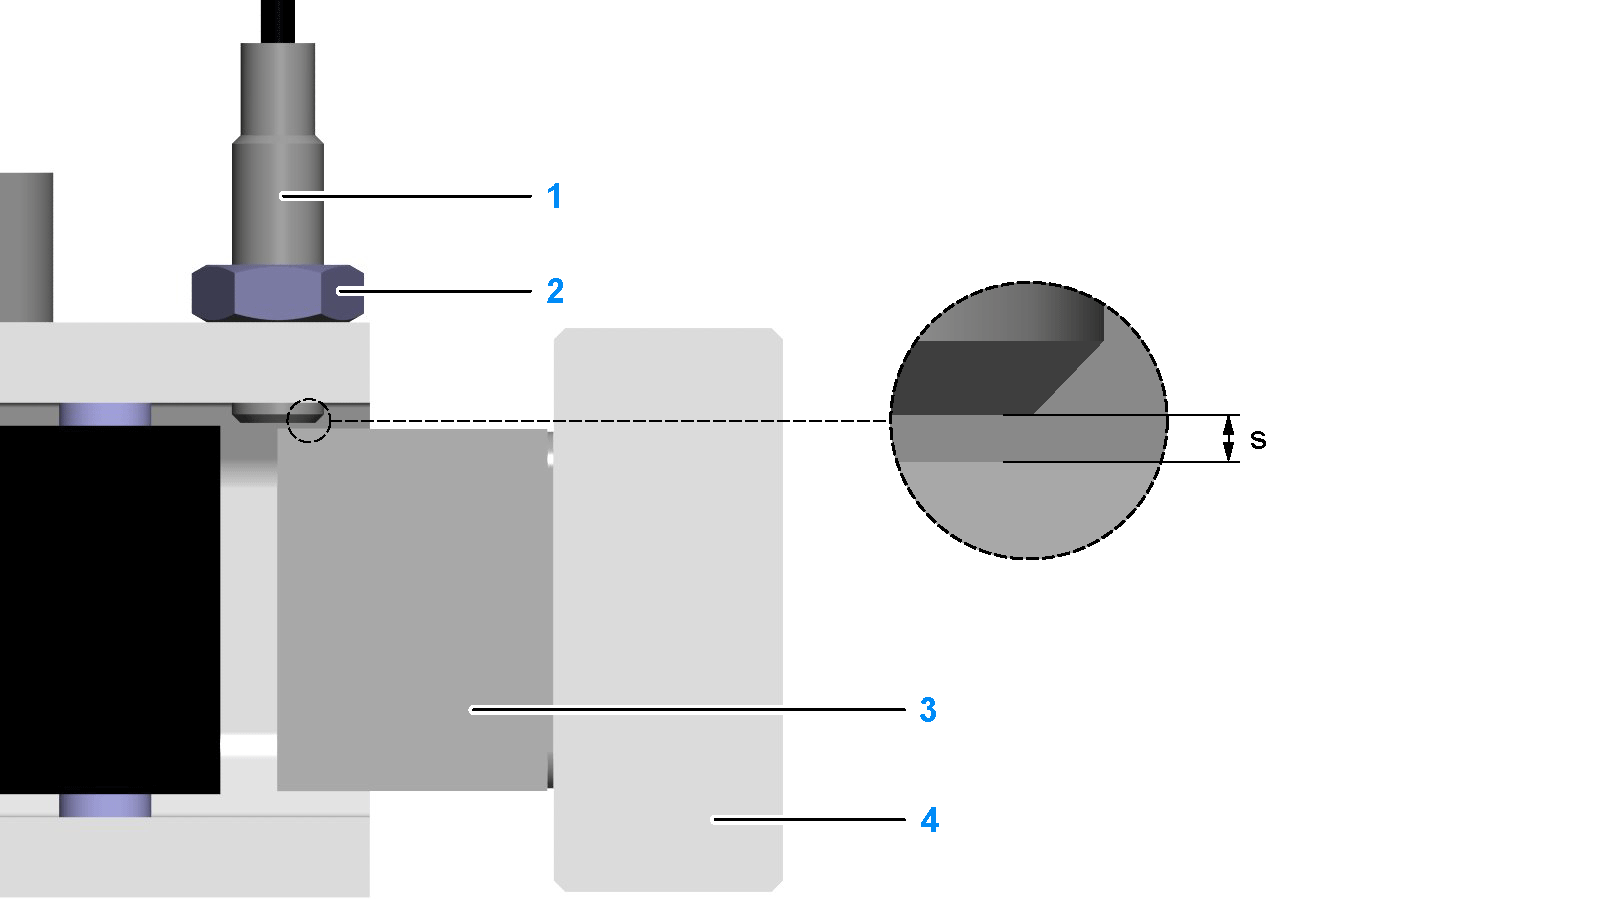
|
|
2 |
Bolt the sensor (1) into the fastening thread until the switching distance s is obtained. Use a feeler gauge to measure the switching distance. Switching distance s: 0.5 +/- 0.1 mm (0.0197 +/- 0.00394 in) |
|
3 |
Tighten the sensor nut (2) to fasten the sensor. Tightening torque: 2 Nm (17.7 lbf-in) |
|
4 |
Verify the correct switching distance with the feeler gauge. |
