View / Command
Overview
The result of the comparison is represented in the view. The left part of the view represents the project that is currently open. The right part of the view shows the reference project that is used for the comparison:
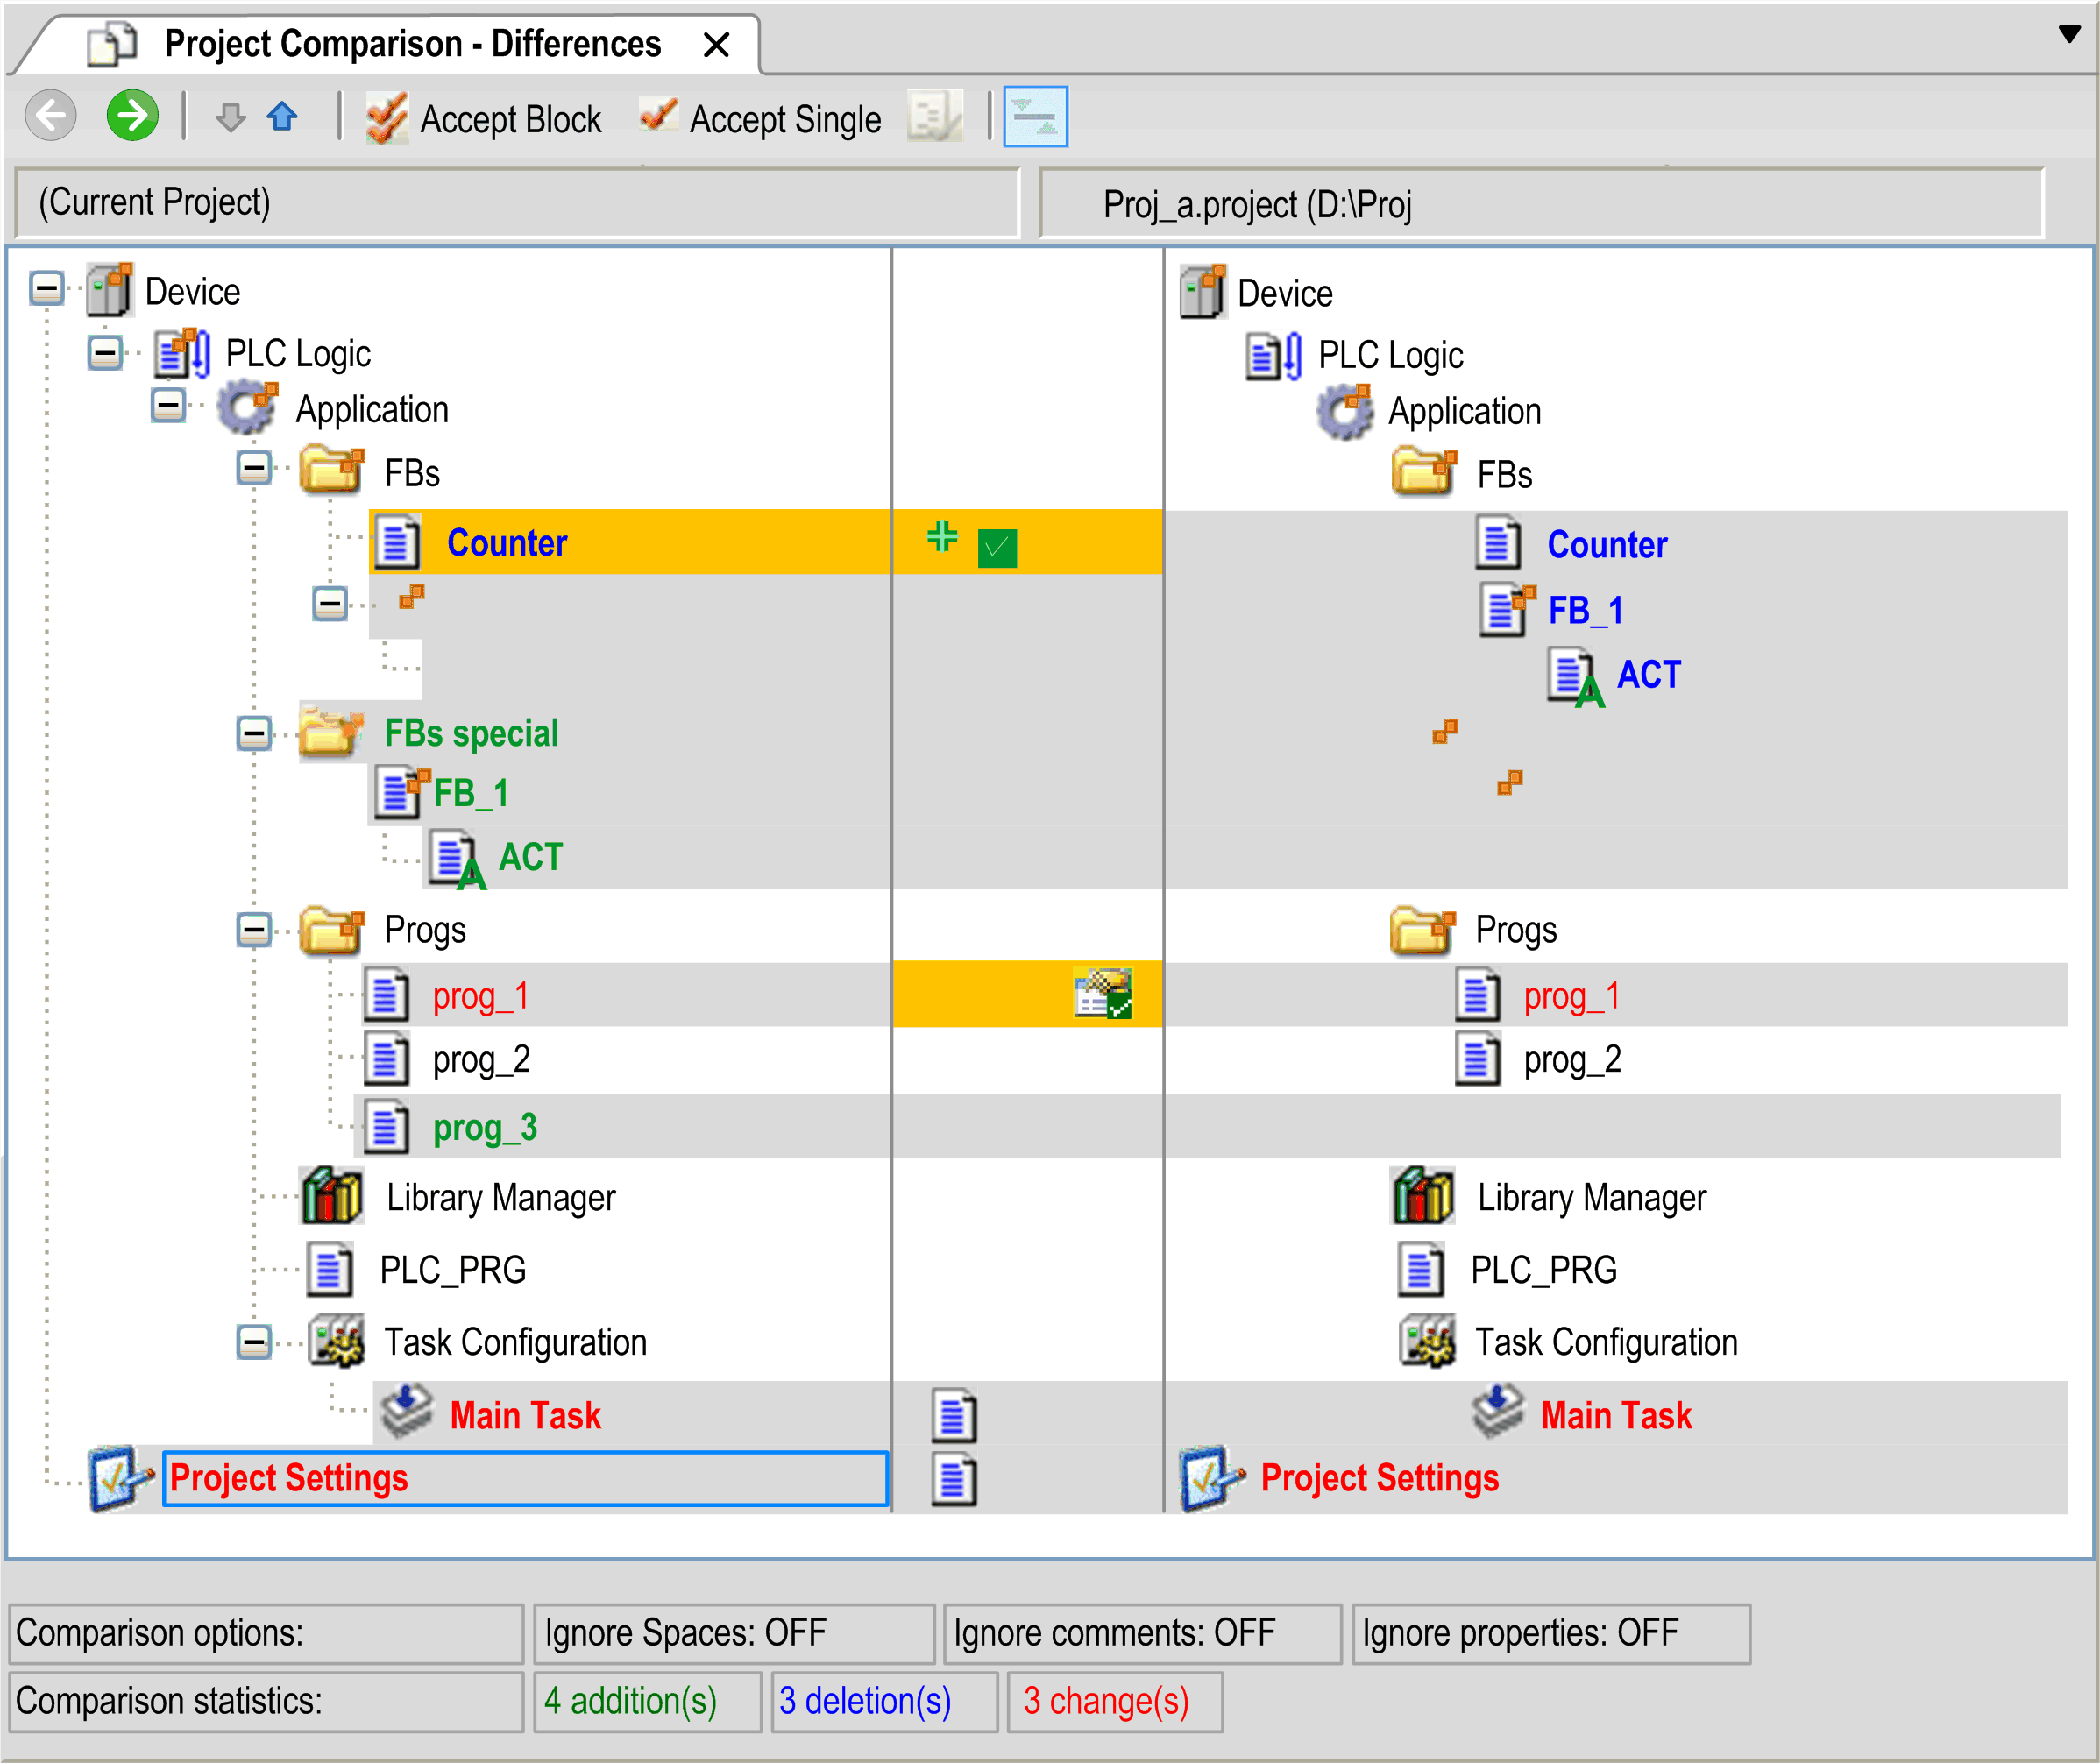
Each line that contains a colored entry is highlighted in gray.
Meaning of the unit colors:
|
Color |
Meaning |
|---|---|
|
Black |
Identical units. |
|
Object name with |
The child objects are different. |
|
Highlighted gray |
The units are different. |
|
Highlighted gray with bold blue font |
The unit exists in the reference project only. |
|
Highlighted gray with bold green font |
The unit exists in the only (not in the reference project). |
|
Highlighted gray with red font and |
The unit has different properties. |
|
Highlighted gray with red font and |
Access rights of the units are different. |
|
Highlighted gray with bold red font and |
Implementation of the units is different. Double-click the line to display the object-specific compare view. |
|
Highlighted yellow |
The unit is activated for acceptance. |
|
Highlighted yellow and |
Adding the reference unit to the open project is activated. |
|
Highlighted yellow and |
Deleting unit (in the ) is activated. |
|
Highlighted yellow and |
Acceptance of the properties of the reference project is activated. |
|
Highlighted yellow with red font and |
Acceptance of the access rights of the reference project is activated. |
|
Highlighted gray with bold red font and |
Acceptance of the implementation of the reference project is activated. |


Information provided in the view:
|
Element |
Description |
|---|---|
|
|
Comparison options defined in the dialog box. |
|
|
Number of added, deleted, and modified units in the , as compared to the reference project. means differences of a unit available in both projects. |
Working in the Compare Mode
The toolbar on top of the compare results provides a set of functions to edit the comparison:
|
Element |
Description |
|---|---|
|
|
To obtain detailed information on discrepancies of units marked in bold red, click the green arrow right button from the toolbar. The view opens in read-only mode. It displays the contents of the two versions in detailed view opposed to each other. The elements that differ are listed in colors as described above.
|
|
|
Return to the compare results. |
|
|
The cursor jumps to the next unit of the tree, which displays the differences. |
|
|
The cursor jumps to the precedent unit displaying the differences. |
|
|
The version of a block contained in the reference project will be accepted for the as well. The direction of the acceptance goes from the reference project to the , not vice versa. In the view (see the Green arrow right button description), a block consists of the entity (line, network, element) the cursor is placed on as well as of the preceding and subsequent entities, which have the same difference marking (for example subsequent lines). After accepting a block within the view, the block will display as highlighted yellow in the current version. In the compare results view however, a block consists of the unit the cursor is placed on as well as of the subordinated units. Having accepted a changed block within the compare results view will highlight the associated units of the in yellow, and add a check mark to them. Accepting a block newly inserted in the current version will delete it (marked by a small red plus sign), whereas accepting a block deleted in the current version will reinsert it into the current version (marked by a small green plus sign). When you replace a single entity with the button, you will be asked if you want to take over these modifications to the detailed view. A repeated click on the button cancels the modifications made during its last execution. |
|
|
The unit (compare results view) or entity on which the cursor is placed will be accepted in the version contained in the reference project for the . The direction of the acceptance goes from the reference project to the , not vice versa. After accepting an entity within the view, the entity will appear highlighted yellow in the current version. When returning to the compare results view, you are asked if you want to confirm the modifications. If the two versions are identical, they will now be displayed in regular black in the compare results. However, having accepted a single unit within the compare results view will highlight in yellow its name in the as well as the name of all other units the specified unit is depending on. In addition, a check mark is added after their names. Accepting a newly inserted unit in the current version will delete it and the subordinated units and mark the corresponding lines by a small red plus sign. Accepting a unit deleted in the current version will reinsert it and all other units the specified one is depending on into the current version and mark their names by a small green plus sign. When you enter a unit, you will be asked if you want to confirm these modifications to the detailed view. A repeated click on the button cancels the modifications made during its last execution. |
|
|
The folder, access rights, or object properties for the unit the cursor is placed on will be accepted for the such as they are set in the reference version. The direction of the acceptance goes from the reference project to the , not vice versa. A collection of objects is displayed. You can select folders, access rights, or object properties in the dialog box. Afterwards, the associated unit will be highlighted in yellow and there will be check marks added to the icons representing folder, access rights, or object properties. |
|
|
This button is only available in the view. It allows you to switch between two display modes:
|
|
|
This button allows you to open or close a third section (below the current and reference project sections) within the view. It displays the result of the actions you have taken to resolve the detected differences. For details, refer to the next paragraph Third Section in the Project Comparison - Differences View. |


Third Section in the View
Click the  button to toggle the display of a third comparison/merging section, referred to as the merge editor herein. Initially it displays the content of the current project. The section is only displayed for objects supporting textual view (like the declaration view of GVLs, DUTs or POUs, and implementation view of ST POUs). In this section free editing is also allowed.
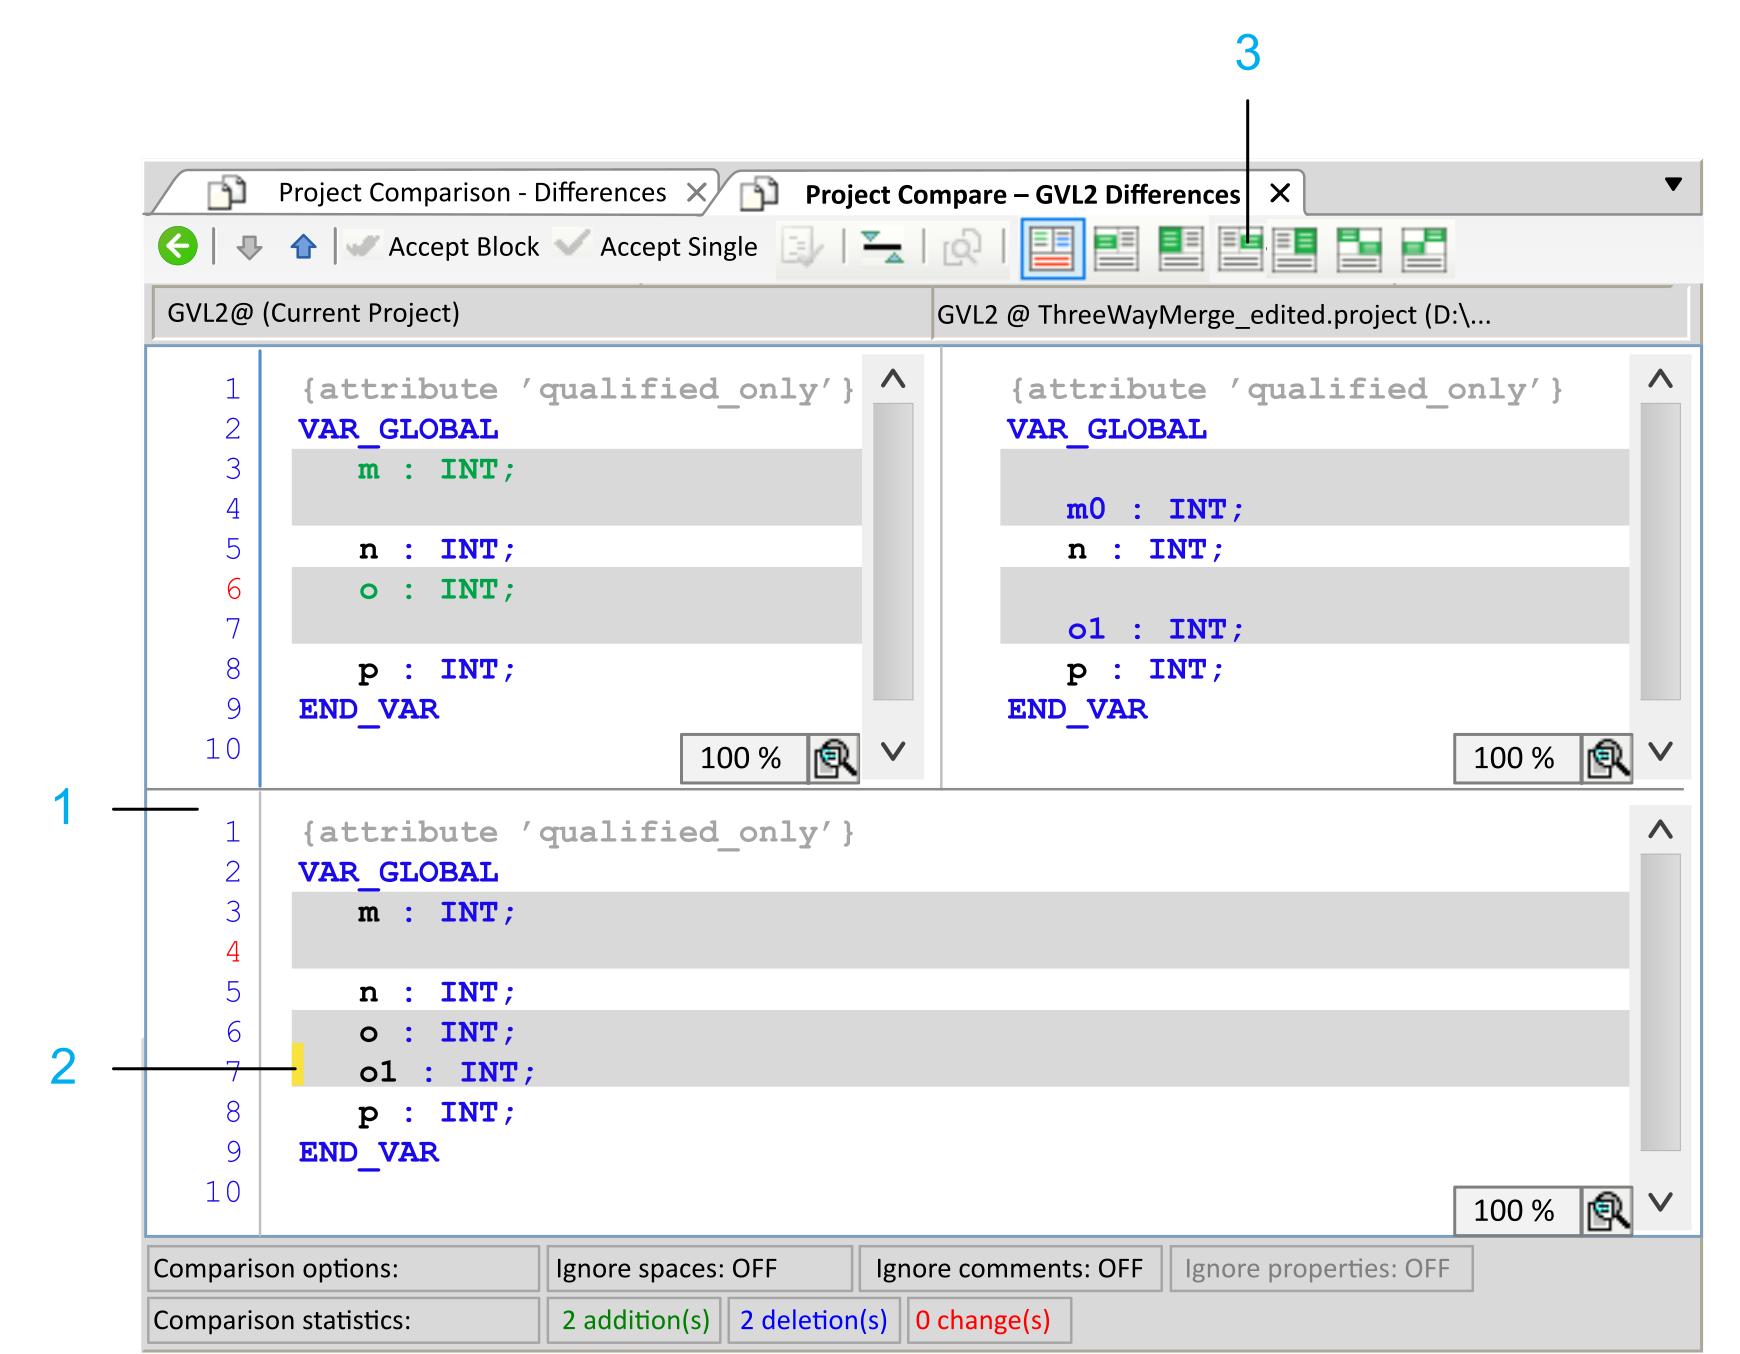
| Legend Item | Description |
| 1 |
Merge editor |
| 2 |
Line highlighted after you have clicked the button. |
| 3 |
Button |
The following buttons are available in the toolbar and are enabled only in case the cursor was set in one of the gray areas (line / block) and to which the buttons are then applicable:
|
Element |
Description |
|---|---|
|
|
Click this button to replace the selected line in the merge editor with the (left) line from the . |
|
|
Click this button to replace the selected block in the merge editor with the (left) block from the . |
|
|
Click this button to replace the selected line in the merge editor with the (right) line from the reference project. |
|
|
Click this button to replace the selected block in the merge editor with the (right) block from the reference project. |
|
|
Click this button to replace the selected block in the merge editor with the (left) block from the followed by the (right) block from the reference project.
NOTE: This button is only enabled if the display mode has not been toggled with the
 button. button.
|
|
|
Click this button to replace the selected block in the merge editor with the (right) block from the reference project followed by the (left) block from the .
NOTE: This button is only enabled if the display mode has not been toggled with the
button.
|


Completing the Compare Mode
To finish the compare mode, click the button of the tab. A message is displayed, prompting whether you want to commit the modifications.
Click to modify the contents, properties, or access rights of the objects highlighted in yellow in the , adapting them to the reference project. The project compare view is closed.
Dialog Box
The dialog box provides the following elements for accepting metadata:
|
Element |
Description |
|---|---|
|
|
If this option is selected, the modifications of the access rights will be accepted. |
|
|
Grouping with access rights accepted by the reference project. A group is accepted if it is present in both projects with different access rights.
Example: |
|
|
The group is not accepted if it is not present in one of the two projects. |
|
|
If this option is selected, the properties will be accepted. This is only available if the properties of the reference object and object are different. |
|
|
Click to accept the settings. |
Command
After the modifications of the project comparison have been accepted, execute the command. The modifications will be applied to the . To apply the modifications permanently, execute the command.
Special Cases
Modifications in the affect the project settings. As a consequence, both objects are marked as modified.
Hotkey settings for action type :
Parameter list and parameter name in the hotkey configuration must match the parameters in the concerned dialog box. Only then any modifications of particular values can be accepted individually. Otherwise, the hotkey settings can only be accepted as block or not at all.