Users and Groups
Overview
The view of the device editor is provided for devices supporting device management. If supported by the device, you can view and edit the management for the device. Thereafter, you can assign rights to allow certain user groups to access objects on the controller at runtime by assigning .
For the user management at the project level, refer to the command.
The device management can be pre-defined in the device description.
As in the project user management, users have to be members of at least one user group. Only user groups can be assigned specific access rights.
For managing , you have to login as a user with administrative rights.
If you want to protect your entire project, activate the option in the dialog box.
If you want to protect only a part of your code inside the project, put this code inside a compiled library.
| CAUTION | |
|---|---|
Toolbar of the View
The toolbar provides the following elements:
|
Element |
Description |
|---|---|
|
|
Click the button to switch on / off the synchronization between the editor and the management in the controller. If is not activated, then the editor contains a management configuration that has been imported from disk, or it does not contain any configuration at all. If is activated, the data displayed in the editor is continuously synchronized with the management configuration on the connected controller. If you invoke while the editor contains a configuration that is not synchronized with the device, you are prompted to decide what will be displayed in the editor:
|
|
|
NOTE: EcoStruxure Machine Expert V2.0 and later versions no longer support Device user management files of type *.dum. The import of a file of type *.dum2 overwrites the user management on the device. Afterwards you will be requested to log in to the device as a user using the authentication data of the new user management.
When you click the button, a dialog box opens requesting you to select a file of type *.dum2 from your hard disk. After you have selected the file, the dialog box opens requesting you to enter the password that was assigned when the file was exported. The user management is enabled. The is available when you are in offline mode or is deactivated. |
|
|
When you click the button, an dialog box opens requesting you to enter a password for the device user management file.
NOTE: The password assigned here will be requested during the procedure.
After you have assigned a password, the dialog box for saving a file is displayed. With EcoStruxure Machine Expert V2.0 and later versions, only files of type *.dum2 are supported. |
|
|
Name of the user who is logged into the controller. |
Management
The handling of the is similar to that of the project user management.
Example of a view of the device editor:
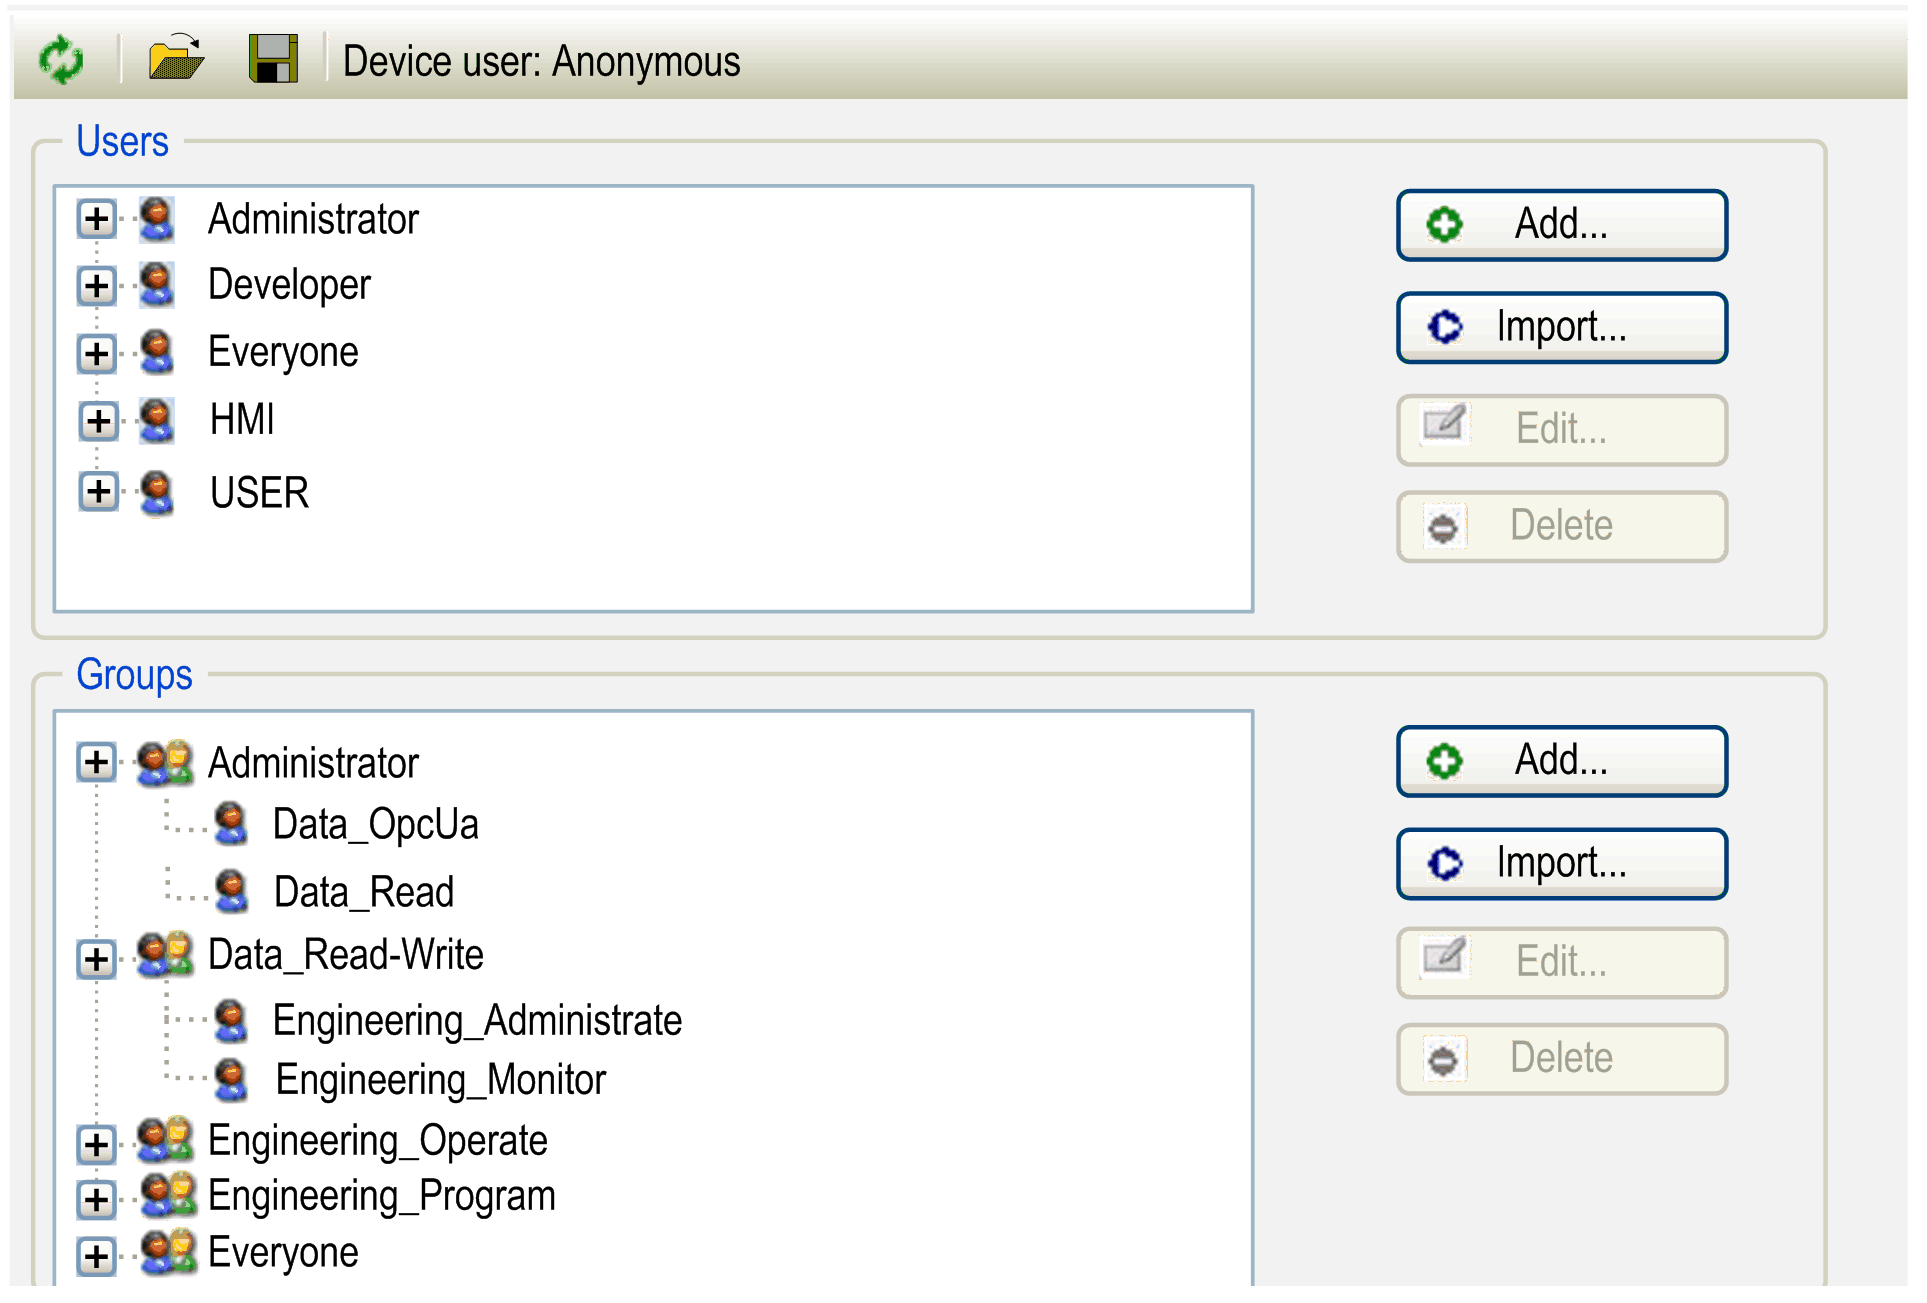
This view is divided in 2 parts:
-
The upper part is dedicated to access management of .
-
The lower part is dedicated to access management of .
Elements of the section:
|
Element |
Description |
|---|---|
|
The tree structure on the left-hand side lists the defined users and indicates the user groups to which they are assigned as sub nodes. |
|
|
button |
Opens the dialog box for creating a new user account. For further information, refer to the section Setting up a New User in the Users and Groups Management of the Controller. |
|
button |
Opens the dialog box. It lists the user accounts defined in the project user management. Select the entries of your choice (by pressing the Shift key for selecting more than one) and click OK to import them in the device user management.
NOTE: For each user to be imported the Enter Password dialog box is displayed requesting you to enter the password of the project user account. This password will then also be used for the corresponding device user account.
|
|
button |
Opens the dialog box. It allows you to modify the settings of the user account. |
|
button |
Deletes the account of the selected user. |
Elements of the section:
|
Element |
Description |
|---|---|
|
The tree structure on the left-hand side lists the defined groups and indicates the assigned users as sub nodes. |
|
|
button |
Opens the dialog box for creating a new user group.
|
|
button |
Opens the dialog box. It displays the user groups defined in the project user management. As a prerequisite for importing groups, you must have imported all users that are members of this group into the device user management beforehand. Select the group entries of your choice and click OK to import them in the device user management.
NOTE: The default group Everyone cannot be imported in the device user management.
NOTE: After you have successfully imported a group, assign access rights either:
For further information, refer to Access Rights. |
|
button |
Opens the dialog box. It allows you to modify the definition of the group. |
|
button |
Deletes the selected group. |
Editing or Viewing the Management Before any Users and Groups Have Been Established
If the controller supports device management, proceed as follows during first login:
|
Step |
Action |
Comment |
|---|---|---|
|
1 |
Double-click the controller node in the . |
Result: The device editor opens. |
|
2 |
Select the view. |
– |
|
3 |
Click the button |
Result: A dialog box opens prompting you to decide whether the device management should be activated. |
|
4 |
Click to confirm the dialog box and to activate device management. |
Result: The dialog box opens. |
|
5 |
Enter a new user name. |
– |
|
6 |
Enter your individual Password. |
NOTE: The password must comply with the password policy configured in the dialog box.
|
|
7 |
Re-enter your individual Password. |
– |
|
6 |
Click to confirm. |
Result: You are requested to enter the new credentials for accessing the controller. They are assigned the highest user rights level and allow you to manage access rights for users or user groups. |
 .
.
Setting up a New User in the Management of the Controller
If the controller supports device management, you can add a new user as follows:
|
Step |
Action |
Comment |
|---|---|---|
|
1 |
Double-click the controller node in the . |
Result: The device editor opens. |
|
2 |
Select the view. |
– |
|
3 |
Click the button |
If you are not logged in to the controller yet, then the dialog box opens. It allows you to enter the user name and the password. Result: The management configuration of the controller is displayed in the editor. |
|
4 |
Click the button in the part of the view. |
Result: The dialog box opens. |
|
5 |
Enter a for the new user and select a for the user from the list. |
You can assign the user to other groups later. |
|
6 |
Enter a new password, confirm the password, and specify whether the user can change the password and whether the user has to change the password at the first login. |
NOTE: The password must comply with the password policy configured in the dialog box.
|
|
7 |
Click to confirm and to close the dialog box. |
Result: The new user is displayed in the part as a new node and in the part as a new subnode of the selected default group. |
Loading a Management From a *.dum File, Modifying it, and Later Downloading it to the Controller
|
Step |
Action |
Comment |
|---|---|---|
|
1 |
Double-click the controller node in the . |
Result: The device editor opens. |
|
2 |
Select the view. |
– |
|
3 |
Click the button, browse to the *.dum file that contains the saved management, and click to confirm. |
Result: The users and groups settings that are saved in the file are displayed in the editor. |
|
4 |
Adapt the settings according to your requirements. |
– |
|
5 |
Click the button |
A dialog box is displayed, prompting you to select an operation. |
|
6 |
Select the option . |
Result: The dialog box is displayed. |
|
7 |
Enter login data in order to log in to the controller. |
After successful login, the modifications are transferred to the controller.
As long as the button |