Switching to TEST mode
Place the meter into TEST mode using the front panel, ION Setup or Vista. The meter’s front panel informs you when the meter is in TEST mode with a special display screen.
Using the front panel
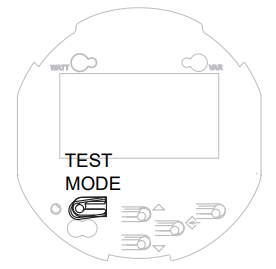
The TEST mode button on the meter is located beneath the outer cover. You must first remove the cover to access the button. Refer to the ION8650 Installation guide for instructions and safety precautions.
 danger
HAZARD OF electric shock
Wear PPE and take precautions not to touch the meter’s lever contact switches if accessing the front panel buttons of a switchboard meter.
Failure to follow these instructions will result in death or serious injury.
After you remove the outer cover, press the TEST mode button.
NOTE: If you have a hardware-locked meter, only the basic communications parameters can be changed in NORM mode. You must enter TEST mode to change other meter parameters on the hardware-locked meter. See for more details.
Using ION Setup
NOTE: You cannot place a hardware-locked meter in TEST mode using ION Setup. The meter must be placed in TEST mode using the front panel. See Using the front panel above.
In ION Setup:
- Open the Setup Assistant for your meter. See the ION Setup Help for instructions.
- Click Verification.
- Select Test Mode on the Verification tab and click Edit. Enter your meter password if prompted. A dialog box informs you that the meter is in Test mode. Click OK.
The Test Mode screen appears, and test values are displayed.
- Click on the tabs to perform various test-related tasks. See the ION Setup online help for more information.
- Click Scaling on the Energy tab if you want to apply PT/CT scaling to the values displayed in Test mode. The default is OFF (no scaling is applied).
- Click Loss Mode on the Volts, Amps and Power tab if you want any transformer loss compensation that you have configured applied to values in TEST mode.
- Click Close. A dialog box informs you that the meter is back in Normal mode.
Using Vista
NOTE: You cannot place a hardware-locked meter in TEST mode using Power Monitoring Expert. The meter must be placed in TEST mode using the front panel. See Using the front panel above.
- Open your meter in Vista.
- Select the Setup/Diagnostics tab and click General Setup.
- Select the Test Mode option for Meter Mode. You are prompted for the Power Monitoring Expert user password. If meter security is enabled, you are also prompted for the meter password. For more information see the Vista section of the online Power Monitoring Expert Help.