Device Manager user interface

Main user interface (UI) and Devices tab
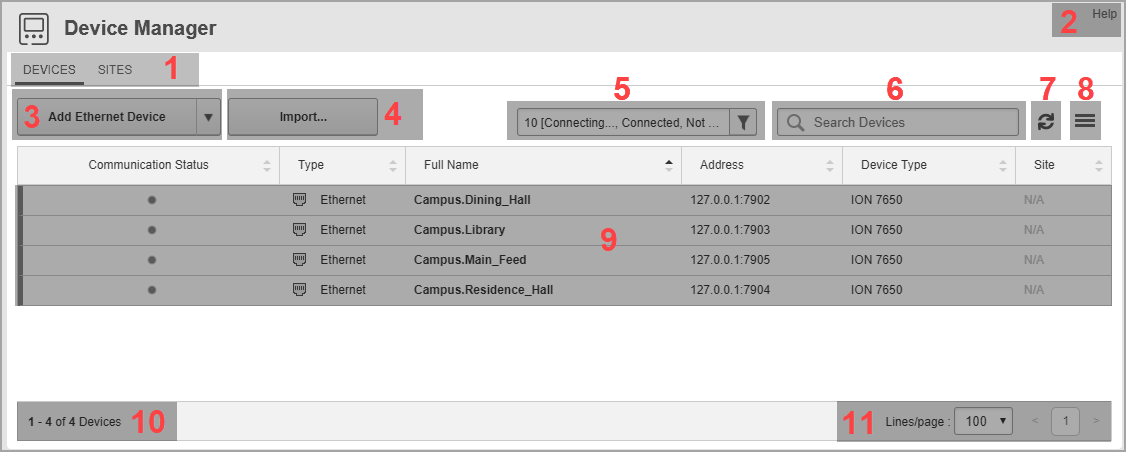
Main UI
1 Selection tabs
Select a tab to see information related to Devices or Sites.
2

Help
Click Help to open the Device Manager online help.

10 Number of displayed items
Shows the number of items visible on this page, and the total number in the system.
11 Page selector
Use the page selector to navigate between pages of information. Set the number of items that are displayed on a page.
Devices tab
3

Add Ethernet Device
Use Add Ethernet Device to add a new Ethernet device to the system. To add a Serial Device, connected through an Ethernet gateway, or an OPC device, click the down arrow and select the appropriate option from the drop-down menu.

NOTE: To add serial devices that are directly connected to the system, for example through a RS485 converter, or to add Logical Devices, use Management Console.

4

Import
Use the import wizard to import device or site configuration into the system. You can import configuration from a different system, from configuration tools, or edited configuration from the same system. See Importing network configuration from a different system and Editing a device, Editing a site for more details.

5 Devices filter
Use the devices filter to customize which devices are displayed in the devices table. You can filter by Communication Status, Type, and Enabled State.
6 Search Devices box.
Enter a search string to find devices in the devices table.
7

Refresh
Click Refresh to update the table content and show changes to the device configuration that might have been done through Management Console.

NOTE: The Communication Status indicator in the table is updated automatically every 10 seconds. To update the configuration information use Refresh.

8

Options menu
The Options menu contains the following options:
- Show/Hide Columns
- Clear Filter
- View Device Licenses
- Export Devices Configuration for Editing
- Export Network Configuration for Use in a Different System
- Refresh

9

Devices table
The devices table shows devices that are configured in the system. Which devices are displayed in the table is controlled by the devices filter, see 5 above.


Sites tab

1

Add Ethernet Gateway
Use Add Ethernet Gateway to add a new Ethernet Gateway site to the system. To add an OPC site, click the down arrow and select the appropriate option from the drop-down menu.

2

Import
Use the import wizard to import device or site configuration into the system. You can import configuration from a different system, from configuration tools, or edited configuration from the same system. See Importing network configuration from a different system and Editing a device, Editing a site for more details.

3 Sites filter
Use the sites filter to customize which sites are displayed in the sites table. You can filter by Communication Status, Type, and Enabled State.
4 Search Sites box.
Enter a search string to find sites in the sites table.
5

Refresh
Click Refresh to update the table content and show changes to the site configuration that might have been done through Management Console.

NOTE: The Communication Status indicator in the table is updated automatically every 10 seconds. To update the configuration information use Refresh.

6

Options menu
The Options menu contains the following options:
- Show/Hide Columns
- Clear Filter
- Export Sites Configuration for Editing
- Export Network Configuration for Use in a Different System
- Refresh

7

Sites table
The sites table shows sites that are configured in the system. Which sites are displayed in the table is controlled by the sites filter, see 3 above.