PQDIF Exporter jobs
The Jobs menu contains commands which allow you to set up PQDIF Exporter jobs that run automatically, according to the schedule you specify. You can also set up manual jobs to collect data for a specific date range from the SQL Server database for conversion to PQDIF.
PQDIF data templates
PQDIF data templates are the mapping files that convert
- Flicker: Short-term and long-term flicker disturbance data on the voltage inputs.
- Sag/Swell: Sag/swell disturbance data for the voltage inputs, including minimum, maximum and average values.
- Sag/Swell Waveforms: Waveform data for voltage sag/swell.
- Steady-state: Steady-state (RMS) data for trending.
-
Steady-state Waveforms: Waveform data for steady-state data.
NOTE: For the Steady-state Waveforms template, you must program the meter to use a Periodic Timer module to perform periodic waveform recording of the voltage and current channel inputs. The time interval you specify must be a multiple of 15 minutes.
- Transient Waveforms: Transient disturbance data for voltage inputs.
In addition to the default templates, custom templates can be also be developed — contact Technical Support if you require customized data templates for your application.
Scheduled export jobs
You can set up PQDIF Exporter to run at a specific time every day, or you can specify a different time interval (for example, every 12 hours or every 7 days). You can create and store multiple scheduled jobs for the PQDIF Exporter.
Creating a Scheduled Export Job
-
Click Jobs > New Job > Scheduled Export to open the Scheduled Export dialog.
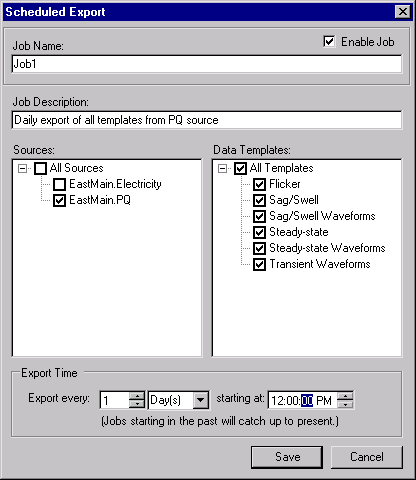
- Type a short but descriptive name in the Job Name field. Use the Job Description field to give more details about the job.
-
Select the sources for your scheduled data export. Click the box beside each source to select or deselect it.
Click All Sources to select all available devices that log the type of data specified by the data templates. When this logged data is detected for a new device, that device is automatically added to all scheduled PQDIF Exporter jobs that have All Sources selected.
-
Select the Data Templates you want to use when the PQDIF Exporter runs. Click the box beside each template to select or deselect it.
Click All Templates to select all available data templates for the selected devices. When a new data template is added, that template is automatically added to all scheduled PQDIF Exporter jobs that have All Templates selected.
- Use the Export Time section to specify how frequently the PQDIF Exporter should run, as well as its start/cut-off time. When a scheduled PQDIF Exporter job runs for the first time (at the specified start time), it collects historical data to create PQDIF files so that the time period for that export is consistent (“caught up”) with the time periods of all subsequent scheduled PQDIF exports.
Example 1: If you saved the scheduled job (1) at 4:25 PM, with the Exporter scheduled to run daily at midnight, the first PQDIF file is generated at midnight (2) the same day, and includes data spanning from the previous midnight. PQDIF Exporter runs again next midnight (3), and includes data spanning the first scheduled export (2).

- Example 2: If you set a scheduled job to run PQDIF Exporter every 8 hours, starting at 3:00 AM, then the first PQDIF file is generated at 3:00 AM, and will include data spanning 8 hours previous to that time (that is, 7:00 PM). The next export starts 8 hours later, at 11:00 AM, then at 7:00 PM, then at 3:00 AM and so on.
- Example 3: To run PQDIF Exporter once a week at 6:00 AM, change Export Time to “Export every 7 Day(s) at 6:00 AM”. In this example, the PQDIF file contains a full week’s worth of PQDIF data
- Click Add Job.
NOTE: Exporter Service must be started in order to run scheduled PQDIF Exporter jobs. See PQDIF Exporter main window.
Manual export jobs
A manual export job enables you to run the PQDIF Exporter immediately. You can create a different manual job for each source and/or template, or for specific groups of sources and/or templates.
Creating a manual export job
-
Click Jobs > New Job > Manual Export to open the Manual Data Export dialog.
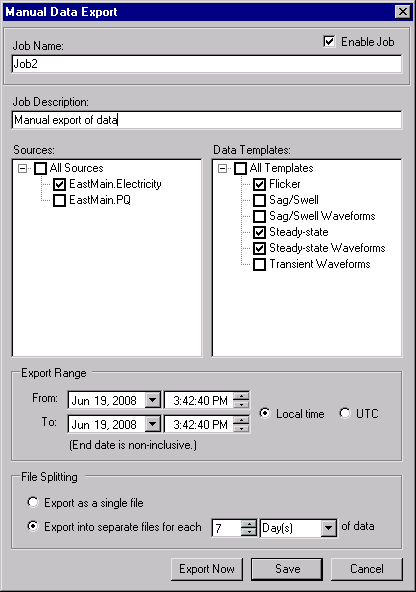
- Type a short but descriptive name in the Job Name field. Use the Job Description field to give more details about the job.
- Select the sources for your data export. Click the box beside each source to select or deselect it.
- To select all available devices, select the All Sources box.
- Select the Data Templates you want to use. Click the box beside each template to select or deselect it.
- To select all available templates, select the All Templates box.
- Use the Export Range From and To boxes to specify the date range of historical data that the PQDIF Exporter will use. The default time format is local time. If you want to use Coordinated Universal Time format, select UTC.
- Use the File Splitting options to specify how PQDIF Exporter exports the data. The default method is to export the data to a single PQDIF file. You can change this so the data is split into different PQDIF files — for example, if you want to split the data so each PQDIF file contains 12 hours worth of data, set the File Splitting to “Export into separate files for each 12 Hour(s) of data”.
- Click Export Now to run and save this manual PQDIF Exporter job, or click Add Job to save without running it.
Running manual jobs
After you enter the manual PQDIF Exporter jobs, you can select and run them:
- On the PQDIF Exporter interface, select the manual job(s) you want to run.
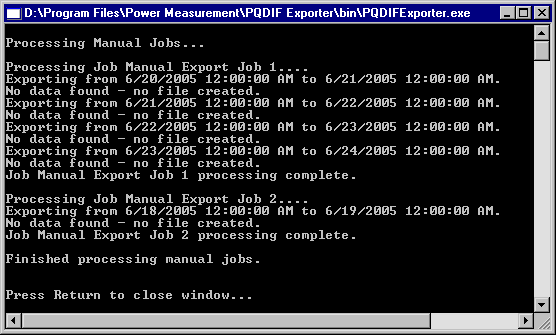
- Right-click and select Export Selected Manual Job(s). A command window displays to indicate the progress of the export. Press the RETURN (ENTER) key when prompted to return to the PQDIF Exporter interface.
NOTE: To run all manual jobs, click Jobs > Export All Manual Jobs.
Editing the PQDIF Exporter jobs
To make changes to a scheduled or manual job:
- To edit a job, open the Export Configuration dialog in one of the following ways:
- Double-click the job.
- Select the job, then click Jobs > Edit Selected Job, or
- Right-click the job and select Edit Selected Job.
- Make your changes and click Save.
Duplicating PQDIF Exporter jobs
If you are creating jobs that have very similar attributes (for example, jobs that use the same set of devices, templates and/or time schedules), you can set up the first job, duplicate it, then simply edit the copy.
- Select the job(s) you want to duplicate, then click Jobs > Duplicate Selected Jobs (or right-click the job and select Duplicate Selected Jobs).
- Double-click the copy of the job you want to edit, make your changes, then click Save.
Enabling/disabling the PQDIF Exporter jobs
To enable or disable the scheduled or manual jobs:
- Select the job(s) you want to enable or disable.
- To enable the jobs, click Jobs > Enable Selected Jobs. To disable them, click Jobs > Disable Selected Jobs. You can also right-click the jobs and select Enable Selected Jobs or Disable Selected Jobs to enable or disable the jobs.
Adjusting the column widths
To change the width of a column, hover the mouse over border of the column headings — the mouse pointer changes into a double-arrow pointer — click and drag to adjust the column width.
Sorting the PQDIF Exporter job list
Click the title of a column to sort the data according to that column heading. An arrow appears in the title of the column. Click the title again to toggle the sorting—ascending or descending order.
Deleting PQDIF Exporter jobs
To permanently remove PQDIF Exporter jobs from the list:
- Select the jobs you want to delete, then:
- Click Jobs > Delete,
- Press the Delete key on your keyboard, or
- Right-click and select Delete Selected Jobs.
- Click Yes when prompted.
NOTE: You can also disable a job instead of deleting it (that is, Enable = “No”). This way, the job can be enabled at a later date if required.