Populating a hierarchy
After installing and commissioning PME, you can populate Hierarchy Manager by associating devices to nodes in a skeleton configuration CSV file and importing the entries into Hierarchy Manager. Following a successful import, you can use Hierarchy Manager to modify your hierarchy information. You can then use hierarchies in other PME applications, such as in view-enabled reports in the Web-based Reports application, and in the Dashboards application.
For illustration purposes, the default hierarchy template in Hierarchy Manager is used as a reference for this task.
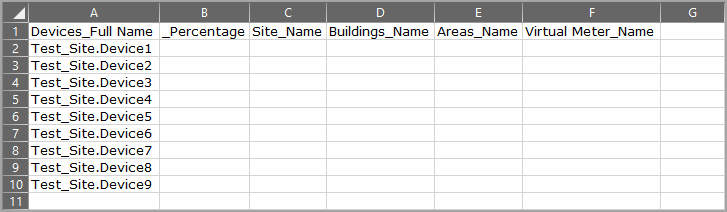
The skeleton configuration CSV file created from the default hierarchy template used in Hierarchy Manager includes a header row with column headings of Devices_Full Name, _Percentage, Site_Name, Buildings_Name, Areas_Name, and Virtual Meter_Name. It also includes a list of the devices in the system that are not included in a hierarchy so that you can associate the devices to the hierarchy nodes.
Different hierarchy templates can be used in Hierarchy Manager. Each hierarchy template determines the information that is included in the configuration CSV file. For example, the Site Building Area Tenant.xml hierarchy template file results in column headings of Devices_Full Name, _Percentage, Site_Name, Buildings_Name, Areas_Name, Tenants_Name, Tenants_Contact, Tenants_email, Tenants_Phone, and Virtual Meter_Name in the configuration CSV file.
(Sample and generic hierarchy templates are located in the: ...\Applications\HierarchyManager\SampleTemplates folder.)
The procedure for updating a skeleton configuration CSV file follows a consistent pattern regardless of the template used in Hierarchy Manager.
The process for adding a large number of entries to a hierarchy consists of:
- Saving a skeleton hierarchy configuration in a CSV file.
- Editing the CSV file.
- Updating Hierarchy Manager with the new entries and verifying the outcome.
notice
loss of data
| ● | Do not use the hierarchy configuration CSV file to incrementally update an existing hierarchy. |
| ● | Use the Hierarchy Manager application to incrementally update an existing hierarchy. |
Failure to follow these instructions can result in the corruption of hierarchy data.
Editing and saving a localized version of a CSV file
If you edit and save a skeleton configuration CSV file that is created from a localized version of Hierarchy Manager with Excel, the UTF-8 encoding in the file is not preserved. This results in an unsuccessful update in Hierarchy Manager when you import the CSV file contents.
To resolve this situation, it is recommended that you use the Google Sheets spreadsheet application. Editing and saving a skeleton configuration CSV file with Google Sheets preserves the UTF-8 encoding, which results in a successful import of the CSV file contents to Hierarchy Manager.
Before you begin
Before you export the skeleton configuration CSV file from Hierarchy Manager, make sure that you complete the following tasks:
-
Plan how the hierarchy is going to be configured, such as: naming conventions, which devices are going to be mapped to which Node, and how the different elements are grouped together. This can save time when you enter content in the configuration CSV file and it is very important when dealing with a large number of devices.
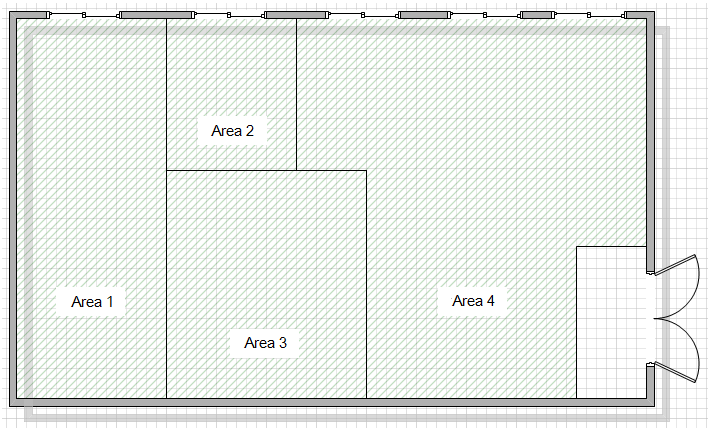
For illustration purposes in this task, devices are going to be mapped to a physical layout consisting of 4 areas within a building.
- Install Microsoft Excel, or another spreadsheet application that you can use to open and edit CSV files on your system.
- Add devices
Saving a hierarchy configuration in a CSV file
This process creates a skeleton hierarchy configuration CSV file with a header row that includes percentage, node type names, and virtual meter column headings. It also includes a list of the devices in the system that are not included in a hierarchy. This allows you to specify which of those devices you want to include in the hierarchy when you import the contents of the hierarchy configuration CSV file.
If devices have recently been added, use the refresh command to update the configuration cache before proceeding. (See Refreshing the hierarchy cache for more information.)
- Open a Command Prompt window:
Use Windows Explorer to navigate to:
...\.- Click the bin folder and press Shift + Right-click and select Open command window here on the context menu.
-
Type
HierarchyConfig.exe export config <file path>\<file name>and press Enter.Where
<file path>is the location for the exported CSV file, and<file name>is the name of the file, including the.csvfile extension. If you do not specify a file path, the current directory is used.NOTE: If you include spaces in the CSV file name and/or file path, you must enclose the file path and file name in quotation marks. For example,
HierarchyConfig.exe export config "C:\test file.csv".The items in the skeleton hierarchy configuration CSV file includes a list of devices not included in a hierarchy, the heading _Percentage, headings for the node types, and the heading Virtual Meter_Name.
Adding content to the configuration CSV file
The following steps describe:
- Defining the main elements (instances of a node) of the hierarchy.
- Associating devices to areas.
- Adding a virtual meters and associating devices.
Defining the main elements of the hierarchy
Define the site, building, and area names in the file as follows:
- Open the hierarchy configuration CSV file in Excel.
-
On an empty row below the list of devices, type the names that you want to use for the site, the building, and an area association in their respective columns.

As indicated in the previous description of the physical layout, there are 4 building areas. You now need to define the association of the 3 remaining areas to the building and site.
-
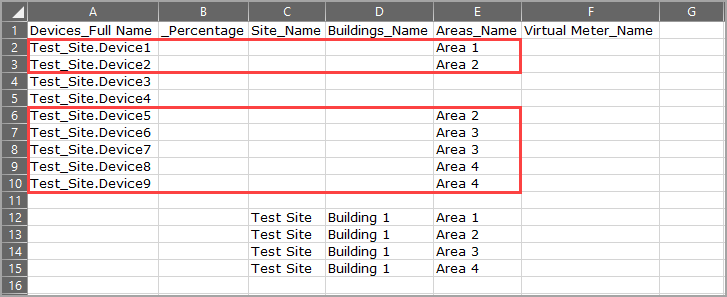
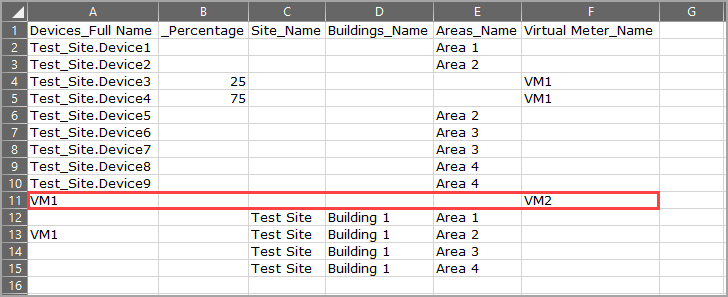
Repeat the previous step for each of Area 2, Area 3 and Area 4, as shown in the following image.
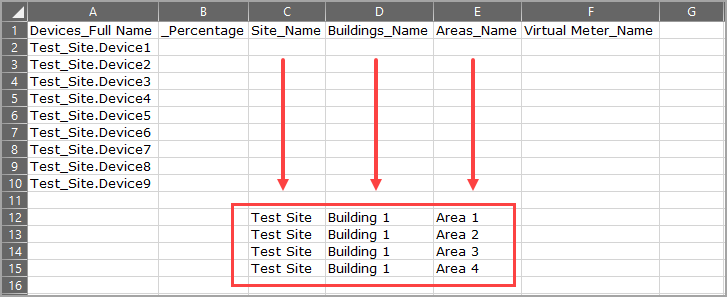
This completes the association of the 4 areas to the building instance, Building 1, and the site instance, Test Site.
If there are additional buildings on the site, you can repeat the pattern that you entered. For example, if there is a Building 2 on the site, your entries would include the same site name, Test Site, but the building name is Building 2. Note that you should use unique names for the areas. For example, for Building 2, define the area names like B2-Area 1, B2-Area 2, and so on.
Associating devices to areas
Complete the following steps to associate devices to specific areas:
-
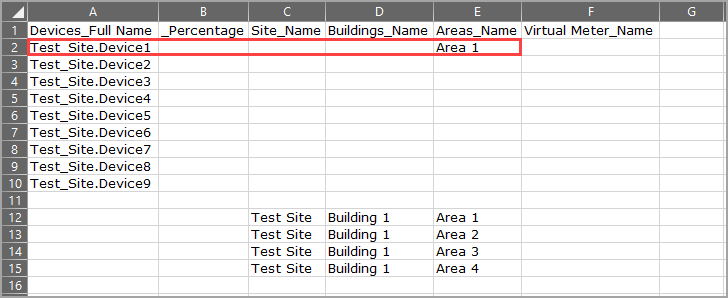
Type the area name that you defined in the previous set of steps, in the Areas_Name column on the row identifying the device full name.
For example, to associate device Test_Site.Device1 to Area 1, type Area 1 in the Areas_Name column in that row.
-
Continue to associate any of the remaining devices to their respective areas. Note that you can assign multiple devices to the same area. For example, the following image shows two devices assigned to Area 3 and two to Area 4.
Adding a virtual meter and associating devices
To define a virtual meter:
-
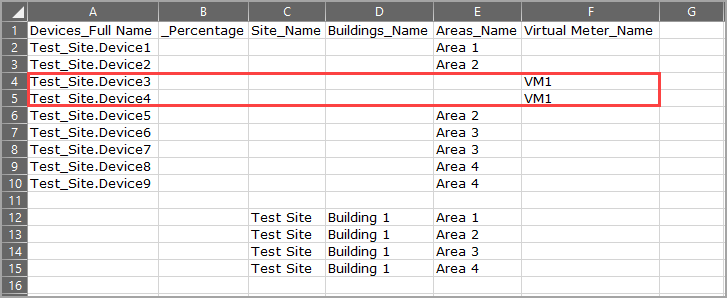
Type the virtual meter name in the Virtual Meter_Name column on the row identifying each device full name that you want to associate with the virtual meter.
-
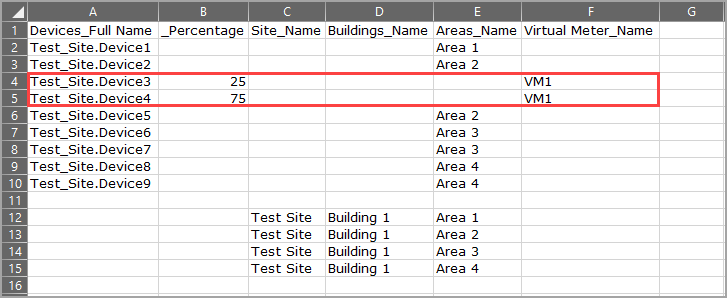
To apportion a percentage of a device's value to the virtual meter, type a percent value for the applicable device in the _Percentage column. For example, apportion 25% of Test_Site.Test_8600_C and 75% of Test_Site.Test_8600_D to virtual meter VM1.
-
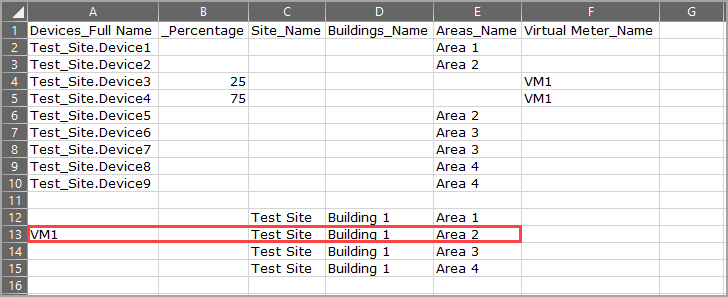
To associate a virtual meter to a specific area, add the virtual meter name to the Devices_Full Name column on a row defining the area. For example, to associate VM1 to Area 2, add VM1 to line 13 (in this example) in the CSV file.
You can also associate a virtual meter (VM1) to another virtual meter by including the virtual meter name in the Devices_Full Name column and adding the additional virtual meter name on the same row under the Virtual Meter_Name column.
When you complete your updates in the hierarchy configuration CSV file, you can now update Hierarchy Manager by importing the contents of the CSV file.
Adding your entries to Hierarchy Manager
Complete the following steps to add the contents of the hierarchy configuration CSV file to Hierarchy Manager:
- Open a Command Prompt window:
Use Windows Explorer to navigate to:
...\.- Click the bin folder and press Shift + Right-click and select Open command window here on the context menu.
-
Type
HierarchyConfig.exe import config <file path>\<file name>and press Enter.Where
<file path>is the location of the file you are importing, and<file name>is the name of the file, including the.csvfile extension. If you do not specify a file path, the current directory is used.The import process provides feedback during each stage of the import. If the import operation is unsuccessful, the utility provides information about possible reasons for the unsuccessful operation.
NOTE: If the CSV file name and/or file path contains spaces, you must enclose the file path and file name in quotation marks. For example,
HierarchyConfig.exe import config "C:\test file.csv". -
Verify the correct hierarchy configuration in Hierarchy Manager.