Setting up a multi-site master global client project
You can use the following example to set up a multi-site master global client project that combines multiple sites. Each of the individual sites are run separately on their own servers and feed data to the multi-site master global client.
Global client project prerequisites:
Three servers with Power Operation 2022 installed: A server dedicated to Site A and Site B respectively, and a third server for the global client.
To set up a multi-site master global client project with multiple sites, you must configure Site A and Site B independently. Then, you must configure the multi-site master client server.
Configuring Site A project
Prerequisites for Site A:
- Power Operation Studio open on the server designated for the Site A project.
- PLS_Example_SiteA.ctz and MultiSite_Common_Include.ctz restored in the following directory:
[Install directory]\ProgramData\Schneider Electric\Power Operation\[version]\Examples\Multi-Site Example
See Restoring a project for detailed information on how to restore a project.
To set up a multi-site master global client project – Site A:
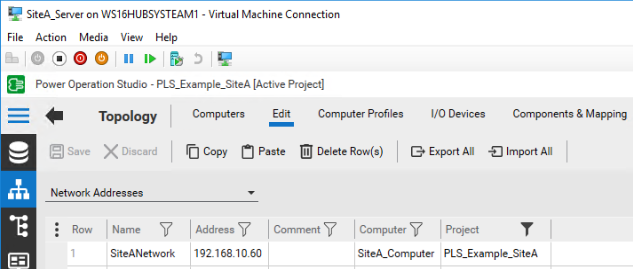
- In Power Operation Studio, set PLS_Example_SiteA as the active project.
- Go to Topology > Edit > Network Addresses and modify the Address field to the IP address/hostname of the server.
- Go to Project > Setup Wizard and run the Computer Setup Wizard in Custom mode.
- Select Next through the Project Setup, Profile Setup, Computer Role Setup, and on Network Setup, confirm that the Networked radio button is selected.
- Select Next through the Report Server Properties Setup, Trend Server Properties Setup, CPU Setup, and Events Setup.
- In the Startup Functions Setup window, do the following:
- Select the startup function for the SiteA_Cluster.SiteA_IOServer.
- Enter PLSD_Startup_SiteA() in the Modify Startup Function dialog.
- Select OK.
- After Cluster Connections Setup, select Next, and set the server authentication password.
- Select Next through Configure Server User, Security Setup - Control Menu, Security Setup - Keyboard, Security Setup - Miscellaneous, General Options Setup, and Finish in Computer Setup.
- SelectRun the active project
 to confirm the Site A server project is set up properly.
NOTE: This password will be required for the other server and projects.
NOTE: If the advanced one-line on Citect Runtime does not run, reset the AdvOneline.ini.txt username and password. The AdvOneline.ini.txt is located in the project folder for the active project. Give the username and password Administrator privileges and, in the field, IsEncrypted, edit the value to False.
Configuring Site B project
Prerequisites for Site B:
- Power Operation Studio open on the server designated for the Site B project.
- PLS_Example_SiteB.ctz and MultiSite_Common_Include.ctz restored in the following directory:
[Install directory]\ProgramData\Schneider Electric\Power Operation\[version]\Examples\Multi-Site Examples
See Restoring a project for detailed information on how to restore a project.
To set up a multi-site master global client project – Site B:
- In Power Operation Studio, set PLS_Example_SiteB as the active project.
- Go to Topology > Edit > Network Addresses and modify the Address field to the IP address/hostname of the server.
- Go to Project > Setup Wizard and run the Computer Setup Wizard in Custom mode.
- Select Next through the Project Setup, Profile Setup, Computer Role Setup, and on Network Setup, confirm that the Networked radio button is enabled.
- Select Next through the Report Server Properties Setup, Trend Server Properties Setup, CPU Setup, and Events Setup.
- In the Startup Functions Setup window, do the following:
- Select the startup function for the SiteB_Cluster.SiteB_IOServer.
- Enter PLSD_Startup_SiteB() in the Modify Startup Function dialog.
- Select OK.
- After Cluster Connections Setup, select Next, and set the server authentication password.
- Select Next through Configure Server User, Security Setup - Control Menu, Security Setup - Keyboard, Security Setup - Miscellaneous, General Options Setup, and Finish in Computer Setup.
- Select Run the active project to confirm the Site B server project is set up properly.

NOTE: This password must be the same for all servers communicating with one another.
NOTE: If the advanced one-line on Citect Runtime does not run, reset the AdvOneline.ini.txt username and password. The AdvOneline.ini.txt is located in the project folder for the active project. Give the username and password Administrator privileges and, in the field, IsEncrypted, edit the value to False.
Configuring Multi-site master project
Prerequisites for Multi-site master:
- Power Operation Studio open on the global client.
- The following projects:
- MultiSite_Common_Include.ctz
- PLS_Example_MultiSite_Master.ctz
- PLS_Example_SiteA.ctz
- PLS_Example_SiteB.ctz
restored in the following directory:
[Install directory]\ProgramData\Schneider Electric\Power Operation\[version]\Examples\Multi-Site Examples
See Restoring a project for detailed information on how to restore a project.
To set up a multi-site master global client project – Multi-site master:
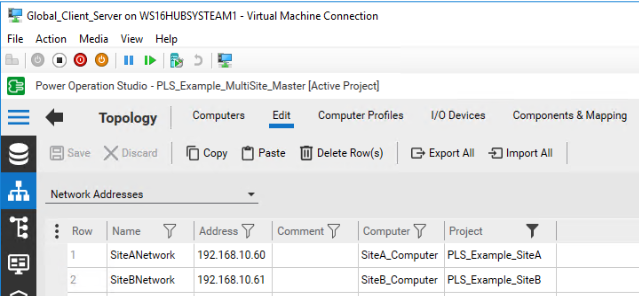
- In Power Operation Studio, set PLS_Example_MultiSite_Master as the active project.
- Go to Topology > Edit > Network Addresses and modify the Address of SiteANetwork and SiteBNetwork to the IP addresses/hostnames of the servers set in the Site A and Site B steps previous.
- Go to Project > Setup Wizard and run the Computer Setup Wizard in Custom mode.
- Select Next through the Project Setup, Profile Setup, and on Computer Role Setup, confirm that the Control Client radio button and Full License checkbox are enabled.
- Select Next, and on Network Setup, confirm that the Networked radio button is enabled.
- Select Next through the Report Server Properties Setup, Trend Server Properties Setup, CPU Setup, Events Setup, and Startup Functions Setup.
- In the Cluster Connections Setup window, confirm both SiteA_Cluster and SiteB_Cluster are selected for the client. Select Next.
- In the Server Authentication window, enter the password used previous.
- Select Next through Configure Server User, Security Setup - Control Menu, Security Setup - Keyboard, Security Setup - Miscellaneous, General Options Setup, and Finish in Computer Setup.
- Select Run the active project and confirm you have information from the Site A and Site B projects.
Troubleshooting
- If Advanced One-line is not running, confirm that the AdvOneline.ini.txt username and password are set, and that IsEncrypted is set to False. This allows Advanced One-line to re-encrypt the username and password, and come online for Site A and B.
- If real time data is not displaying on the global client, confirm that the firewall allows the default ports and the specific ports for Site A and Site B.
- If servers are not communicating, add the [CtAPI] Remote = 1 citect.ini setting.