Scheduler Module
The Scheduler Module provides the ability to create up to eight periodic or aperiodic schedules for up to two years (24 months).
Module icon
![]()
Overview
You can use the Scheduler for:
- Time of Use
- Demand Control
- Load Shedding
- Logging
- Periodic Alarming
On an ION meter, the Scheduler works in conjunction with the Clock module to automatically account for time zone variations and daylight savings times. On a Virtual Processor, the Scheduler module obtains the correct time from the computer on which the Virtual Processor is running.
NOTE: The registers and settings available in this module depend on the device or node you are configuring, as well as its firmware and template versions. Not all registers or settings are available on all devices or the Virtual Processor, and labels may vary.
Inputs
 Enable
This input enables or disables the Scheduler module (by setting it to on or off respectively). Any time this register changes from on to off, all eight Status output registers are set to not available. It must be a Boolean register from any other module’s output. This input is optional; if you leave it unlinked, the module will be enabled by default.
 Time
Time
On an ION meter, this input is by default linked to the LocalTime output register of the Clock module. This provides the Scheduler with the correct local time (accounting for time zones and daylight savings time). If you unlink this input on an ION meter, the Scheduler will not function.
NOTE: Linking the Time input to an output register other than the LocalTime output register of the Clock module will cause undefined behavior in the Scheduler module.
On a Virtual Processor, the Scheduler module gets the correct time from the computer on which the Virtual Processor is running. Linking this input is optional on the Virtual Processor. If you want the Scheduler on the Virtual Processor to use the same time as an ION meter, you can link the LocalTime output register of that meter’s Clock module to the Time input of the Scheduler on the Virtual Processor.
Setup registers
 Calendar
Because of its sophisticated timing facilities, setting up the Scheduler module is more involved than setting up many of the other modules. The process of adding a Scheduler module to a node diagram in the Designer is the same as for other modules, and selecting setup registers is also the same. Once you have selected the Calendar setup register however, a more advanced configuration utility will appear.
Output registers
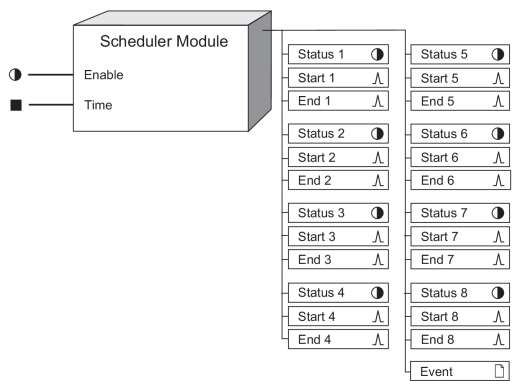
The Scheduler module allows you to program up to eight groups of output registers. Each output group has a Status, a Start and an End output register. (Collectively, these three register are referred to as an output.)
 Status 1 to Status 8
These registers indicate when an interval is in progress. This register will be on for the duration of the interval.
 Start 1 to Start 8
Each time an interval starts, the Start output register generates a pulse. These output registers also generate a pulse for each pulse activity.
NOTE: See the Detailed module operation section for details about profiles, intervals and pulses.
 End 1 to End 8
Each time an interval ends, the End output register generates a pulse. These output registers also generate a pulse for each pulse activity.
 Event
Event
All events are recorded in the Event register.
Possible events and their associated priority numbers are:
| Event priority group | Priority | Description |
|---|---|---|
| Setup Change | 10 | Input links, setup registers or labels have changed. |
| Warning | 30 | Calendar expiry pending in 30 days; Calendar expired. |
The Event output register stores the following information for each ION event: time stamp, priority, cause, effect, and any values or conditions associated with the cause and effect.
Responses to special conditions
The following table summarizes how the module behaves under different conditions.
Condition | Response of output registers |
|---|---|
If the Time input is linked but not available | All Status output registers contain not available. |
If the Enable input is off | All Status output registers contain not available and no pulses occur. |
How scheduled intervals affect the output
The Scheduler module itself has no awareness of the passage of time. It simply gets the correct time (from either the Clock module or the computer’s system clock) every minute and determines from the programmed schedule what each output register should do. In the case of intervals, the Scheduler determines the values of its outputs as follows:
Condition | Result |
|---|---|
If Status was off in the previous minute and an interval is scheduled | Start pulses and Status is turned on. |
If Status was on in the previous minute and an interval is scheduled | Status remains on. |
If Status was off in the previous minute and no interval is scheduled | Status remains off. |
If Status was on in the previous minute and no interval is scheduled | End pulses and Status is turned off. |
In the case of pulses, the Scheduler checks the time and if a pulse is scheduled for that minute, it will pulse both Start and End.
Detailed module operation
The first screen to appear is the Scheduler screen with a tab for each of the 8 outputs. Under each tab is a calendar that displays the schedule for that output. When you first configure the Scheduler module, there are no schedules defined and the calendars are all blank. For each of the 8 outputs, you can define a schedule that defines the behavior of its Status, Start and End output registers for a period of two years.
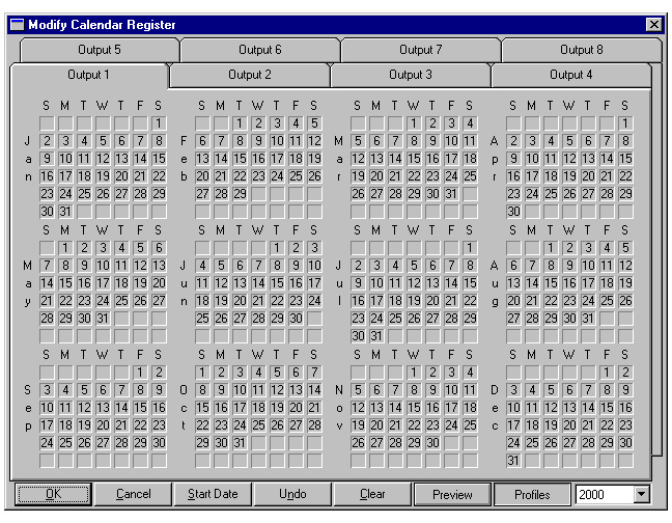
NOTE: Each output includes a Status, Start and End output register.
To define a schedule:
- Select a start date from when your 2 year calendar begins.
- Select which days in the calendar you want to use different daily profiles.
- Configure each daily profile, specifying when the outputs should be on or off and when pulses should occur.
- Repeat for each output, or copy one output’s calendar over other outputs. (Profiles must be defined separately for each output.)
- Preview the schedules for each output.
NOTE: Once you have specified a start date, you can perform the other steps in any order.
Selecting a start date for the schedule
By default, a Scheduler module running on a meter has a start date of January 1, 1970. On a Virtual Processor, the default start date will depend on when the Scheduler module was created. In either case, you will need to change this date to the day you want your schedule to start. You will also need to change this date every two years when you reprogram the Scheduler module.
NOTE: The Scheduler modules will generate events in the device’s Event log when the programmed schedule is within 30 days of expiration.
To change the start date:
- Press the Start Date button at the bottom of the window. The following dialog box appears:
- Type in the year, and select the month and day on which you want the schedule to start.
- Press the OK button.

NOTE: Changing the start date is an irreversible operation. If you had activities scheduled on days that are not part of the new calendar, you will lose them.
The calendar in the main window will be updated; all days from the start date to 24 months after the start date will be active. Days prior to, and more than 24 months after the start date will be grayed out to indicate they are not included in the schedule.
Assigning profiles to days in the calendar
The first step in programming a schedule is to select an output and apply profiles to the days in the calendar. This allows you to make an output behave a particular way on a certain type of day. For example, output 1 (Status 1, Start 1 and End 1) may control a module that you want to do one thing during the week, and something different on a weekend.
To select an output, click on its tab at the top of the Scheduler screen. Double check the year box at the bottom of the window to ensure you are working in the correct year (there may be up to 3 years depending on your start date).
To access the profiles for that output, click on the Profiles button. A palette appears showing each color-coded profile.
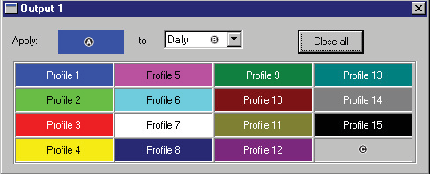
| A | Currently selected profile |
| B | Currently selected filter |
| C | Null profile |
When applying profiles to the calendar, you can do it to a range of days and use filters to speed up the task of programming. The filters allow you to apply the selected profile only to days matching the selected criterion (for example, all weekdays, or all weekends). The default is Daily which will apply the profile to all days in the selected range.
NOTE: When you point to a day in the calendar the cursor changes to a hand with a cross-hair.
To apply a profile:
- Click on the profile you want in the palette. (Its color appears at the top.)
- If you want to select a single day in the calendar, double-click on it.
- If you want to apply a profile across a range of days in the
calendar, click on the first day of the range to which you want to
apply the profile, then click on the final day of the range. If the
final day is in a different year, use the year drop-box at the bottom
of the screen to switch to another year. (You can also start with
the final day and then click on the first day of the range.)
To remove a profile from one or more days in the calendar, use the same procedure but select the null profile (i.e. the light gray box in the lower-right corner of the palette to paint over the existing profile.
- The selected days in the calendar will change to the color of the selected profile (in accordance with the selected filter). If any of the days were already assigned a profile, you will be prompted to overwrite the existing profiles.
Repeat these steps until every day in the calendar for the selected output is filled in with the appropriate color (i.e. each day is assigned the appropriate profile). Be sure to program the full 24 months. When you have set up the calendar for one output, you need to do the same for the other outputs that you plan to use. You can repeat the steps described above, or as a shortcut, you can copy the calendar from one output over top another.
If you make a mistake applying profiles to the calendar, you can press the Undo button at the bottom of the window; this will undo only the most recent change.
Copying calendars from one output to another
To copy an output’s calendar over to another output, hold down the SHIFT key and click on the tab of the output you wish to copy, then drag the cursor to the tab of the output you wish to overwrite. The complete calendar (all 24 months) of the first output will be copied to the second output. Note that only the calendar is copied; since each output has its own profiles, you will need to define profiles separately for each output.
NOTE: When copying a calendar, the cursor will change to a hand with a box.
Defining a daily profile
A daily profile is a simply a 24 hour period that consists of activities, which can include intervals, pulses or both.
- An interval is characterized by a pulse on the Start output register, the Status register going on for some period of time, then the End register pulsing and the Status register going back to off.
- A pulse is just the Start and End output registers pulsing simultaneously with no change in the Status output register.
NOTE: The Scheduler module supports a total maximum of 900 activities or pulses. This includes all profiles for all outputs.
Each output has 15 daily profiles. To define a daily profile, either right-click on the profile in the Profiles palette or right-click on a day in the calendar colored with the profile you want to define. The following dialog box, referred to as a profile editor, appears:
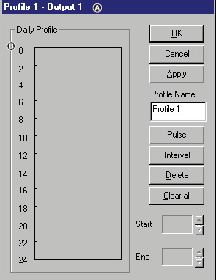
| A | The title bar indicates which profile you are editing and for which output. |
| B | The numbers along the left side of the box represent a twenty-four hour clock. |
Before creating activities, you may want to assign a descriptive name to the profile to make it easier to remember where you plan to use it. For example, you may want to name it "Weekend". Creating custom labels for these profiles uses device memory, so there are a limited number of custom labels available.
NOTE: You cannot have more than one activity at the same time. If you want to schedule multiple events at the same time, you must use separate outputs.
To create a name for the profile, type a name into the Profile Name box. It must be 15 characters or less. The name will appear in the Profile palette.
To add an interval to the daily profile:
- Press and hold down the Interval button and drag the interval cursor into the Daily Profile box (but not on top of an existing interval or pulse). A colored bar will appear.
- Click on the colored bar and drag it until the top of the box is positioned where you want the interval to begin (i.e. the Start time). Dragging allows you to move in steps of 5 minutes. If you want to position the bar more precisely, use the Start box which provides 1 minute resolution.
- To adjust the End time of the interval, click on the bottom sizing handle and drag it down to the point where you want the interval to end. Again, dragging gives you 5 minutes resolution. Use the End box to enter a more precise End time.
Repeat steps 1-3 for each interval you want to add. Note that you cannot overlap intervals within a 24-hour period; they must be separated by at least 1 minute. If you try to start an interval while another one is in progress or if you try to drag one over a pulse, you will be warned that there is a conflict.
There is one exception to the aforementioned rule: you can create one interval that begins at 0:00 and another that ends at 24:00. If the profile is applied to two consecutive days, the two intervals are treated as a single interval that spans two days.
For example, if you create an profile that looks like this, then apply it to a Monday, Tuesday, Wednesday & Thursday (and Friday has a NULL profile), the pulse outputs will behave as follows:
| Monday @ midnight | Start pulses | 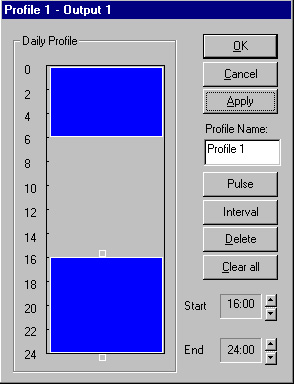 |
| Monday @ 6 a.m. | End pulses | |
| Monday @ 4 p.m. | Start pulses | |
| Tuesday @ 6 a.m. | End pulses | |
| Tuesday @ 4 p.m. | Start pulses | |
| Wednesday @ 6 a.m. | End pulses | |
| Wednesday @ 4 p.m. | Start pulses | |
| Thursday @ 6 a.m. | End pulses | |
| Thursday @ 4 p.m. | Start pulses | |
| Thursday @ midnight | End pulses | |
If you create a single interval starting at 0:00 and ending at 24:00, then apply it to a contiguous range of days, there will be a Start pulse at midnight of the first day and an End pulse at midnight of the last day, but no pulses in-between.
The intervals that span across day boundaries do not have to be in the same profile. If Monday is assigned Profile 1, which has an interval from 18:00 to 24:00 and Tuesday is assigned Profile 2, which has an interval from 0:00 to 8:00, there will be a Start pulse on Monday at 6 p.m., the Status output will go on until Tuesday at 8 a.m., at which point the End output will pulse and the Status output will go off.
To add a pulse to the daily profile:
- Press and hold down the Pulse button and drag the pulse cursor anywhere into the Daily Profile box except on an existing interval or pulse. A line will appear.
- Click on the line and drag it to where you want the pulse to occur. Dragging allows you to move in steps of 5 minutes. If you want to position the pulse more precisely, use the Start box which provides 1 minute resolution.
- Repeat steps 1-2 for each pulse you want to add.
To delete an activity:
- Click on the interval or pulse you wish to delete and press the Delete button. The selected activity will disappear from the Daily Profile box.
- If you want to deleted all the activities from an profile, click the Clear All button.
After you have created all the activities you want to comprise the profile and given the profile a descriptive name, press the OK button to save your changes and close the profile editor. If you press Cancel, your changes will be lost and the profile editor will close.
You can also click Apply if you want to save your changes but keep the profile editor open. This may be useful when you want to make adjustments to multiple profiles at the same time. For example, if you want to run motor A from 8:00 a.m. to 6:00 p.m. (i.e. during the day) and run motor B from 6:00 p.m. to 8:00 a.m. (i.e. at night) you would need to use 2 different outputs: one to control motor A and one to control motor B.
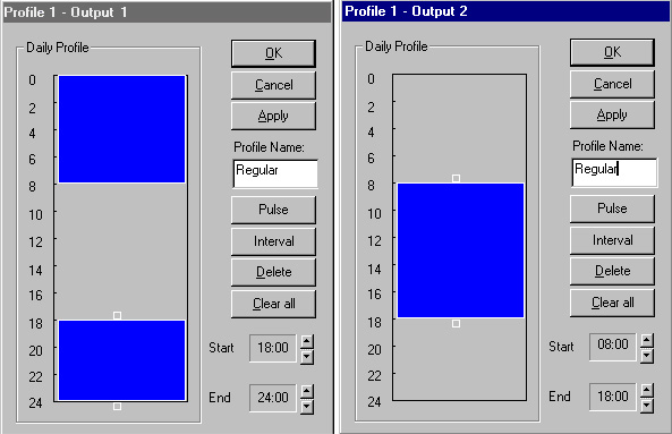
You would then need to define profiles for both these outputs. If may be helpful to see both profiles at the same time to ensure there is no gap between when motor A turned OFF and motor B turned ON.
Previewing schedules
If you are programming a complicated schedule, it may be difficult to keep track of all your outputs. Once you have created schedules for all the outputs you plan to use, you can preview these schedules in a chart format so you see when outputs are going on and off and ensure there are no gaps or overlapping periods. This allows you to verify that the schedule you created is correct.
For example, in the case described earlier, motor B is supposed to turn ON at the same time that motor A is turning OFF. If you want to ensure that there is no gap between these two events, and to see how they fit in with the rest of the outputs, you can preview the schedule by pressing the Preview button. A dialog box like the following will appear (in its default state it will show the outputs by day rather than by week):
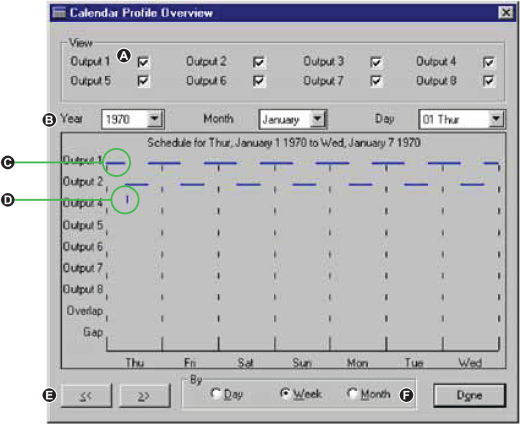
| A | Which output’s schedules will be plotted |
| B | The part of the schedule that will be displayed. By default, this is set to the start date. |
| C | Intervals are indicated by horizontal lines in the color of the active profile |
| D | Pulses are indicated by vertical lines in the color of the active profile |
| E | Scroll back and forth through the schedule by day, week, or month |
| F | View by day, week, or month. The default is day. |
You can have the preview box open at the same time as one or more profile editors and it will update automatically to reflect changes in the profiles. This allows you to make adjustments to your profiles and dynamically preview them. The check boxes at the top allow you to select which outputs you want to view so you can display any combination.
Overlap and gap
The Overlap and Gap rows in the chart allow you to compare two or more outputs and display when they are all on at the same time and when they are all off at the same time.
In the motors example described earlier, if you decide that you want a 5 minute overlap between when the motors A and B turn on and off to ensure that at least one of them is running all the time, you can edit the profile for output 2 to go on at 7:55 a.m. and off at 6:05 p.m.
If you press the Apply button in the profile editor, the profile editor will remain open and the preview box will update.
You can see in the chart that each time output 1 goes OFF and output 2 goes on, there is a line in the Overlap row to confirm that these outputs are indeed timed as you specified.
The Gap row is useful for showing if there are periods of time in your calendar during which no activities are scheduled. If you see a gap where you don’t expect one, you can go back to the output and either edit the profile in effect at that time, or assign a new profile to that day.
You can preview a full day, week or month depending on which radio button you select. This allows you to see details or to get a broader view of your schedule.
Accounting for daylight savings time
If the device’s Clock module (or the computer) is programmed to adjust for Daylight Savings Time, it is possible that scheduled activities may not happen as expected.
In the case of pulses
Pulses are more susceptible to Daylight Savings Time changes simply because of their short duration.
- If there are pulses scheduled to occur during the time that is lost when the clocks are moved ahead, the pulses will be missed. (For example, if a pulse is scheduled for 12:05, and the clocks are moved ahead an hour at 12:00, the pulse will not happen because the clock jumps directly from 12:00 to 1:00.)
- If there are pulses scheduled to occur during the time that is gained when the clocks are moved backed, the pulses will occur twice. (For example, if a pulse is scheduled for 11:30, and the clocks are moved back an hour at 12:00, the pulse will happen once at 11:30 and then again an hour later.)
In the case of intervals
Different outcomes are possible in the case of intervals, depending on whether the time change jumps into, out of, or completely over an interval. Generally, when the clocks are moved forward, it is possible that intervals could be cut short or missed. When the clocks are moved back, it is possible that intervals will be repeated (either in part or in whole).
When the clock is moved forward
If there are intervals scheduled to both start and end during the time that is lost when the clocks are moved ahead, they will be missed (just like a pulse described above). For example, if a 10-minute interval is scheduled for 12:05, and the clocks are moved ahead an hour at 12:00, the interval will not happen because the clock jumps directly from 12:00 to 13:00.

If an interval is in progress and the clock is moved ahead to a time outside the interval, the duration of the interval will be cut short (i.e. you will lose the second part of the interval). For example, if a 1-hour interval starts at 11:30 but at 12:00 the clocks are moved ahead 1 hour, Status will go off and End will pulse after only a half an hour.

If there is no interval in progress but the clock is moved ahead to a time inside an interval, the duration of the interval will be shorter than expected (i.e. you will lose the beginning part of the interval).
For example, if a 1-hour interval starts at 12:30 but at 12:00 the clocks are moved ahead 1 hour, Status will go on when the clocks jump forward. Status will go OFF and End will pulse half an hour later.

If an interval is in progress and the clock is moved ahead to a time inside the interval, the duration of the interval will be cut short (i.e. you will lose the second part of the interval). For example, if a 2-hour interval starts at 11:30 but at 12:00 the clocks are moved ahead 1 hour, Status will go off and End will pulse after only one hour.

If an interval is in progress and the clock is moved ahead to a time inside another interval, the duration of both intervals will be cut short (i.e. you will lose the end of the first interval and the beginning of the second interval).

When the clock is moved back
If there are intervals scheduled to both start and end during the time that is gained when the clocks are moved back, they will be repeated. For example, if a 15-minute interval is scheduled for 11:30, and the clocks are moved back an hour at 12:00, the interval will happen twice that day because 11:30 happens twice.

If an interval is in progress and the clock is moved back to a time outside the interval, the duration of the interval will be cut short (i.e. you will lose the second part of the interval) but then the complete interval will be repeated. For example, if a 1-hour interval starts at 11:30 but at 12:00 the clocks are moved back 1 hour, Status will go off and End will pulse after a half an hour, and then half an hour later, the complete interval will occur.

If an interval has just completed, and then the clock is moved back to a time inside that interval, the second portion of the interval will be repeated. For example, if a 1-hour interval starts at 10:30 and ends at 11:30, but at 12:00 the clocks are moved back 1 hour, Start will pulse and Status will go on again for another half an hour.

If an interval is in progress and the clock is moved back to a time inside the same interval, the middle part of the interval will be repeated. The Start and End pulses will occur at the correct times but Status will remain on for longer. For example, if a 3-hour interval starts at 10:00 but at 12:00 the clocks are moved back 1 hour, Status will stay on for 4 hours (instead of 3). Start will still pulse at 10:00 and End will still pulse at 1:00.

If an interval is in progress and the clock is moved back to a time inside another interval:
- the first interval starts and ends normally, then the second interval starts;
- the clocks are moved back and the last part of the first interval is repeated, as is the first part of the second interval;
- the second part of the second interval continues normally.
