|
|
|
FALLING HEAVY UPPER ARM |
|
Secure in place the upper arm when loosening and removing the bolts. |
|
Failure to follow these instructions can result in death, serious injury, or equipment damage. |
|
Step |
Action |
|---|---|
|
1 |
Remove the parallel rods and the lower arms with parallel plate. For further information, refer to Replacing the Parallel Rods and Replacing the Lower Arms. |
|
2 |
Remove the bolts (1) on the upper arm (2). 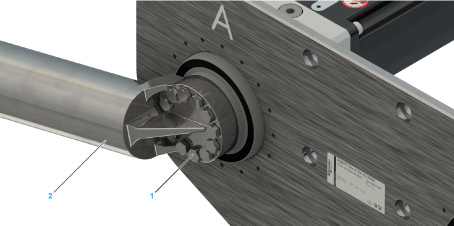
|
|
3 |
Pull off the upper arm. |
|
4 |
Verify whether the threaded pin (4) is in the hole of the gearbox. If there is no threaded pin, insert a new threaded pin at the position shown in the figure. NOTE: Verify that the threaded pin protrudes approximately 3 mm (0.118 in) 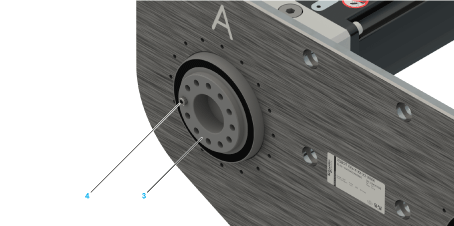
|
|
5 |
Verify whether the flange surfaces of the gearbox (3) and of the upper arm are free from grease and oil. If necessary, remove grease and oil residues from the upper arm and/or the gearbox flange. |
|
6 |
Attach the new upper arm to the gearbox. Tightening torque: 22 Nm (195 lbf-in) For more information about tightening torques, bolt locking devices and installation notes, refer to the respective dimensional drawing in Mechanical and Electrical Data. |
|
7 |
|
|
8 |
Mount the lower arms with parallel plate to the upper arms and mount the parallel rods. For further information, refer to Mounting the Lower Arms with Parallel Plate and Mounting the Rods for Parallel Linkage. |
|
NOTICE |
|
INOPERABILITY OF UPPER ARM |
|
Remove all grease and oil residues from the gearbox flange and the upper arm. |
|
Failure to follow these instructions can result in equipment damage. |
|
NOTICE |
|
COLLISION OF COMPONENTS |
|
oOnly use the bolts that are prescribed by Schneider Electric. oPerform a calibration procedure of the robot mechanics after replacement of an upper arm, motor, or gearbox. |
|
Failure to follow these instructions can result in equipment damage. |
