Configuring Keyboard Shortcuts
You can define keyboard shortcuts and assign specific actions to them. At runtime, a visualization detects the keyboard input event and executes the action.
There are different locations where you can configure a keyboard input event.
The options include the following:
-
Configure keyboard input for a specific element.
-
Configure keyboard input for a specific visualization.
-
Configure keyboard input that is valid for all visualizations.
-
Activate the preset default keyboard shortcuts.
If the visualization integrated in CODESYS is executed, then you can deactivate the keyboard input of the visualization in order to use the keyboard shortcut from CODESYS in this state.
Configuring keyboard shortcuts for elements
You can define a keyboard shortcut that triggers an action for an element. The element must be visible and operable. For this purpose, the property is available in the Properties view of the visualization editor.
Requirement: A CODESYS project is open with the existing visualizations visEllipse and visRectangle.
-
Select the application in the device tree and add a visualization named
visMain.⇒ The visualization editor opens.
-
Select the Frame element from the Toolbox view and drag it to the editor.
⇒ The Configuration of Frame Visualizations dialog box opens.
-
Double-click in succession the
visEllipseandvisRectanglevisualizations in Available Visualizations.⇒ The visualizations appear in Selected Visualizations.
-
Click OK to close the dialog box.
⇒ The visualization contains a new element type Frame. The two selected visualizations appear in the Referenced visualizations property.
In the editor, the frame shows the visualization with the index
0. -
Add a button and configure its properties:
Select
Rectanglein the property .In the property, select Switch frame visualization for the visualization
visRectangle.Specify the value
Rin the property .⇒ The button has a user input and a keyboard shortcut.
-
Add a button and configure its properties:
Select
Ellipsein the property .In the property, select Switch frame visualization for the visualization
visEllipse.Specify the value
Ein the property .⇒ The button has a user input and a keyboard shortcut.
-
Click for the device and start the application.
⇒ The visualization starts. It has a frame where one of the referenced visualizations runs. Focus on the
visEllipsevisualization and press E. The visualization switches the contents in the frame to thevisEllipsevisualization. When you press R, the visualization switches the contents in the frame to thevisRectanglevisualization.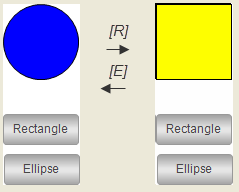
See also
Configuring keyboard shortcuts for a specific visualization
You can define keyboard shortcuts that trigger an input action on a specific visualization. The Keyboard configuration tab in the editor of the visualization is used for this purpose.
Requirement: A CODESYS project is open with the visualizations visEllipse and visRectangle.
-
Open the CODESYS TargetVisu object and select
visEllipseas the start visualization. -
Open the
visEllipsevisualization and click the Keyboard Configuration tab. -
Click .
⇒ The Keyboard configuration opens.
-
Select the value
Cin the Key column. -
Activate the Press key option.
-
Select the value Change shown visualization in the Action type column.
-
Select
visRectanglein the Action column.⇒ The user input is configured for C.
-
Open the
visRectanglevisualization and click the Keyboard Configuration tab. -
Select the value
Cin the Key column. -
Activate the Press key option.
-
Select the value Change shown visualization in the Action Type column.
-
Select
visEllipsein the Action column.⇒ The user input for C is also configured for this visualization.
-
Build the application.
-
Click for the device and start the application.
⇒ The visualization starts and displays an ellipse. Focus on the
visEllipsevisualization and press C. ThevisRectanglevisualization is displayed. Focus on the visualization and press C again. Now the visualization is switched again tovisRectangle.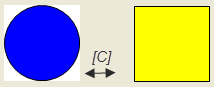
See also
Configuring keyboard shortcuts for all visualizations in the application
You can define keyboard shortcuts that trigger the same input action for all visualizations of the application. The Default Keyboard Shortcuts tab in the visualization manager is available for this purpose.
Requirement: A project is open with a visualization.
-
Open the visualization.
-
Add a rectangle.
-
Configure the property with
Keyboard shortcut. -
Double-click the GlobalTextList object.
-
Click in the table, Add Language, and then specify
de.⇒ The language
deis configured. -
Click in the table, Add Language, and then specify
en.⇒ The language
enis configured. -
Configure translations for
deandenfor the textKeyboard shortcut.⇒
Hotkey Tastaturkürzel Hotkey -
Open the visualization manager and select the Default Keyboard Shortcuts tab.
-
Specify
Din the Key column. -
Activate the Press key option.
-
Select the value Change language in the Action Type column.
-
Select the language
dein the Action column.⇒ The keyboard event for D is configured.
-
Specify
Din the Key column. -
Activate the Press key option.
-
Activate the Alt option.
-
Select the value Change language in the Action Type column.
-
Select the language
enin the Action column.⇒ The keyboard event for Alt+D is configured.
-
Compile, download, and start the application.
⇒ The visualization opens.
-
As visualization user, press D.
⇒ The text is displayed in the language
de.
See also
Activating default keyboard usage
When you activate the universal keyboard shortcuts for default keyboard usage, the user can operate the visualization without a mouse. Elements that respond to user input can process a keyboard event instead of a mouse event without you adapting its input configuration.
Requirement: A project is open with a visualization.
-
Click the Visualization Manager object.
-
Activate the Activate default keyboard usage option.
⇒ The universal keyboard shortcuts are activated.
-
Load the application to the device and start the application.
⇒ The visualization starts. Now operation can continue without the mouse. You can navigate in the window by means of the arrow and tab keys and press Enter instead of the mouse button.
See also
Activating and deactivating keyboard shortcuts for integrated visualizations
If you execute the visualization as an integrated visualization, then the command is available in order to deactivate the capturing of keyboard events. It is actually possible for the same keyboard shortcuts to be defined in the visualization and in CODESYS
When you activate the command, the visualization executes the configured keyboard events.
When you deactivate the command, CODESYS executes the keyboard events. Capturing keyboard events is then deactivated for the visualization.
See also