Performing a reset
Resets allow you to clear various accumulated parameters stored by the meter.
Performing a master reset
To perform a master reset on a hardware-locked meter, you must remove the front cover and press the master reset button. See Master resets and hardware-locked meters for more information.
With a meter that is not hardware-locked, you can perform a master reset using software. It does not have to be in TEST mode.
notice
data Loss
Retrieve all important data from the device before you perform a master reset.
Failure to follow these instructions can result in data loss.
Parameters affected by a master reset
The master reset deletes most accumulated values and all derived revenue measurements from the meter, clears the meters event and waveform logs, and clears COMTRADE waveform records from the meter’s internal FTP server. The mode that the meter is in (NORM mode or TEST mode - see Modes of operation) defines the values that are reset.
NORM or ALT mode
In NORM or ALT mode, the following parameters are reset to zero:
- Energy and Demand
- Peak Demand
- Loss Calculation
- Long-term Min/Max
- Power Quality disturbance counters
- Time of Use
The following are cleared:
- Event Log
- All Data Recorders
- All Waveform Recorders
- All COMTRADE files
TEST mode
All TEST mode Energy and Demand measurements are set to zero.
Performing a demand reset
Parameters affected by a demand reset
The mode that the meter is in (for example, NORM mode or TEST mode) defines the values that will be reset.
- NORM mode: resets the peak demand values logged in the meter.
- TEST mode: resets the test demand parameters to zero.
Demand Lockout Time
The setup register labeled Demand Lockout Time (Display Options module) sets the minimum time allowed between consecutive demand resets; the meter ignores any attempts to reset the demand outside the bounds of the register.
The default value for the Demand Lockout time is 25 days. For details on the Demand Lockout Time setup register, refer to Configuring demand reset lockout time.
For more details on the Display Options module, see ION Reference.
Using the front panel
Performing a master reset from the front panel
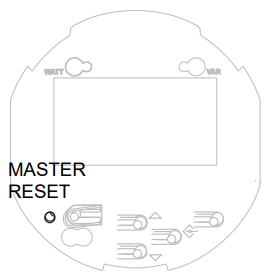
The master reset button is recessed to avoid accidental activation. You must first remove the meter’s cover before you can perform a master reset.
 danger
HAZARD OF electric shock
Wear PPE and take precautions not to touch the meter’s lever contact switches if accessing the front panel buttons of a switchboard meter.
Failure to follow these instructions will result in death or serious injury.
- Remove the front cover of the meter. Refer to the ION8650 Installation guide for instructions and safety precautions.
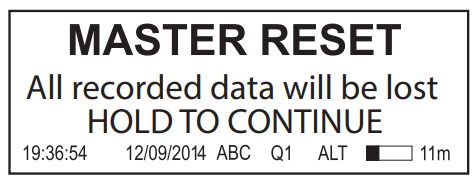
- Using a pin or similar instrument, press and hold the master reset button. The message All recorded data will be lost HOLD TO CONTINUE is displayed. Hold the master reset button for 5 seconds to continue with the reset.
NOTE: Do not configure or power down your meter until the meter’s front panel displays a message stating that the master reset is complete. If you configure or power down your meter during a master reset, the affected parameters may not be completely reset.

Performing a demand reset from the front panel
The demand reset switch can be activated with the cover on or off.
In most applications, the demand reset switch is sealed with an anti-tamper mechanism; a through-hole in the switch can accommodate either an external seal or a locking mechanism. See for details of anti- tamper sealing.
NOTE: A Demand Lockout Time register sets the minimum time allowed between consecutive demand resets; the meter ignores any attempts to reset the demand outside the bounds of the register. The default value for the Demand Lockout Time is 25 days (2160000s).
Using ION Setup
- Open the Setup Assistant for your meter. See the ION Setup Help for instructions.
- Click Verification.
- Select Normal Mode, and then click Display.
- Select the desired tab in the Normal Mode dialog box. Two resets are available: Peak Reset and Master Reset. Click the appropriate button to perform the reset (Peak Demand in the example below).
A dialog box informs you when the reset is complete.
NOTE: Do not configure or power down your meter until a message appears stating that the master reset is complete. If you configure or power down your meter during a master reset, the affected parameters may not be completely reset.
Using Vista
Open your meter in Vista. You can perform several resets from within Vista.
Performing a master reset
NOTE: The master reset is not accessible via software in a hardware-locked meter, whether the meter is in TEST, ALT or NORM mode. A master reset on a hardware- locked meter can only be performed from the front panel. See Master resets and hardware-locked meters for details.
With a meter that is not hardware-locked, you can perform a master reset via software. It does not need to be in TEST mode.
- Click the Setup/Diagnostics tab and click the General icon.
- Click the Master Reset icon.
NOTE: Do not configure or power down your meter until a message appears stating that the master reset is complete. If you configure or power down your meter during a master reset, the affected parameters may not be completely reset.
Performing a peak demand reset
- Click the Revenue tab and click the Demand Max icon.
- Click the Peak demand reset icon.
Performing a Min/Max reset
- Click the Volts/Amps tab and click the Long-term min/max icon.
- Click the Reset Min/Max icon.
Performing a Sag/Swell or Harmonics Min/Max reset
- Click the Power Quality tab.
- Click Reset counters to reset the disturbance counters. Click the Harmonics Details icon then click Reset Min/Max to reset the harmonics min/max values.
NOTE: The master reset is not accessible via software in a hardware-locked meter, whether the meter is in TEST, ALT or NORM mode. A master reset on a hardware- locked meter can only be performed from the front panel. See Master resets and hardware-locked meters for details.
With a meter that is not hardware-locked, you can perform a master reset via software. It does not need to be in TEST mode.
Master resets and hardware-locked meters
The master reset is not accessible via software in a hardware-locked meter, whether the meter is in TEST, ALT or NORM mode. A complete master reset on a hardware- locked meter can only be performed by pressing the master reset button on the meter’s front panel. See Performing a master reset from the front panel.
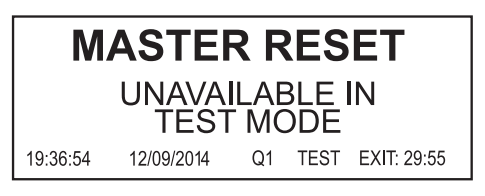
TEST mode
In TEST mode, a screen is displayed stating that the master reset is unavailable:
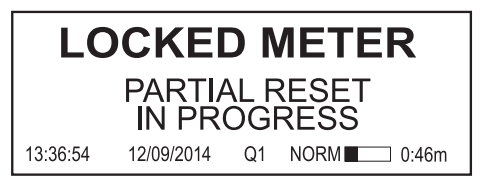
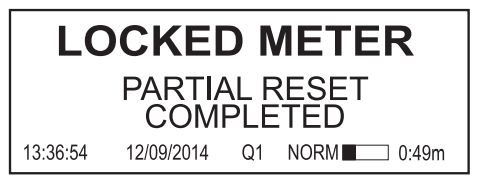
Normal mode, Locked
In this case the meter attempts the master reset, but revenue and event logs are not cleared. The rest of the master reset is successful.