Configuring CAE cybersecurity
Cybersecurity Admin Expert can be configured online or offline. CAE must be online to send and apply configuration to devices and view user accounts and devices in the network in real-time view.
Only user accounts assigned SECADM or SECAUD roles can access CAE. By default, the security administrator (SecurityAdmin) and Default Security Auditor (DefaultSecAud) user accounts have access.
See Installing CAE for information about installation, system requirements, and licensing.
Configuration checklist:
- Record activities: Document actions according to your company’s policies and standards to keep a record of activities, usernames, and passwords.
- Open Cybersecurity Admin Expert: Use the default security administrator (SecurityAdmin) username and password for first login. CAE automatically forces the default password to be changed. See Managing CAE passwords, for information about default passwords and user accounts.
- Add devices and certificates:
- Devices using Device Profiles for Web Services (DPWS) communications protocol are automatically discovered.
- Add devices manually when they do not use UDP (User Datagram Protocol) communications or when substation network firewalls and routers do not allow UDP.
- Device certificates must be added and accepted to the CAE Certificate Allowlist (sometimes called a allowlist).
- Define Authentication Configuration security settings
- Add projects, user accounts, roles, and models:
- For information about opening, creating, importing, exporting, and deleting a project, see Working with CAE projects.
- For information about adding, disabling, editing, and deleting user accounts, see Managing CAE user accounts.
- For information about adding, editing, or deleting a user role, see Managing CAE user roles.
- For information about adding or editing a model, model permissions, objects, actions, or parameters, see Managing CAE models.
- (Optional) Adding Security Banners to device displays
- (Optional) Importing a PFX key container file from a device
- Sending and applying configuration to a device
- Viewing Configuration History
Required for these procedures:
- Security administrator (SecurityAdmin) log-in credentials.
Adding devices and certificates
Device certificates must use encrypted communication between devices in system networks.
Use this procedure to add devices and certificates one at a time.
To add multiple devices at a time, import a CSV file containing a list of devices from the SYSTEM EDITOR tab. The spreadsheet must contain one device per row, with the following information in cells: device name, device type as known by the system, firmware version, IP address, Ethernet port number for getting metadata (if blank, default is 9867).
To add devices and certificates:
- Open Cybersecurity Admin Expert.
- Select SYSTEM EDITOR tab > Add Device button. The Add a new device dialog opens.
- Enter values for the device and click Save.
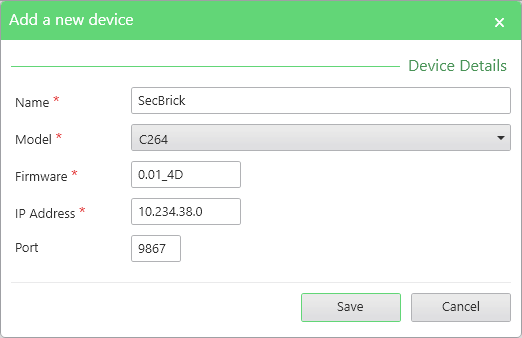
NOTE: Right-click on a device to edit or delete it.
- On the MANAGEMENT OF SYSTEM tab > click the Refresh icon
 . The New certificate(s) detected window opens if new device certificates are detected.
 - Verify device certificates are valid > select certificates > click Accept.
NOTE: You can also add a certificate in the SECURITY SETTINGS tab.
- Click Yes to accept addition to CAE Certificate Allowlist.
- Click OK to push certificates to CAE Certificate Allowlist.
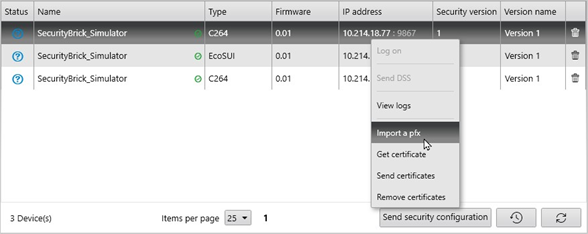
- Confirm that all devices and certificates have been successfully discovered or found if added manually:
Indicator Description Action Status 
Device successfully discovered. None Status 
Device has been discovered, but its information is different from the local device discovered. Go to System Editor and re-enter the correct device information. Status 
Device discovered in the network, but not declared in System Editor. Go to System Editor to add the device manually. Status 
Device has not been discovered over the network, but was added in System Editor. Review device IP Address and port. Confirm device is on. Restart may be required. Security version – Connection denied Device password refused or device user account is locked out.
Right-click on device and select Log on. Enter specific device password or common password.
Name Device certificate is in the CAE Allowlist. None Name Device certificate is not in the CAE Allowlist. Right-click on a device to get, send, or remove certificate. Name 
No certificate information found for device. Click the Refresh icon and accept certificate. - Click Send Security Configuration. CAE stores accepted certificates in the CAE Allowlist and displays them on the Security Settings tab.
You can get, send, or remove certificates by right-clicking on a device in the MANAGEMENT OF SYSTEM tab.
You can edit, delete, or export accepted certificates by right-clicking on a device under Certificate Allowlist in the SECURITY SETTINGS tab.
Defining Authentication Configuration security settings
Authentication is the mechanism used to verify the identity of users. Use Authentication Configuration in CAE to define the authentication mode, for example, local or local then centralized, and other authentication security settings.
To define Authentication Configuration security settings:
- Open Cybersecurity Admin Expert.
- Select SECURITY SETTINGS tab > Authentication Configuration.
- Select the options you want.
- Click Save.
Radius server authentication protocol options:
| Radius Details | Description |
|---|---|
Mode | RADIUS client mode of connection. |
| IP address | The IP address of the RADIUS Server. |
| Port | Port number used by RADIUS Server for communication with the Radius client. |
| Shared secret | Text string password between the RADIUS client and the RADIUS server. |
| Backup server IP address | IP address of second RADIUS Server (optional). |
| Backup server port | Port number used by second RADIUS Server for communication with the Radius client. |
| Backup server shared secret | Text string password between the RADIUS client and the RADIUS server. |
| Role attribute name | Attribute name in the Radius protocol accepted answer where the role assignment is stored. |
| AoR attribute name | Attribute name in the Radius protocol accepted answer where the AoR assignment is stored. |
| Date attribute name | Attribute name in the Radius protocol accepted answer where the date assignment is stored. |
| Attribute separator | Character that splits the attributes if several attributes returned. |
| Dictionary | String storing contents of RADIUS dictionary. |
| Parsing debug | Enable or disable parsing debug. |
LDAP client-server protocol authentication protocol options:
| LDAP Details | Description |
|---|---|
Domain | Domain name of the LDAP server, e.g. DC=MyDomain, DC=com. |
| IP address | IP address of the LDAP server. |
| Port | Port number used by LDAP server for communication with the LDAP client. |
| Group(s) | Name of LDAP Group(s). |
(Optional) Adding Security Banners to device displays
To add Security Banners to device displays:
- Open Cybersecurity Admin Expert.
- Select SECURITY SETTINGS tab > Security Banners.
- Enter text for security banners.
- Click Save.
Sending and applying configuration to a device
Use this procedure to send and apply security configuration settings from CAE to a device.
At the end of this procedure, CAE will:
- Create four XML files and send them to each device: user account file, role file, user file, and a security policy settings file. Sometimes, a Device Specific Settings file is created and sent.
- Create a devices report CSV file.
- Display the newest security configuration version number and name for Devices in the MANAGEMENT OF SYSTEM tab.
To send and apply configuration to a device:
- Open Cybersecurity Admin Expert.
- Select MANAGEMENT OF SYSTEM tab.
- Click the Send security Configuration button. The Push Security Configuration dialog box opens.
- Click Yes.
- Enter a name for the new version.
- Click Save. The Push configuration status dialog box opens.
(Optional) Importing a PFX key container file from a device
A key container is a part of the key database that contains public and private keys belonging to a device. Use this procedure to create a new key container in CAE that encrypts and decrypts information.
Required for this procedure:
- P12 file stored in an accessible location.
- Password for P12 file.
- Device embeds CS brick 3.0 or upper.
To import a PFX key container file from a device:
- Open Cybersecurity Admin Expert.
- Select MANAGEMENT OF SYSTEM tab.
- Right-click on a device > Import a pfx.
The Import a pfx file dialog box opens.
- Click Browse to navigate to the PFX file you want to import.
- Enter the PFX file password.
- Click Import.
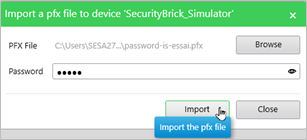
NOTE: PFX file is encrypted and password protected.
PFX file is imported inside the device.
Viewing Configuration History
You can view Configuration History.
To view Configuration History:
- Open Cybersecurity Admin Expert.
- Select MANAGEMENT OF SYSTEM.
- Click the View History Configuration icon
 on the bottom right.