Configure your Virtual ViewX Clients to use Single Sign-on
You can configure Geo SCADA Expert to enable users to use single sign-on (SSO) to log on to Virtual ViewX client using AVEVA Identity Manager. You set up this configuration on the Virtual ViewX server to which the Virtual ViewX clients connect. The settings affect all Virtual ViewX clients that connect to that Virtual ViewX server.
To enable the single sign-on method to log on to Virtual ViewX, you have to ensure that the PCS framework is installed and configured (see Geo SCADA Expert Prerequisite Components).
To set up Virtual ViewX to use single sign-on with AVEVA Identity Manager:
- Register your Virtual ViewX Client ID—Use the AVEVA Identity Manager Client Registration Tool to register your Virtual ViewX client ID to allow logons (see Register ViewX or Virtual ViewX to Use Single Sign-on).
The AVEVA Identity Manager registration process enables you to specify an expiry time for the security token. Once you are logged on to AVEVA Identity Manager, the security token expires based on the specified expiry time.
Before the token expires Geo SCADA Expert requests a new security token. If the first attempt fails, Geo SCADA Expert will re-attempt. If the token expires and the request fails each time, for example if the Virtual ViewX machine has a network failure, you will be logged out of Geo SCADA Expert.
- Configure Geo SCADA Expert to use External Authentication—Configure Geo SCADA Expert to use AVEVA Identity Manager token-based authentication (see Using External Authentication with Geo SCADA Expert).
Once the above setup is complete, you use the Authentication settings on the Virtual ViewX Manager window to configure the settings for Single Sign-On (SSO) authentication. The settings apply to all of the Virtual ViewX clients on that server.
To configure Virtual ViewX to use SSO:
- Open the Virtual ViewX Manager on the Virtual ViewX server.
- Select Add on the Authentication tab.
A dropdown menu displays the list of logon methods. - Select OAuth 2.0 and then select Other.
The Authentication Method Settings window is displayed.On the General tab:
- Client ID—Specify the unique identifier that is assigned to the client for authentication and communication with the server. The AVEVA Identity Manager Client Registration Tool assigns this Client ID during client registration (see Register ViewX or Virtual ViewX to Use Single Sign-on).
On the Server tab:
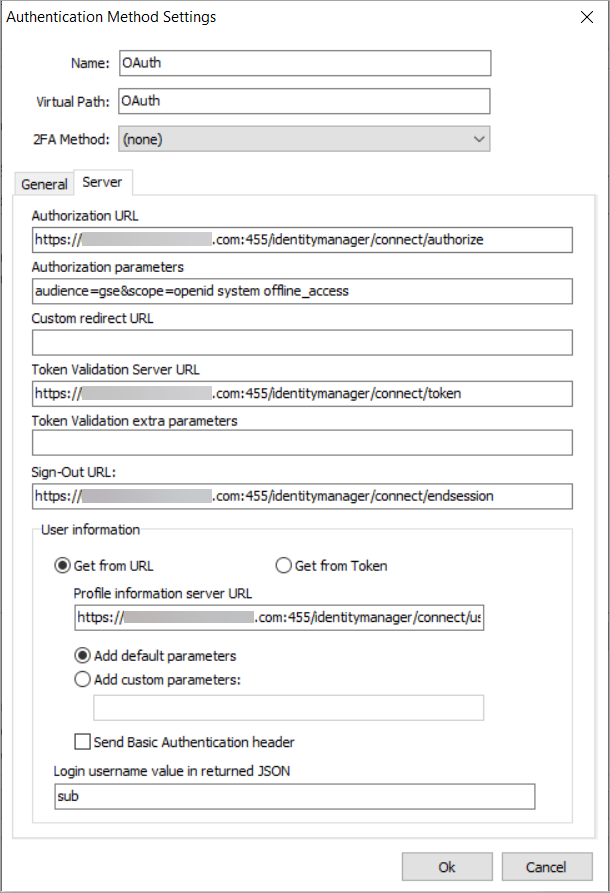
- Authorization URL—Specify the web address to which users are redirected to grant permissions and obtain authorization tokens. For example, you might specify the web address in the following format:
https://<machineid>.<domainname>:<port>/identitymanager/connect/authorize
- Authorization Parameters—Specify the parameters that define the criteria or conditions that are used to grant or deny authorization/access.
- Custom Redirect URL—Specify a user-defined web address to which to redirect the user. This is an optional field.
- Token Validation Server URL—Specify the web service address to which the server sends authentication tokens for verification and validation before granting access. For example, you might specify the web address in the following format:
https://<machineid>.<domainname>:<port>/identitymanager/connect/token
- Token Validation extra parameters—Specify the parameters that define the criteria or conditions that are used to validate the tokens. This is an optional field.
- Sign-Out URL—Specify the web address to which users are directed to securely log out or terminate their current session. For example, you might specify the web address in the following format:
https://<machineid>.<domainname>:<port>/identitymanager/connect/endsession
- In the User Information section, select the Get from URL option, and then specify the following:
- Profile information server URL—Specify the web address where the server retrieves or stores user profile data. For example, you might specify the web address in the following format:
https://<machineid>.<domainname>:<port>/identitymanager/connect/userinfo
- Login username value in returned JSON—Set the value of this field to 'sub'.
- Profile information server URL—Specify the web address where the server retrieves or stores user profile data. For example, you might specify the web address in the following format:
- Select OK.A new authentication method is added to the Authentication Methods section on the Authentication tab.
- Select the SSO authentication method and then select Apply.
- Repeat this procedure on any other Virtual ViewX servers on your system.
- Use the AVEVA Identity Manager Client Registration Tool to register a callback. This is the web address typically used with OAuth to redirect the user to Virtual ViewX after the authentication is completed. You must specify the callback web address in the following format:
https://<VVXHost>.<domainname>:<VVX port>/<OAUth VirtualPath>
You also have to ensure that:
- The Geo SCADA Expert servers have the AVEVA Identity Manager token-based authentication feature enabled (see Use External Authentication with Geo SCADA Expert).
- The Virtual ViewX client is configured to use SSO (see Configure the Client Connection Security Settings).
Users can now log on to the Virtual ViewX clients using SSO authentication. For more information, see Log On to a Virtual ViewX Client.